Home-brew Gel Frame

Charc

Well-Known Member
I'm looking to create a home-brew gel frame for a number of PAR30 type lights, which have no gel frame holder. Are there any suggestions from the wonderful CB on how to proceed? One thought I had was to take an aluminum sheet, and grab some electrician's scissors and cut out a bunch of rings, 1/2" thickness, 4-5" inner diameter. Then poke some holes in the aluminum, and sandwich a piece of gel between two rings, then use some brass paper fasteners to secure the assembly together. Then lastly, probably just some blacktak securing the frame to the unit. It doesn't leave a nasty residue, does it?

Any other suggestions would be appreciated. I am willing to contribute funds to this project, in about total cost of $20-$45 for materials. As such, armature wire was another thing that jumped into my mind as a solution for attaching the gel-frame to the unit, and possible more long term.
 
If you had photos of the original fixture it would help in figuring out a solution for you.

That said, I've done the same sort of project. When I rewired the Frame, the primary light source for most of our paintings, I modified some track light fixtures by adding a gel frame to them. These fixtures used a GU-10 lamp, which is essentially a 120 volt version of an MR-16 lamp.

The first trick was getting the gel far enough out from the front of the fixture so the lamp wouldn't cook the gel, in this case 1/4 inch. To do this I attached a 3/4 inch length of steel tubing to the outside of the fixture using JB Weld. To determine the size tubing I needed, I simply took one of the fixtures I was looking to modify to Industrial Metal Supply and tried slipping it inside various types of tubing until I found one that was the right size. Then I bought a scrap piece of that size. If you have a similar supplier in your area, you should be able to use the same method, assuming of course, that this is even remotely similar to your project.

Next I had to make the gel frame. For this I took a thin sheet of aluminum and cut it into rectangles twice the length I needed plus 1/4 inch, then folded them in half using a vice to start the fold. Next I used a 2 1/2 inch NPT knockout punch to create the opening in the gel frame. Given that you probably do not have one of these, I would recommend using a hole saw of whatever size you need, on a drill press. Be aware though, that if you are cutting aluminum, the teeth on the hole saw will get gummed up very quickly. Then I drilled two 3/16 inch brad holes in the top corners of the frame.

The next step was to glue the frame to the metal tubing with JB Weld. For the most part this worked fairly well, but I'm not sure JB weld was the best choice for attaching the frames. It doesn't seem to adhere too well to aluminum. I've had to re-glue 7 out of 25 frames in the last three years.

The final step was to primer and paint the lights.

I'm not sure how applicable this will be to your project, but I hope it helps.
 
Last edited:
I would recommend using a hole saw of whatever size you need, on a drill press. Be aware though, that if you are cutting aluminum, the teeth on the hole saw will get gummed up very quickly.

In the event you need to cut aluminum in the future (which may be a pretty safe bet) squirt a little WD40 onto the teeth of the saw blade (any type of saw blade for that matter), and the soft aluminum will not stick. This trick served me well in the tool and die shop for many years.

Apollo has black donut and gel frame material by the roll which we use to stamp out said items on our clicker press. If you would like to purchase this type of material, I'll get the specifics for you to determine the best approach.
 
I had a bunch of oddly sized strip lights at my old high school that I couldn't get gel frames for. I just purchased a closely sized cardboard frame and cut them down to fit in a paper cutter. Cheap and much easier than metal work. Also odds are pretty good that someone actually makes the odd size frame you need. Take the instrument down to your local dealer and ask them to help you find the frame you need or to help you find a closely sized cardboard frame.

I believe the cardboard frames are specially fabricated and treated to make them extremely heat resistant. Anyone know more about the construction of them?
 
Last edited:
I've only ever had cardboard frames scorch a bit on me, and that was on an old 2K. I prefer them to the metal ones -- a common trait for those poeple who have seen metal frames bury themselves "Chinese throwing star"-like into the deck after accidentally being dropped from a height . . .
 
What Charc you actually expect me to read the original post! :rolleyes: I prefer jumping to conclusions based on the thread title.

I would still try taking the fixture into the local theater shop for ideas... it's hard for us when we haven't seen it.

You could just go to your local auto parts store and buy some muffler tape and tape the gel to the fixture. Muffler tape is a metal tape... sort of like black wrap with adhesive. It may be a pain in the butt to get the tape goo off later (try Goo Gone) but that'll do it. If it's only a PAR 38 the gel will be perfectly safe taped to the fixture.
 
Yea there are cleaner solutions if you have the time and the patience.

I'm thinking some plumbers tape bent into frame holders, some machine screws or small nuts, washers and bolts to hold these to the fixture, and whatever standard frame size, metal or fiber, that fits.

Short of custom (and expensive) fabrication, that's really what you got, accept it or accept sticky fixtures.
 
you might try contacting a local metal shop for a hands off approach if you don't have the tools. they can fold and cut a hole to the specs you need for the gel frame out of a sheet of aluminum or even tin. It will last longer than the cardboard stuff and be reusable. they should not cost you too much as it is a simple project for them. I hope this helps!
 
At my church we use outdoor flood lights around the perimeter of the gym to provide a little light during services that require a "dark" setting (i.e. services that are "candle lit") I tell you that to tell you this: I remember seeing gels on them at one point in time. It looked kind of like a lamp shade. There was a ring that went between the lamp base and the lamp (just slide it on before screwing the bulb in.) Then there were four legs that were attached to the ring (I think they were bent around the ring, maybe soldered.) The legs attached to a wire bent into a square. I can't remember if there was a top piece, or if they just used metal clips to hold the gel on. It looked pretty easy to make with wire (a coat hanger, perhaps) and a pliers. I'll admit, though, my memory is a little fuzzy, as I believe I was 10 when I saw this. If I wasn't 7 hours away right now, I'd take a look for you to see if I could find them and snap some pictures. I always love crawling around under the stage.

Afterthought: If it's out in the open, the wire and clip method would look good if paired with modern decor.
 
Last edited:
Last edited by a moderator:
Josh, what you have google-linked at Home Depot is FRP Fiber Reinforced Plastic, as found in commercial kitchens and washrooms, and in our industry on roadcases. Not FRP Flame Retardant Fiberboard, which I suspect was a typo on Rosco's site that has been disseminated all over the Internet. Perhaps they meant FRF or FRFB.
 
Ah I had read up higher seeing the reference to FRP and since the rosco page doesn't exist anymore didn't realize the difference


Sent from my iPod touch using Tapatalk
 
Josh, what you have google-linked at Home Depot is FRP Fiber Reinforced Plastic, as found in commercial kitchens and washrooms, and in our industry on roadcases. Not FRP Flame Retardant Fiberboard, which I suspect was a typo on Rosco's site that has been disseminated all over the Internet. Perhaps they meant FRF or FRFB.

If you go to the spec. sheet from the manufacture it is denoted as FRP Fiberglass Reinforced Plastic and as being Fire-Retardent.
 
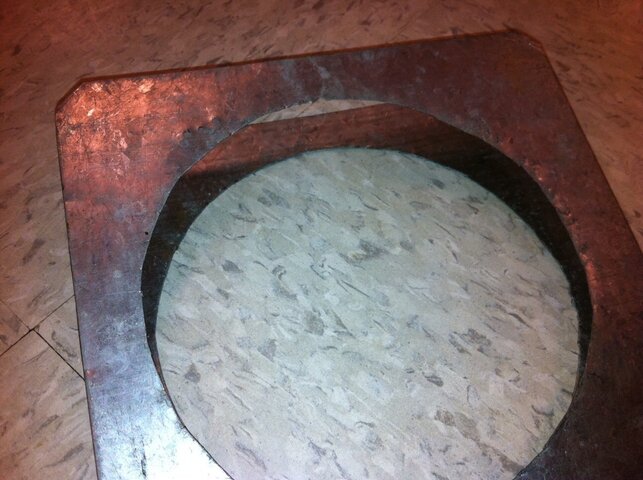
Here is a picture of a a home made 7.25 in gell frame. Don't know who made it but it is pretty good.

For your enjoyment!
photo.JPG
 

Users who are viewing this thread

Back