Altman 360Q loose lamp sockets

Smatticus

Active Member
I have already checked out the following thread, which refers to loose lamp sockets in Altman Shakespeares;
http://www.controlbooth.com/forums/showthread.php?t=1160

I have a similar problem with loose lamp sockets in Altman 360Q's. I have somewhere around 35 360Q's in the theater and they are all about 10 years old, at least 5 of the lamp sockets no longer make adequate contact with the lamps. In the thread on the Shakespeare it seems that replacing only the Shakespeare socket itself (part #97-1580) is possible. I am wondering if this is possible with the 360Q or if it would be easier to just purchase new socket cap assemblies. The problem with the 360Q is that the socket is partially covered by a metal box (#20-0138 in the Altman drawing) that is riveted to the socket base plate; from my initial attempt to access the socket this seemed to make it fairly difficult.

I am wondering if it is indeed fairly straightforward to replace the socket only and what steps I need to follow to do this effectively. Any help would be greatly appreciated!
 
Replacing the lamp base in a 360Q is a simple matter of removing the focus plate completely from the end cap. Drill out the rivets. Replace the socketbase using new screws, nuts and washers. Put the whole thing back in place. The oddities occur when you get sockets with short tails on them. Typically the Tails or "whips" will be the length of the cord on the instrument. occasionally there will be a short tail replacement socket these must be crimped to the old tails and wrapped in "silver flex" fiberglass insulating tape. It's a great time to be looking into the condition of all tails, plugs, and strain releif clamps too.
 
Don't know what rivets Van is talking about, 8-32 screws should be in use mounting the lamp base to this plate. That aluminum cover mentioned, gone - a part of the lamp base assembly and not needed for the replacement.

As easy as pie, whip length for a new lamp base is standardized and not short. It's not permissible to crimp inside the cord so if you should get a short whip you would have to crimp inside the lamp housing than as Van says or by way of fiberglass electrical tape insulate your high temperature butt splice. Not to worry, the proper lamp base (others with short whips are available but not common) will normally be of a proper length. Save the replaced heat wire for stuff like Fresnels.

On choice of replacement lamp bases, go with the higher tempeature #97-1580 (TP-220) lamp base over that of the 58-0017 (TP-22) base. The higher temperature rating for a few dollars more is worth the investment. Otherwise these are all Osram, Buhl or Bender & Wirth as brands are permissible and what Altman is buying. Electrical/lamp parts suppliers and lamp distributers can also get these products.

One final step is to both with say Sharpee or paint marker where that lamp base sat within your fixture at it's seat height according to the screws mountin it. Than once re-assembled, bringing it back to that location and doing a proper bench focus of the fixture given this starting position. Must do the bench focus after changing the lamp base.


http://www.buhl-electric.com/electric/default.asp
http://www.bender-wirth.com/
Www.osram.com
Www.sylvania.com
 
Sorry, must have missed the boat on the Rivets, My bad. Maybe I should quit posting on Lighting subjects. . I did not however suggest haveing crimps inside the cord wrap. Any crimps, and I have seen a lot of them in the end cap of 360Q's, should be inside the end cap. Regardless of the crimp used, eg a T&B High temp Nylon or a non insulated butt splice< not recommended for a variety of reasons.> , the crimps should be wrapped in Silverflex High temp Fibergalss insulating tape.


< could swear I remember drilling out rivets on a bunch 360Q's endcaps. During a huge maintenance push. The only time I was able to remove screws was on units that had been previously repaired.>
 
Sorry, must have missed the boat on the Rivets, My bad. Maybe I should quit posting on Lighting subjects. . I did not however suggest haveing crimps inside the cord wrap. Any crimps, and I have seen a lot of them in the end cap of 360Q's, should be inside the end cap. Regardless of the crimp used, eg a T&B High temp Nylon or a non insulated butt splice< not recommended for a variety of reasons.> , the crimps should be wrapped in Silverflex High temp Fibergalss insulating tape.
< could swear I remember drilling out rivets on a bunch 360Q's endcaps. During a huge maintenance push. The only time I was able to remove screws was on units that had been previously repaired.>

Nope, do not stop posting on lighting stuff, perhaps check the specs once first or put a ? In front of what you remember if it's been a while, this otherwise put a framework about it in history if no longer so sure. This framework something like having to remove the rivets that mounted the lamp base that's very possible to have seen. Very possible you have in the past experienced some barbarian that rivited a lamp base to it’s plate, and it’s not in any way slacking your experience with the stuff that you mentioned your own memories of such things. My memories are just different and between the two and more we have an effort going on here to help. This from both of us that between the two of us could charge money are helping for free instead for the intent to help.

Nylon in my remembering has a safe operating temperature of up to about 220̊F and the same as that of any vinyl insulated crimp terminal. Only difference between vinyl and nylon is that vinyl melts at that temperature and nylon retains it’s shape but breaks away in chunks instead. I’m a big fan in opposing debate to the fiberglass electrical tape insulated high-temp butt splice, or at least for otherwise high temp splice with heat resistant/water resistant heat shrink for open faced PAR cans. Am interested in the lack of recommendation on the other hand.
 
Thanks for the information, I would have gotten back to you sooner but I had an old email address set in my profile so I wasn't receiving notifications. I am a little unclear on a couple things. Will I actually need to splice the wires together? It seems that if I buy a new lamp socket with 36" leads I should be able to just cut the existing leads off the existing lamp socket and remove them from the fiberglass sheath - then I just thread through the new ones attached to the new lamp socket. Doing that would require removing the strain relief from the back of the socket cap and from the connector - and I would also have to put new crimp-on terminals on the connector end. Does this seem like the right idea?

Also on the comment Ship about the aluminum cover - to remove it I would have to get rid of the rivet securing it, but that rivet also secures the ground to the focus plate. It seems like the best thing to do is just bend it out of the way while working and then bend it back in place after the new socket is installed. Does that sound alright or is there some reason why I wouldn't have to do that? Thanks for the help, I just want to make sure when I repair them I do it the best and ultimately safest way possible.
 

Attachments

  • 360q socket cap.JPG
    360q socket cap.JPG
    62.3 KB · Views: 405
I think that you're right about the leads. They should just slide right in to the fiberglass sheath. Yeah you'll have to deal with the strain relief though. I have 4 20 year-old 6x9's and I'm not really looking forward to working on them. Using them yes, working on them no.

What I would do about that aluminum box is either bend it back and forth until it breaks off leaving the rivet and tab there, or just gently moving it out of the way until the socket replacement is complete and then repositioning it. I don't see why not as long as the rivet doesn't loosen.

Les
 
Last edited:
It would seem that my memory is not much better than Van's thus prooving the point of a community for advice and not relying on any one member for absolute advice.

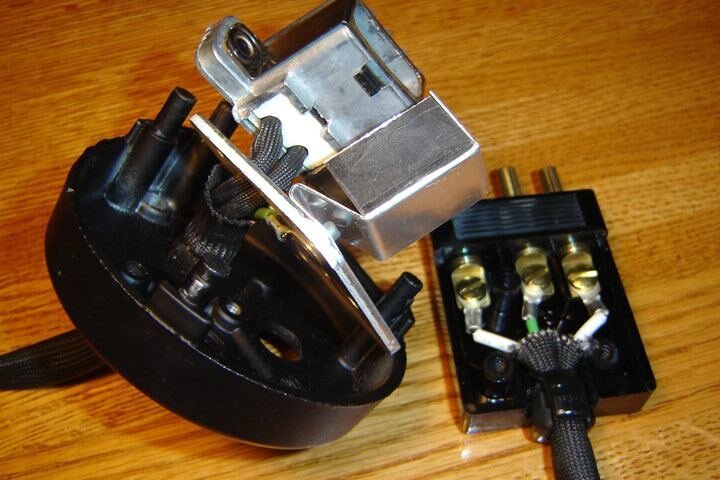
Forgot about that wiring cover completely, much less as the photo shows a good idea of what's up. I should have checked the Altman website or some of the caps in my garage before advising and understanding what Van was saying.

None the less, as said, bend the sucker out of the way than re-bend it into position when done. First check the ground wire and it's tension on this plate. If you can move the ground wire about or at all without serious work, it's loose and needs attention because it's not giving proper tension.

This re-tensioning of the rivet by way of taking a punch and pounding the thing tight again or drilling it out, removing the cover or re-using it & bolting this ground and cover to the plate. Make the head of screw down with nut up by the lamp base so as not to get in the way of a bench focus by way of a too long screw sticking out. Put a external or internal tooth lock washer both under the head of the screw & under the nut. Normal nut - not nylock though a toplock nut will also work well as long as zinc or stainless but if stainless not the same material as the screw.

In other words, zinc plated steel screws will work to some extent but given the heat, stainless steel is preferred if not brass. For the nut the same material is preferred but if top lock type nut, stainless steel screws and stainless steel top lock nuts don't get along together in a way that allows tension. Brass & stainless take heat better than zinc plated steel but otherwise that's details. Top lock nuts have thread deforming parts of it which sort of strip the nut onto the screw in making it difficult to remove. This is a preferred nut in addition to a lock washer but only to some extent for this application.

That's about re-grounding the fixture and only if the ground is not tight and or if it's not very feasible to pound by way of alignment pin the rivet tight again. Should your base plate be stripped than you would also want to bolt lamp base to plate.

As said, 36" whip & sleeve it thru the fiberglass sleeving.

In strain relief for the fixture, I assume you have a black plastic Heyco type strain relief instead of a two screw strain relief on the fixture. Check for brittleness on this nylon cable grip. If it breaks, it will need to be replaced. Look at the number and letters on the small gripping insert part, that's it's part number to replace if necessary. These are standardized parts the strain relief available thru any electronics supply company. http://www.heyco.co.uk/

On removing such things, a pair of Heyco Pliers is a good investment for the theater. Makes working with them not persay easy but less difficult.

Heyco #7425K37 Pliers, Heyco Snap-In Cord Grip Extraction/Insertion Pliers

McMaster Carr sells them #7413k37 amongst others such as Cable Components and TechniTool. Anixter just bought out Heyco as a company and they also have many branches around the US that can also get both the tool and strain relief within a standard $20.00 to $30.00 price that's reasonable.

Your crimp terminals at the plug are also fairly standard, in this case you would need a #8 stud ring terminal for 16-14ga wire. Any electronics supply, above company if not McMaster Carr can supply this part. In crimping it, you want the saddle in the seam and a proper tooth crimp tool.

In other words, the crimp terminal has a seam to it, this needs to be placed into the rounded part of the crimp tool as opposed to the tooth part. Two proper crimp tools for this would be what's commonly called a "Stakon tool." All are the same amongst the Klien #1006 Double Jaw Crimp Tool, 16-14ga, 12-10ga and better yet for 16-14ga wire the Klien #1005 Single Jaw Crimp Tool, 12-10ga, Insulated Crimp.

The #1005 will work better for a 16-14 ga. crimp terminal. Other companies make these same tools. Concept being that a proper crimp tool has a tooth that displaces material into the wire as opposed to just crushes the crimp. A proper crimp you should very much be able to tug on - hard. For example of the proper tool McMaster Carr #7289k1 is what it looks like and everyone sells these same tools. Another good like $18.00 to $25.00 investment for the theare.

Otherwise the Klien owned Vatco company makes their #1900 tool which works well in doing the same for all three types of crimp terminal and even flag termianls for old Union type plugs. With flag terminals otherwise you have to cut away the wire cutter part of a Stakon tool for it to work properly in crimping.

So there is tools, crimps & lamp base details hopefully further of help if possible.
 
Thanks, that answered all my questions. I think getting the strain relief tool is probably a good idea because it doesn't seem like it will come out of the socket cap very easily. When I'm ready to fix them I will go with the higher temperature TP-220 bases. Fortunately the ground on this particular unit is not loose and not stripped holes so I won't have to worry about that. We'll see about the others. Thanks again!
 
Last edited:
See, That's what I love about Ship! I can say, "Yeah you take that thingy off, then use one of those hoohas to remove the whatchamacallit.", Ship can give you reference and names.
Besides all that, Ship you and I were both right!. Screws for the base, rivet for the aluminum thingy. Good luck with the project.
On the connector end of things, I have a wonderful story about having having to replace 300 GSPs with 300 twist-locks, in 2 days, if you ever want to hear it! :mrgreen:
 

Users who are viewing this thread

Back