Curved staircase for school theater

Hey,
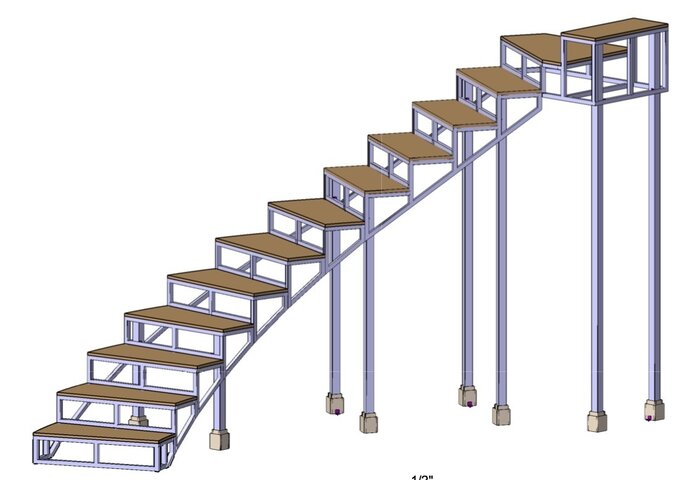
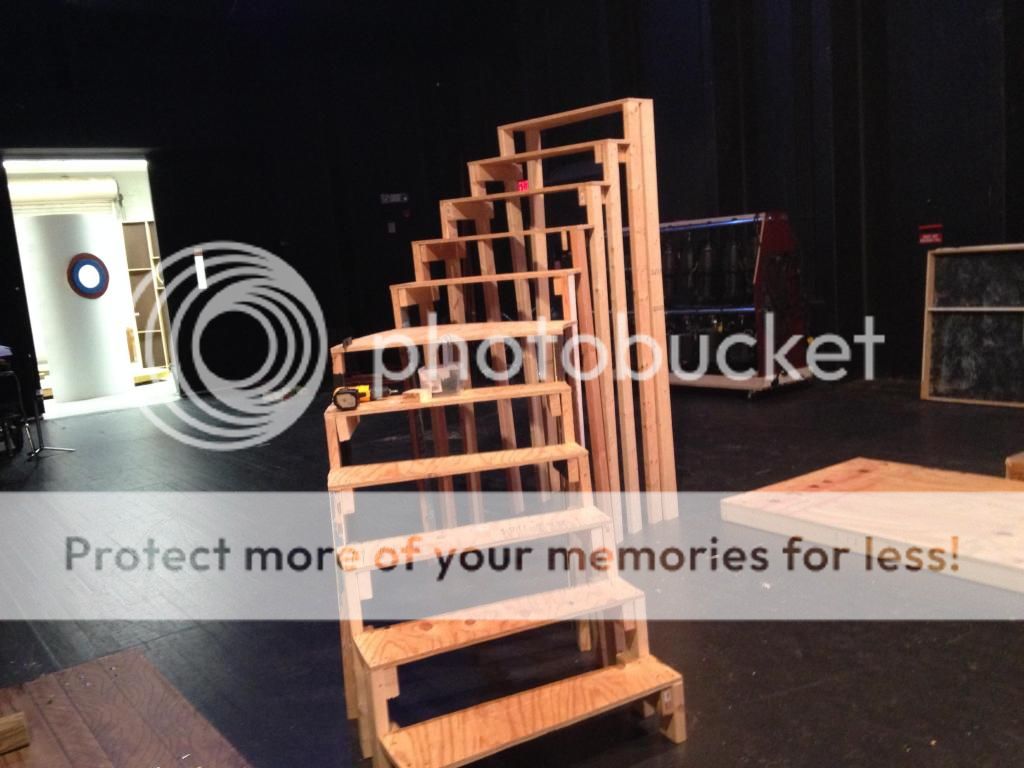
im setting up a school theater. This year they want stairs on each side of the stage, leading up to a second floor almost like a balcony. I have never done this before, and there is some complications... For starters, people need to be able to walk underneeth the stairs, because the emergency exit is located right behind, so the support needs to be pillars or something in that direction. Second, i would like the staircase to be made of somethingelse than wood, the directors dosnt want it to look like a house (villa.) They want it to be more like back street, i dont really know, only that it shouldnt be of wood. I saw the staircase on Killer Karaoke, which i quite liked, something like this would be perfect. I have also checked out hoac, but i dont really know. If anyone has any sugestions feel free to shout em out! The budgent isnt super high, but its not the smallest. Il add a picture so you can see my idea.

Thanks anyways
-Rein

proxy.php

ps: the height is about 3,8m not 3,02 ;)
 
I don't know where you're from, but in the United States "back street" would not have curved stairs. I imagine that curved stairs are much more complicated to build than straight runs (I've never tried). So far this sounds like a big project that will require someone with experience being directly involved.
 
Perhaps open spiral stairs. These were used in a HS production of Phantom Of the Opera. It had a 1 1/2" black pipe with pie shaped steps, separated by a 2" pvc pipe section as they spiraled their way up. The bridge is a painter scaffold, suspended from overhead battens.
Phantom (698).JPG
 
Curved stairs as you've depicted are a big and complicated project, and certainly involve welding and bending steel tube. If you are to have no support legs over the span of the stairs, it will take some serious engineering math (like by an engineer) to make sure it's safe. I'd recommend using straight stairs, perhaps coming off the bridge to SR and SL, then a landing and continuing down toward downstage. We did (just one) curved stair similar to yours, with legs every 4', and spent 128 man-hours.

Here's a drawing of the frame. It was later skinned and given a railing.
 

Attachments

  • plans Midsummer stairs.jpg
    plans Midsummer stairs.jpg
    98.3 KB · Views: 3,434
When I was in high school, we built a curved stair case by bending wood. There was a lot of wood glue involved and it took a long amount of time to finally get it completed. I am not sure how well it would work for you, but it is possible. Not wanting it to look like wood is easy with a good paint job, but the budget gets much higher if you need to weld it. There was a book called "The Perfect Stage CrewL The Complete Technical Guide for High School, College, and Community Theater"
that had step by step instructions on how to build the wooden version.

http://www.amazon.com/dp/1581153155/?tag=controlbooth-20

It was a great read for HS theatre, especially for students new to the technical side of things.
 
We built curved step units for "Anything Goes" last year and used different height risers (2x4) and 3/4" ply cut into pie shapes fitting the curve that was spec'd. You attach the risers to the bottoms of the pie shaped step and then to the next step riser. Super durable and heavy, but not terribly expensive or time-consuming to build (I'd estimate one 7' high unit took maybe 20-30 hours to complete). It doesn't meet your requirement of an unsupported span, but you can paint wood to make it look like metal and you're going to spend a whole lot less money and time building it out of wood. Here's a picture of it almost done (before cross-bracing, hardboard, and we ended up putting a horizontal 2x4 under each step for added support):

proxy.php


From what I'm reading it sounds like your stage is smaller in size and the set may actually block a fire exit? Even if it's an open stair, I don't know how your ADJ will feel about a set that impedes egress. You might want to also find someone in your area that can help you with the engineering of this set. Falling from 7-8' off the ground is no joke. Not to mention if you're falling into a set that collapsed.
 
I hope I'm not being a party killer with what I'm about to say. But to me it sounds like you want to make a spiral staircase to a platform at height, in a manner where there will be a trade-off between supports for the platform / staircases; and access to fire exits. And you've never done this before.

My instinct, particularly in high school theatre where the performers and crew are not professionals (professional in the sense of doing it every day as a job; I'm not judging your professionalism in what you do), is that it would be ethically wrong to attempt this without involving expert assistance. And by that I don't mean the internet, I mean somebody who can come in and see the space, and use their experience to consult on the best - structurally, artistically and administratively - way of doing things, and help you produce a final design which you can then take forward to the build.

I'm not being negative to your own ability but sometimes the best skill is to know when yours alone do not suffice; (and what makes the good production managers is knowing who to ask).
 
Thanks for all replies! I know this was not going to happen when i first though of it, due to diffrent reason. Im just scouting out the options. I've decided to make it straight stairs, and i've got a 3d party builder to help out with all the maths and materials. So the curve idea didnt pull through as I had imagined. Anyway, thanks for the response and comments, i'll post the final results herer anyways!
 
We built curved step units for "Anything Goes" last year and used different height risers (2x4) and 3/4" ply cut into pie shapes fitting the curve that was spec'd. You attach the risers to the bottoms of the pie shaped step and then to the next step riser. Super durable and heavy, but not terribly expensive or time-consuming to build (I'd estimate one 7' high unit took maybe 20-30 hours to complete). It doesn't meet your requirement of an unsupported span, but you can paint wood to make it look like metal and you're going to spend a whole lot less money and time building it out of wood. Here's a picture of it almost done (before cross-bracing, hardboard, and we ended up putting a horizontal 2x4 under each step for added support):

proxy.php


From what I'm reading it sounds like your stage is smaller in size and the set may actually block a fire exit? Even if it's an open stair, I don't know how your ADJ will feel about a set that impedes egress. You might want to also find someone in your area that can help you with the engineering of this set. Falling from 7-8' off the ground is no joke. Not to mention if you're falling into a set that collapsed.


These are very similar to what we're doing for a production of Annie, Jr. (although ours are only a 4' high).
I'm assuming you added a railing to these stairs, how did you build that?
We're having a lot of trouble with ours. =0p

Thank you!
 
The railing, as specified in the blueprints we rented, was fashioned from thin wall PVC pipe. The idea was that you heat the pipe (they suggested a plumbers torch- not great) and then bend it to form the curves. We managed to get it mostly acceptable using a heat gun, but I wish we had more time to revisit it but we were up against the deadline at that point.

I saved the lower portions of each curved stair and have reused them a few times, but the best way I've found to get the railing curve right is to buy these flat strips of PVC. They can be found in the siding/trim section of the box stores. They come in standard lengths and are about 3/4-1" wide. They flex easy against the flat side so I mounted banisters on the steps and then attached the PVC strip along the outside edge of the curve. Then I took another piece of the PVC and laid it on top of the banister, making it into a sort of hog's trough that sat on top of each banister. Then it's just a matter of fitting it to the curve and rise and attaching it with drywall screws. The heat gun helped a lot here since it's a bit stubborn to bend against it.

From there you could conceivably coat the whole thing in dope to make it really smooth, but in our most recent case we just painted them white to mask the drywall screws. It was surprisingly sturdy too. I'll try and get a picture of it in a bit. It was waaaaaay easier than trying to do a laminate (which would be the correct way) and a heckuva lot cheaper.

The PVC stuff looks like this, though the stuff we actually used was nowhere near that expensive- http://www.homedepot.com/p/Veranda-...C-_-NavPLPHorizontal1_rr-_-NA-_-203640256-_-N

My wife, the elementary music teacher, did Annie Kids last year and I got tasked with assembling bunk beds for that one- might be helpful! http://www.controlbooth.com/threads/bunk-beds.37630/#post-328296

Thank you for the help.
That sounds much simpler than what we've been trying.
Thanks also for the link to the bunks post.
That was one of the first posts I found on this site and used it as a basis for my build (I'll also try and get some pictures up).
 
Thank you for the help.
That sounds much simpler than what we've been trying.
Thanks also for the link to the bunks post.
That was one of the first posts I found on this site and used it as a basis for my build (I'll also try and get some pictures up).
I have a design for curved stairs that is modular and reusable. It has already been used about 4 times and is still holding up.
My curved staircase.
 
The railing, as specified in the blueprints we rented, was fashioned from thin wall PVC pipe. The idea was that you heat the pipe (they suggested a plumbers torch- not great) and then bend it to form the curves.

I've had some success bending PVC with a heat gun. The trick is to fill the pipe with sand so it resists kinking. Heating up the sand in an oven might work but I've not tried it.
 
I've had some success bending PVC with a heat gun. The trick is to fill the pipe with sand so it resists kinking. Heating up the sand in an oven might work but I've not tried it.
@sk8rsdad When PVC electrical conduit initially became popular, one of the tricks to bending it was to heat it with a torch by playing your torch longitudinally along approximately a 24 to 30 inch length at a time but playing your torch back and forth at a slight angle to the pipe such that your flame was off one side of the pipe at one end of your travel and off the opposite side at the opposite end of your travel thus when you paused even very briefly to reverse direction your torch's flame was pausing in mid-air and not burning the pipe. When the pipe was pliable, set your torch safely aside, grip the pipe with both hands, bend it as required and plunge it into a waiting 45 gallon drum of room temperature water maintaining your desired bend until the pipe is again solid. During my apprenticeship I bent several thousand feet of 3/4, 1 and 1.5" PVC during a local hospital renovation. Strangely enough the PVC conduit's manufacturer sold grey spray paint which, when dry, precisely matched the un-burnt color of their PVC conduit. Nowhere did the manufacturer ever publicly admit why they offered the matching grey spray paint in their accessories column. The brand we were using was continuously 'foot-printed' with a turquoise colored print. Clever electrical inspectors quickly caught on and questioned any bends if the turquoise foot-printing was obscured. This would've been during approximately 1969.
Toodleoo!
Ron Hebbard
 
I've had some success bending PVC with a heat gun.

That's what we ended up doing. It was unfortunate as we were working into our deadline and didn't have the time to play with it, but it was very slow and arduous and prone to failure. Sand probably would have made the difference.

plunge it into a waiting 45 gallon drum of room temperature water maintaining your desired bend until the pipe is again solid.

That's a great point. We had a lot of trouble with the pipe retaining its original shape and that also contributed to dimples when repeatedly heating and shaping. A quick bath might've prevented it.
 
That's what we ended up doing. It was unfortunate as we were working into our deadline and didn't have the time to play with it, but it was very slow and arduous and prone to failure. Sand probably would have made the difference.


That's a great point. We had a lot of trouble with the pipe retaining its original shape and that also contributed to dimples when repeatedly heating and shaping. A quick bath might've prevented it.
@StradivariusBone The 45 gallon drum of room temperature water did the trick every time, bend after bend, for months on end. Every few days I had to add water to my drum between evaporization and some getting slopped out due to the pipe and my arms being plunged on a regular basis.
Toodleoo!
Ron Hebbard
 

Users who are viewing this thread

Back