Gain-before-feedback can be roughly calculated based on mic placement and loudspeaker placement. An article on a "PAG-NAG" feedback calculator is here:
http://www.bartlettmics.com/newsletter/newsletter_12-12.pdf
Here are ten tips to help you get the maximum volume from floor mics or hanging mics before feedback occurs.
1. VERY IMPORTANT: Place the loudspeakers close to the audience and far from the microphones. Your existing speaker placement might work fine. But if you have trouble with feedback, it might be helpful to buy, borrow or rent two portable PA speakers and speaker cables. If it's difficult to access your venue's sound system loudspeaker connections, you might want to use a separate powered mixer as well.
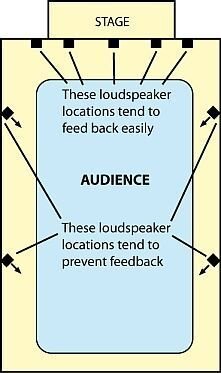
Start with just two speakers and place them near the side walls, even with the third row from the front, aiming diagonally across the audience at the opposite corner (see attachment). That’s an effective loudspeaker placement for reducing feedback. If the sound is too quiet at the back of the theater, add two more speakers farther back. The feedback calculator mentioned above, and real-world experience, have validated this technique.
Loudspeakers over the stage tend to cause feedback with floor mics and hanging mics. Then why are many auditoriums designed with the loudspeakers over or near the stage? Those sound systems were designed for close-miked performances, in which feedback is not a serious problem. However, distant miking with floor mics or hanging mics requires a different speaker placement to minimize feedback.
You might try a loudspeaker with an 8” to 12” woofer and a horn tweeter with a coverage angle close to 90 degrees horizontal and 40 degrees vertical. Loudspeaker examples: Electro-Voice ZX1090B, JBL JRX 112MI, Community DnD12, EAW JF29, Carvin PM10, Peavey PR10. Speaker stand examples: Pyle Pro PSTND2, On-Stage Stands SS7761B, Ultimate Support TS-80B.
2. Turn the mic faders up or down on the mixer to follow the action on stage. Ideally only one mic is on at a time. The more mics that are turned up, the more feedback (based on the Number of Open Mics equation).
3. Place the mics as close to the actors as possible without getting in their way. That increases the SPL at the microphones, so a little less gain is needed.
4. Train the actors to project their voices loudly toward the audience. The microphones need something to pick up!
5. Do not cover the grille holes with tape. That can cause feedback and change the sound of the mic.
6. If you can’t hear sibilance (“s” sounds) clearly, turn up the high-frequency EQ a little at 10 kHz, but watch out for feedback.
7. Do not use compression. It softens loud sounds, and you might need that extra volume.
8. Optional: Use a feedback suppressor (such as Sabine FBX1200) between the mixing console and the power amplifier. Or use a 1/3-octave graphic equalizer between the mixing console and the power amplifier. Turn down frequencies that feed back by no more than 3 dB if possible.
9. Optional: You might want to delay the signal going to the speakers so that the audience will localize the sound on stage. The Behringer Shark DSP110 is a low-cost audio delay unit.
10. If the stage is carpeted, put each floor mic on a hard foot-square panel of 1/8" masonite or something similar. That prevents muffled sound due to high-frequency absorption by the carpet.
Article on reducing feedback:
www.bartlettmics.com/10_tips_to_reduce_feedback.pdf
Here's another article that may be helpful:
http://www.bartlettmics.com/newsletter/newsletter 3-11.pdf
Here's an article on amplifying children in the theater:
http://www.bartlettmics.com/newsletter/newsletter 6-11.pdf
If you want to know more about audio systems, equipment and techniques, there are some free audio articles at http://www.bartlettmics.com/articles.html
http://www.bartlettmics.com/newsletter/newsletter_12-12.pdf
Here are ten tips to help you get the maximum volume from floor mics or hanging mics before feedback occurs.
1. VERY IMPORTANT: Place the loudspeakers close to the audience and far from the microphones. Your existing speaker placement might work fine. But if you have trouble with feedback, it might be helpful to buy, borrow or rent two portable PA speakers and speaker cables. If it's difficult to access your venue's sound system loudspeaker connections, you might want to use a separate powered mixer as well.
Start with just two speakers and place them near the side walls, even with the third row from the front, aiming diagonally across the audience at the opposite corner (see attachment). That’s an effective loudspeaker placement for reducing feedback. If the sound is too quiet at the back of the theater, add two more speakers farther back. The feedback calculator mentioned above, and real-world experience, have validated this technique.
Loudspeakers over the stage tend to cause feedback with floor mics and hanging mics. Then why are many auditoriums designed with the loudspeakers over or near the stage? Those sound systems were designed for close-miked performances, in which feedback is not a serious problem. However, distant miking with floor mics or hanging mics requires a different speaker placement to minimize feedback.
You might try a loudspeaker with an 8” to 12” woofer and a horn tweeter with a coverage angle close to 90 degrees horizontal and 40 degrees vertical. Loudspeaker examples: Electro-Voice ZX1090B, JBL JRX 112MI, Community DnD12, EAW JF29, Carvin PM10, Peavey PR10. Speaker stand examples: Pyle Pro PSTND2, On-Stage Stands SS7761B, Ultimate Support TS-80B.
2. Turn the mic faders up or down on the mixer to follow the action on stage. Ideally only one mic is on at a time. The more mics that are turned up, the more feedback (based on the Number of Open Mics equation).
3. Place the mics as close to the actors as possible without getting in their way. That increases the SPL at the microphones, so a little less gain is needed.
4. Train the actors to project their voices loudly toward the audience. The microphones need something to pick up!
5. Do not cover the grille holes with tape. That can cause feedback and change the sound of the mic.
6. If you can’t hear sibilance (“s” sounds) clearly, turn up the high-frequency EQ a little at 10 kHz, but watch out for feedback.
7. Do not use compression. It softens loud sounds, and you might need that extra volume.
8. Optional: Use a feedback suppressor (such as Sabine FBX1200) between the mixing console and the power amplifier. Or use a 1/3-octave graphic equalizer between the mixing console and the power amplifier. Turn down frequencies that feed back by no more than 3 dB if possible.
9. Optional: You might want to delay the signal going to the speakers so that the audience will localize the sound on stage. The Behringer Shark DSP110 is a low-cost audio delay unit.
10. If the stage is carpeted, put each floor mic on a hard foot-square panel of 1/8" masonite or something similar. That prevents muffled sound due to high-frequency absorption by the carpet.
Article on reducing feedback:
www.bartlettmics.com/10_tips_to_reduce_feedback.pdf
Here's another article that may be helpful:
http://www.bartlettmics.com/newsletter/newsletter 3-11.pdf
Here's an article on amplifying children in the theater:
http://www.bartlettmics.com/newsletter/newsletter 6-11.pdf
If you want to know more about audio systems, equipment and techniques, there are some free audio articles at http://www.bartlettmics.com/articles.html