If of further help, my 6" Chicago
Stage Lighting
fixture with its original
yoke measures 17.1/4" long not including its
gel frame clips or rear handle your
fixture does not have. The
yoke given this, measures with it’s 45 degree bent corners, 15" long and 9" wide inside. Your
fixture with the 5"
lens should be scaled down from there if not further in
yoke leg length.
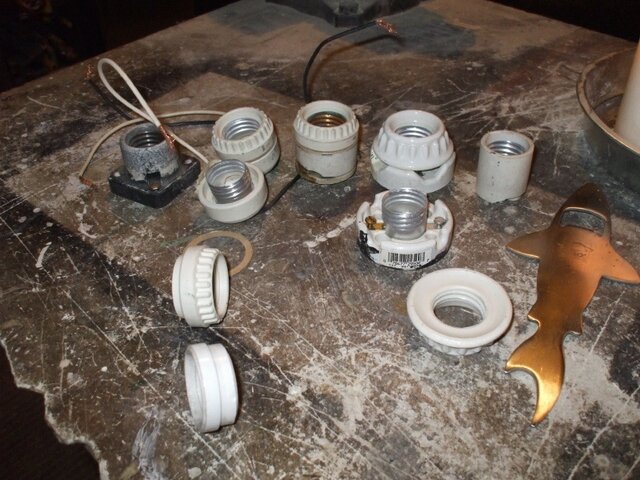
The lamp
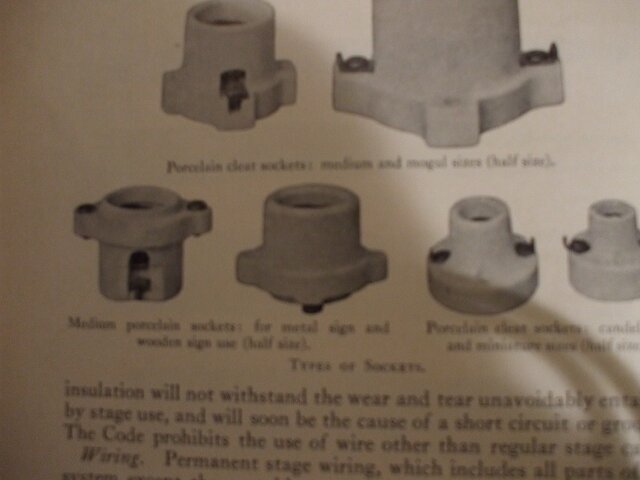
base given you have seen it should be easy to describe be it rectangular, square or round. Many of the old lamp
base styles are still available unless as described and in some photos I believe of my PC fixtures, the rectangular style still available.
Leviton still has available a few types that were in use for fixtures since the 1920's. Than again, as posted about my PC fixtures in the past, it could be something really unique and special that could have been in this
fixture. Than it would be a shame to be missing but could be reverse engineered for a different medium screw lamp
base. Tricky but you just have to find the center of the
lens in relation to the lamp
base platform, than given a 3"
LCL of your lamp find a lamp
base type that either matches that with the lamp installed or once jacked up will again
bench focus correctly.
However given your photos show only the light shielding slide plates I fear this lamp
base platform is missing from your
fixture. That would be a problem in making it work properly. Possibly given what is shown it is similar to what is used on a
Fresnel - sort of a bent U-shaped
platform that is atop the plates - the wear of the
fixture in sliding over the years will help otherwise. Otherwise a thick possibly aluminum or copper stepped
platform that slid. Age of the
fixture would be a determinant of what was used back than on this
fixture.
Doubting it had a
reflector but it is possible, especially if there were some sort of knob
system that allowed the
reflector to be removed from the rear in access to the lamp replacement. Another factor in not just age of
fixture but also quality of
fixture given age. Hex verses square nuts inside the
fixture - behind those slotted round head screws holding the frame together would tell a lot about the age of this
fixture thus other details to consider in making it right.
I noted the
wing nut to the lamp
base slide, missing but seen. McMaster Carr
www.mcmaster.com if you type in
wing nut shows a lot of shapes to
wing nut so as to replace that exact
wing nut and that is the easy part. Possibly after that it used a slab
base weld
nut attached to the lamp
base assembly but up for debate in style. Hard to make guesses after that. Really a shame the lamp
base is missing and possibly that of the lamp
base assembly.
In the future, save the lamp
base and various other parts even if trash. Spray some WD-40 into a ZipLock bag and put the parts into it you won’t be using. Cut the
asbestos at the lamp
base or where its
insulation was stripped off, and save that part. Save everything in general by way of sealing them up with some oil if necessary when in question of what one can replace or not. That missing lamp
base and especially missing mounting assembly I theorize drove this fixtures worth down quite a
bit given its unique nature. Were it a
Altman 360... not as big a deal, here it’s like re-inventing the wheel if you want to get it back up and running.
Post back what you remember in what is missing if not sketch out and post what you can about what was there. That all would help in finding original replacement parts and or calculating what would replace what is needed. Sure you can make it work... make it work well, if not make it work in at this
point as close to original condition as possible is another potential question. It ain’t a S-4
Leko, instead it will have its own style.
On the
cord strain relief /
wire in
bushing, that can be replaced by a two screw
strain relief without a problem. Today’s ethics say you provide a
fixture strain relief of the cable beyond just a at best UL knot to the wires. Save the
bushing that was on the
fixture in the WD-40 coated plastic bag and replace with dependant upon size and ½" or 3/4" NPT two screw
strain relief. Believe this hole will properly fit one of these two sizes. At that
point use say a #0 sleeved fiberglass
cover and some #16ga SF-2
wire to feed the lamp
base. TBA the lamp
base type. High temp. ring terminals to the lamp
base, some fiberglass electrical tape,
ceramic fiber cushioning for the lamp
base and fiberglass electrical tape to the
barrel part of the crimps. Silicone coated bronze lock washers on the lamp
base terminals if removable
etc. amongst other details - lots of other details.
Ground the slide - that is okay to drill a hole for.
At lest once determined what lamp
base to use you get one, you won’t have to re-surface a used one. That is always challenging, but a shame the lamp
base no longer exists.
On lamping or use, I wouldn’t plan to use it any longer for theatrical uses.
Fixture is tired, let it retire if not just leave it un-wired or modified for
current usage. Note my idea of turning it into a
LED prop
fixture. Were it two fixtures, potentially you could make some special use of them when called for in a design, but one
fixture would be very hard to make use of by way of design instead of intent. Form follows function = not the reverse. As a 25w or even color changing
LED fixture it would be really cool as antique - preserved and there is lots of rust reformer spray paint out there, in working and being a cool prop, without attempting to make it into a fully factory spec lighting
fixture.
Factory spec also means something. Take apart every screw, tap every hole, replace every screw that is deteriorated with a similar one
etc. Or just replace what is necessary such as the
yoke screws, oil up the thing, rust reform and leave in place the
fixture attaching screws once oiled and rust reformed. Overall paint, if aluminum, corrosion should be removed and if the
base color of it was natural, leave it alone, if painted aluminum than your choice to paint it. How much paint is also a question.
In areas not easy to chip the flaking paint off if any, rust reformer or at least spray paint if not high temp. spray paint will prevent the rust from getting worse in varying degrees. On more noticed surface panels, dependant upon rust and intent to keep origional, rust reformer, some sanding the edges, if not up to sand blasting than a new coat of paint might be called for or appropriate. Very hard question to determine the extent of need. This much less in value, some would like to see totally original, others would accept cared for condition on such a
fixture.
Personally, were I buying such a
fixture, I would want it as I see it in the photos. From there I would do my own work on the
fixture in preserving it. For me, someone else doing the work to it would decrease its value to me in me at least thinking I could do a better job and or enjoy the item more were I servicing it. Given this however, if a
fixture for you on the other
hand, it should perhaps be you that services and saves it no matter end result of value. Make the
fixture what you need it and wish it to be.
Hope it helps, love old fixtures as one can probably see. I also have serviced a few of them over the years and it's always a challenge not just to do but how much to do to them by balance of what is origional and what is
current factory spec. Often that very much is dependant upon what you start with, but otherwise it also depends upon how much you don't touch in trying to do good. At times even if a surface layer of rust under the paint, it is a good question of if you should remove the paint so it cannot rust, coat so it cannot get worse or leave it alone in being origional.