Hairline WL93 mics ok until there's 4 or 5 actors. SUggestions?

LesWilson

Well-Known Member
We've been using Shure WH20 headsets for 5 years and while durable with High Schoolers, some are drooping badly and in replacing them, I wanted to move to something less obtrusive. After reading here and elsewhere about hairline mics, I picked up some WL93 tan lavaliers. They worked OK until I had 4 or 5 actors all at the same time. I'm having gain before feedback issues. Quite inadvertently, an actor put her head on the shoulder of someone singing and the audio through the hairline mic of the non-singing actor sounded radically better and with more signal.

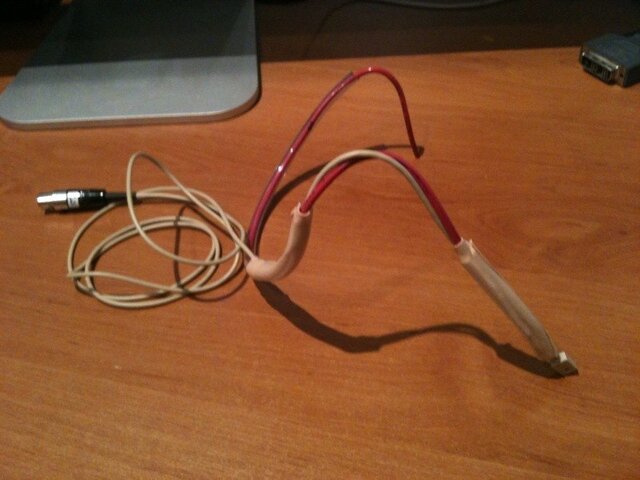
Since we're stuck with these mics, I made a two ear over the ear rig to get the mic closer to the mouth and will try them next rehearsal. I've read a few articles but I can't get a clear idea. Does it matter if I go over the ear and follow the cheekbone or under the ear and follow the jaw?

Also, other than sweat, is there any reason to face the pickup opening of the WL93 in one direction vs another (toward the skin vs away)?
 
You are going to naturally have a different sound and response with the WL93's since the hairline placement is further from the sound source. If you are having gain before feedback issues, I would look to speaker placement to see if you can make any adjustments there to help you out. Even a slight adjustment might do the trick.

In our older space we ran 20 WL93's before we got our Countrymen. After you get your placement worked out, they should serve your well. You absolutely want to have the opening away from the skin. It will sound muffled if it is facing toward the skin. That position would also make it significantly more prone to being damaged by sweat and makeup.

Both of your ear rigs you made up can be successful. You might find that the jaw line works better for actors with hats or other types of headgear.

~Dave
 
Any opinions on over the ear vs under?

I don't care for the python wrapping of the mic wire with floral wire and shrink tubing seems out of the question. Is there a cleaner way to attach the mic cable to the headpiece other than floral wire and Hellerman sleeves?
 
Any opinions on over the ear vs under?
Avoid the jaw line because it moves so much. No matter what type of tape you use to attach it, it'll loosen faster because of the talking and singing.

I don't care for the python wrapping of the mic wire with floral wire and shrink tubing seems out of the question. Is there a cleaner way to attach the mic cable to the headpiece other than floral wire and Hellerman sleeves?
That's the best way we have found so far. I'll agree that it is cumbersome, but it gets the job done, and does it well. (I heard an interesting rumor that Sennheiser had experimented with putting a thin piece of wire inside the first few inches of the jacket. But rumors are rumors.)
 
Remember to take the time to ring out and EQ your microphones properly. I used to do this by asking each actor to come on stage, individually, and both speak lines from the show and sing parts of songs. The first time they did this, we would ring out the mic to find the unhappy frequencies, and also EQ them for transparency. Each night thereafter (it was required every show, even for equity actors), we'd just do a quick spot check that took no more than ten seconds.

Those ten seconds saved our butt more times than I can count.
 
Another point to make is to stay on the cheekbones as much as possible. If the mic wanders up to the temple or down to the cheek you'll notice a drop in the high frequencies. The soft flesh absorbs HF while thin skin over bone seems to remedy the issue. Ideally the capsule isn't touching any of the body and is hovering just above the skin.
 
We have an analog Allen-Heath GL2800 mixer. I've seen a demo of software called Smaart that identifies ringing frequencies. But at $450, it's a hefty package. Can you recommend any "slimmer" software packages to help find those pesky frequencies? We are Mac based.
 
Using SMAART to find ringing frequencies is like using a backhoe to dig holes in a flower pot. The reason it costs $450 is because of the dozens of other high powered features that you will not need for this job. I highly recommend taking the training class to everyone because Jamie Anderson is knowledgeable about all things acoustics. I learned a lot about how sound operates from him.

Sounds like you're looking for a software RTA. There are Andriod and iOS apps that are basic RTA apps that will help you identify feedback loop frequencies. There are OSX and Windows applications that have demos, and in fact, SMAART has a 30 day demo.
 
Last edited:
photo.jpg

These mics just didn't work out in our venue. Once there were 4 or 5, feedback was still a problem even when headworn. Thanks for the help.

I tried several designs for headworn rigs using floral wire etc but the best was using scrap 14 or 12 gauge solid electrical wire and tubing from an aquarium store. Skin colored surgical tape hid the mic on the face well and the tubing was easy to split when I needed to insert the WL93 wire. Attached is a design that used the tubing down the cheek. But I found just taping the 12 gauge and WL93 wires together worked just as well. The rigs are easily customized to each actor and more comfortable than the WH20 headworn rigs which squeeze the head on some or are too loose or extend the mic too far on others. YMMV
 
Using SMAART to find ringing frequencies is like using a backhoe to dig holes in a flower pot. The reason it costs $450 is because of the dozens of other high powered features that you will not need fo this job. I highly recommend taking the training class to everyone because Jamie Anderson is a knowledgeable about all things acoustics.
Agreed on both counts.

Sounds like you're looking for a software RTA. There are Andriod and iOS apps that are basic RTA apps that will help you identify feedback loop frequencies. There are OSX and Windows applications that have demos, and in fact, SMAART has a 30 demo.
Even a 1/12 or 1/24 octave band RTA is looking at bands of frequencies and thus while it may provide a general idea of the feedback frequency, it is limited in being able to identify the specific frequency. That may be good if you are doing something like using a 1/3 octave RTA to adjust a 1/3 octave graphic equalizer, but rather limited if you are trying to adjust a parametric or quasi-parametric equalizer. In those cases a FFT based analyzer can provide more discrete frequency identification.

The spectrograph mode of Smaart can be used as a neat feedback identification tool as you can run it real time with the limits for the display set so that you see little or nothing with normal levels while anything above those do appear. That way you can potentially visualize feedback and quickly identify the offending frequency.
 
Instead of immediately replacing all your mics, I would recommend taking a look at the way you mix. Professionally, it's generally accepted that you will have a much higher quality of sound when you do what is called "line-by-line mixing". This is a technique where instead of just unmuting each actor as they walk on stage, you actually have all the faders down, and only push up the fader of one actor right before their line, then push it back down. The idea is that you will have as few many open mics as possible at any given time. For every open mic on a stage, your maximum gain before feedback will drop by a significant amount, which is why this is happening, and the quality of the sound will also be much better because each voice will not be getting to the speakers through multiple open microphones. This is how every single show is mixed on broadway, on tour, and in any regional theatre where actors are individually miced. It's certainly much more challenging, especially with an analog console, but the sound quality is much better. If you're interested in this, there's a great book by Shannon Slaton called "Mixing a Musical: Broadway Theatrical Sound Techniques" that I would highly recommend to anyone interested in live sound reinforcement.

Quite inadvertently, an actor put her head on the shoulder of someone singing and the audio through the hairline mic of the non-singing actor sounded radically better and with more signal.

Actually, this is far from rare, and this is an extremely common technique in mixing. As soon as two actors start singing into eachother's faces, the boundary effect of the sound bouncing around often makes using both mics sound very bad. Instead, the commonly-accepted technique is to only turn on the mic of the taller actor (so that the other actor's face isn't directly next to the mic), and then just bump the fader up slightly whenever the shorter, non-active-mic-actor is singing. Nearly every musical will have at least one or two of these moments, and this technique of using only one mic to cover two people is very normal. It's great that you discovered that this works for you - I'd encourage you to continue doing that and keep an eye out in the future for other instances where you can get better sound quality using only one mic.

Hope that helps!
 
6936-hairline-wl93-mics-ok-until-theres-4-5-actors-suggestions-wl93.jpg

I was successful in our venue buy getting the mic as close as possible to the mouth. They won't win a beauty contest but are better than the WH30 mics.
 

Attachments

  • wl93.jpg
    wl93.jpg
    62.5 KB · Views: 2,062
Last edited:
When we taped them on, placement was 2/3 of the way from the center of the ear to the corner of the mouth - about where an e6 would be.

On the pic of the one that has been made into a headset, the boom is too long, and the mic is facing away from her mouth.
 
On the pic of the one that has been made into a headset, the boom is too long, and the mic is facing away from her mouth.
The WL93 is an omni, so where it faces isn't a big issue. I would recommend positioning them this way to avoid any plosives from speaking or singing. It is also a fine length for a boom, the DPAs stick out just as far without any extra consequences from the e6.

Just make sure that your gain structure is correct and those rigs should serve you well. Nice job.
 
+1 on a job well done. Placement shouldn't be an issue for you unless you get a singer who can really belt it out. As for whether the capsule is backwards or not, it doesn't really matter, as Stookeybrd said, WL93 is an omni. I prefer the grill facing away from the mouth just to keep spit out of it. It ain't fun when you get people coming up to you going "Why does it sound like they're singing in a swimming pool?"

Also, thanks rochem, that book is on order from Amazon. I hadn't come across it before, but I'm looking forward to reading it... if I can finish the Hunger Games and The Martian Tales Trilogy first.
 
...Just make sure that your gain structure is correct and those rigs should serve you well. Nice job.

Thanks. The wire was cheap. After a few rehearsals, I customized the curve for each actor's face and the length based on their volume. Getting it close made the difference in managing gain before feedback. I new the capsule orientation didn't matter and I read a tip somewhere here on ControlBooth about pointing the opening away from the skin/mouth. Love this place.
 
I've use the 93s almost exclusively for years. At times I've had over two dozen on stage at once with no trouble. The key is spending some good time with them while you're tuning up the system. If you've got some of those and the rest are another type it's a good idea to bus all the 93s to a group and insert a graph just for them since they will behave differently and need a different curve. With an all 93 fleet I just do this on the main EQs but when I have front mics and other input groups they all get their own group with individual EQs. It's possible to get very high gain before feedback but it takes a lot of chopping on the graphs. I usually spend all of tech working on this and then during dress I'll be back on the channel strips making each actor sound more natural.
 

Users who are viewing this thread

Back