Built a corded LED microphone stand in the past that by like the 6th prototype worked out with a spare. Imagine even the cost of road cases just for microphone stands... two of them and that was a minor cost for the project given all of the R&D that went into it, time and parts. And over the years have too frequently gotten brought kicking and screaming into the LED tape world for doing special projects often short in time and big on the project meaning long hours to not just make the project work, but also make the tape work for the proect. LED tape just isn't very user friendly in trying all kinds of it over the years = double your project time and get lots of extra, than if on tour... expect to replace it all at some point if no frequent if portable in replacing sections at times. This beyond the some sections of it going dimmer or blank as happens also.
That's all with new tape, this is a 501c3 donation in scrap materials and my off time from work plus extra donated materials for a high school prodution in a lot of time (like over 120 hours so far) but only me able to provide time in doing it it as opposed to if for a show my crew of people working on it and lending their skills and thoughts. It's not going well, but it's going.
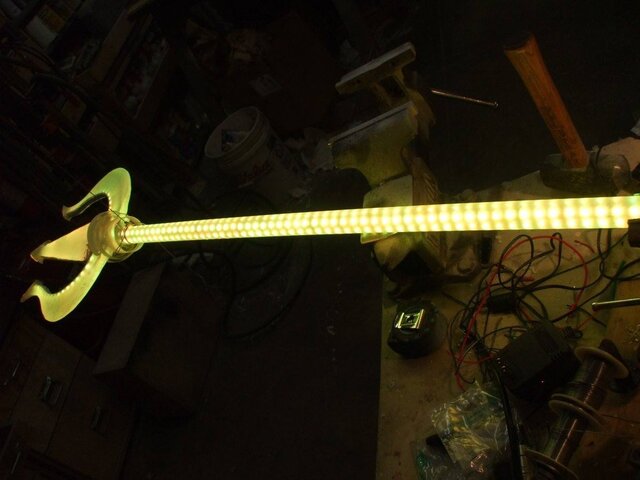
Finallly figured on the Milwaukee M-12 Lithium battery system - took time to find a battery powerful and strong enough but also very small. Luckily I had enough scrap tubing and plexiglass left over from other projects, that and the LED tape that was scrapped from use and I had to repair lots of - constantly.
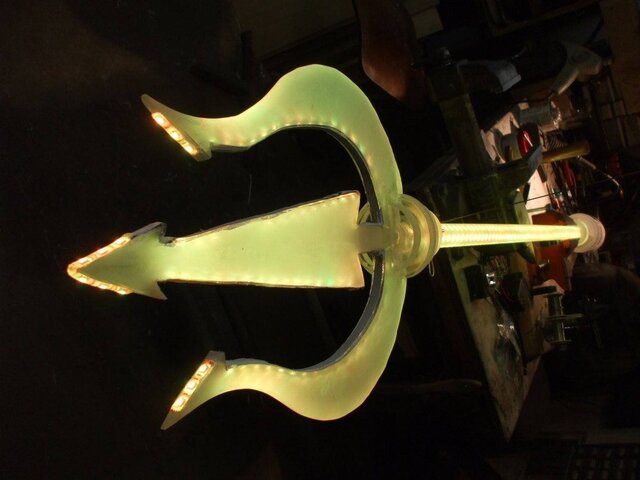
All tested so far in every step of the process of course and after the harp is done tonight in painting and replacing yet another section at the start of the night.. This after starting over on half of the sections last night... Done and panited, than re-tested... three new LED sections went bad in chasing them all thru the project in repair or replacement again and again. In this case, it's only in the blue color but in two less important zones. Literally new sections went bad between the last test and painting white what I don't want seen, and sanding the surface to make glow, than testing again. Blue only... going to hand over the head of the harp to the electronics guys and see if they can fix but otherwise given it's only in the blue "happy magic" mode, I might leave it as it is with a few nodes not working but it a blue harp overall.
Other projects for my child to get onto at this point in taking lots more time than I thought on this project.
Once the trident head/harp is figured out, took some amount of director/son that is the actor/Dad at work as project manager interpititations of like v.4 now of what colors and or control the trident is to be doing. Even now.. some charactor named something like Ursula is dressed in purple and it's requested a green trident as opposed to other colors in not even yet requesting purple. But when it's main owner has the trident, it switches to red when mad and casting a spell. There is a conflict there the talent and director don't see yet in preference but having to get designed in for future color changes overall for coloring of the trident.
Two sustaind colors - one amber, the othe red. Two momentary contact colors, one on the red the other on the blue or white light in what ever I make it. Lots of TBA in not even testing if the whole thing will work. Also a lot of switching to make thiis work.
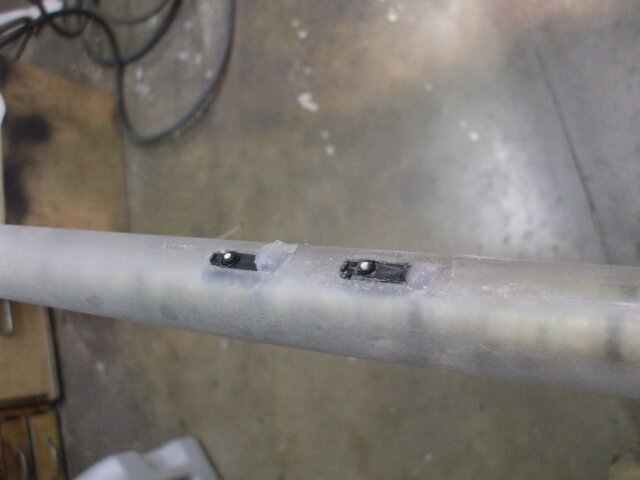
Wish this were just a prototype as I leaned from it's "prototype" creation a lot. Stuff like why if I'm connecting remote sections of LED tape do I need to dogmatically follow color code? If connecting one strip to another, white solid 18ga wire is easier to hide and splice sections together with. Easier to make go away and if tape done correctly, easier to mask as opposed to having to do the black,blue,green,red wires, and also stranded wires harder to sculpt. Stuff like node length, where to place wiring holes and lots of ETC. makes it obsolete in better were it just a prototype.
Functional wise the entire trident is ready to assemble in all parts ready to go. That was easy, wiring wise except for thee new sections that I might just leave dead, the harp works. Strips for the pole/shaft all in splicing repairs now work and are redy to go. All other hardware/components are redy to go except in figuring out how to mount the "bump" button momentary contact switches with a very shallow depth as a TBA project. Lots of R&D into that but something I think I figured out at least for switch in TBA how to mount.
Very difficult project in by the time it's figured out... what would be for a tour, I would consider this the prototype in expecting 250 man/hours so far and more to create the prototype the high school will be using. Good donated project in learning a lot every day on the project in how to do it for a future need. As I have said all thru the project, I know something cordless similar is coming and this is more so for my education because it's coming for a paid show need. Possibly once finished, it will be like 400 Man/hours to make it at this point and that's just to make the prototype viable for a high school show.
Yes... photos and details will be later but for now... LED trident project - not an easy project and hopefully by Monday done.
That's all with new tape, this is a 501c3 donation in scrap materials and my off time from work plus extra donated materials for a high school prodution in a lot of time (like over 120 hours so far) but only me able to provide time in doing it it as opposed to if for a show my crew of people working on it and lending their skills and thoughts. It's not going well, but it's going.
Finallly figured on the Milwaukee M-12 Lithium battery system - took time to find a battery powerful and strong enough but also very small. Luckily I had enough scrap tubing and plexiglass left over from other projects, that and the LED tape that was scrapped from use and I had to repair lots of - constantly.
All tested so far in every step of the process of course and after the harp is done tonight in painting and replacing yet another section at the start of the night.. This after starting over on half of the sections last night... Done and panited, than re-tested... three new LED sections went bad in chasing them all thru the project in repair or replacement again and again. In this case, it's only in the blue color but in two less important zones. Literally new sections went bad between the last test and painting white what I don't want seen, and sanding the surface to make glow, than testing again. Blue only... going to hand over the head of the harp to the electronics guys and see if they can fix but otherwise given it's only in the blue "happy magic" mode, I might leave it as it is with a few nodes not working but it a blue harp overall.
Other projects for my child to get onto at this point in taking lots more time than I thought on this project.
Once the trident head/harp is figured out, took some amount of director/son that is the actor/Dad at work as project manager interpititations of like v.4 now of what colors and or control the trident is to be doing. Even now.. some charactor named something like Ursula is dressed in purple and it's requested a green trident as opposed to other colors in not even yet requesting purple. But when it's main owner has the trident, it switches to red when mad and casting a spell. There is a conflict there the talent and director don't see yet in preference but having to get designed in for future color changes overall for coloring of the trident.
Two sustaind colors - one amber, the othe red. Two momentary contact colors, one on the red the other on the blue or white light in what ever I make it. Lots of TBA in not even testing if the whole thing will work. Also a lot of switching to make thiis work.
Wish this were just a prototype as I leaned from it's "prototype" creation a lot. Stuff like why if I'm connecting remote sections of LED tape do I need to dogmatically follow color code? If connecting one strip to another, white solid 18ga wire is easier to hide and splice sections together with. Easier to make go away and if tape done correctly, easier to mask as opposed to having to do the black,blue,green,red wires, and also stranded wires harder to sculpt. Stuff like node length, where to place wiring holes and lots of ETC. makes it obsolete in better were it just a prototype.
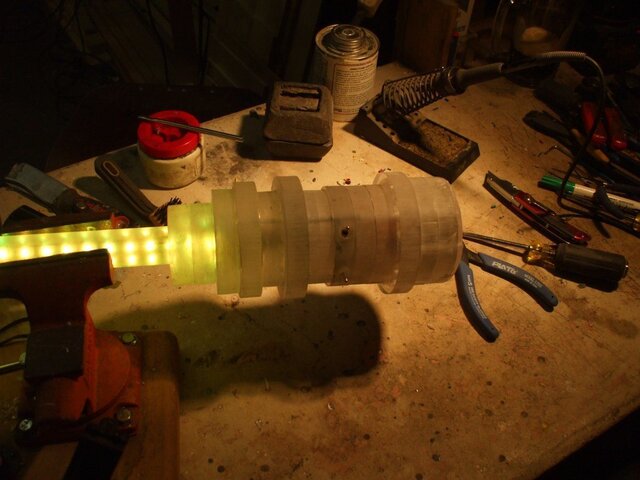
Functional wise the entire trident is ready to assemble in all parts ready to go. That was easy, wiring wise except for thee new sections that I might just leave dead, the harp works. Strips for the pole/shaft all in splicing repairs now work and are redy to go. All other hardware/components are redy to go except in figuring out how to mount the "bump" button momentary contact switches with a very shallow depth as a TBA project. Lots of R&D into that but something I think I figured out at least for switch in TBA how to mount.
Very difficult project in by the time it's figured out... what would be for a tour, I would consider this the prototype in expecting 250 man/hours so far and more to create the prototype the high school will be using. Good donated project in learning a lot every day on the project in how to do it for a future need. As I have said all thru the project, I know something cordless similar is coming and this is more so for my education because it's coming for a paid show need. Possibly once finished, it will be like 400 Man/hours to make it at this point and that's just to make the prototype viable for a high school show.
Yes... photos and details will be later but for now... LED trident project - not an easy project and hopefully by Monday done.
Last edited: