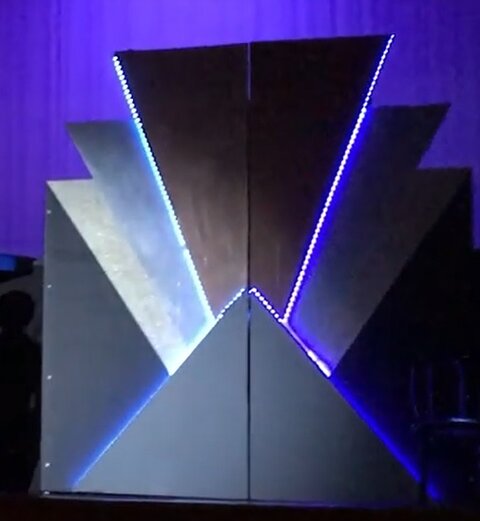
LED rainbow light box advice

Stuart R

Member
Screen Shot 2021-10-11 at 2.33.13 PM.png


Hello light wizards,

How would one go about building a light box that is something like the rainbow in this photo? Could it be done with RGB LED rope lights? Do you think the faces of the segments are acrylic? How is that really nice diffusion pattern achieved? And how would one arrange the lights and then control the whole thing?

I'm thinking that if each segment had its own coil of rope light inside, they could each be a different color.

If, say, 7 rope lights were run the whole length of the arch, then there could be an actual rainbow effect, where the stripes progress through ROYGBIV as they move from inner to outer edge.

I'd actually like to be able to do BOTH. Is it possible?

Advice? Thanks!
 
I've worked on an extremely similar project before. I can't speak to rope lights, but we used RGBAW LED tape spaced about 2-3" between rows and were very happy with the results. You can use Ws2811 / Ws2812b if you want per-pixel control, but we opted for 5ch/box (RGBAW) or "dumb" leds to save on DMX. Excuse my rushed drawing, we did something similar to what's shown below. 4x rows of the LED tape spaced about 6" from the front paper. We used a textured "Tyvek" for the front material according to the scenic artists. It was essentially an opaque textured paper that allowed light through, without being too transparent. Looks exactly like what's in your picture. We found that the paper created enough diffusion so we didn't need to add any frost or anything in between. If you used a DMX Led decoder with enough channels, you'd be able to set the color of each box individually.
Untitled1.jpg
 
Last edited:
To me it looks like the diffuser is made of something like white craft paper and that is what is giving that irregular pattern. I might go about recreating it by making light boxes covered with white craft paper and colored LED strips or lights inside.
 
Thank you, gentlemen. Sounds like I'll be experimenting with LED strips and a few different diffusers - the Tyvek idea is especially intriguing.

Meanwhile, I need to acquire a better education in the art of DMX as applied to LED strip lights.

Cheers -
Stuart R
 
DMX to LED strips is largely based on budget and feature needs.

- Do you want it to be wireless DMX?
- Do you want to be able to adjust the PWM?
- Do you want to be able to adjust the dimming curve?
- Do you want to set offsets on each outout?
- Do you want it to just dim the LEDs up and down with no fancy features?
- Do you want 16-Bit dimming?

There are a lot of options for low voltage DMX dimming out there.
 
Hi Harrison,

My hat is off to you for being well-versed in the intricasies of LED dimming. I thought I knew a little bit about it (PWM vs analog, etc.) but some quick reading suggests I'm a babe in the woods.

I think I can address your questions with this blanket statement: Rather than dreaming of everything I'd like our LED "rainbow" to do and then seeking the technology to make it happen, I am plenty fine with flipping the tables: let's consider a basic/simple setup and we'll figure out how best to use the capabilities available. Our audiences (mostly kids and family members) are not particularly discerning, and won't be disturbed by semi-abrupt dimming curves or minor differences in color temperature across our rainbow. I also don't have the bandwidth to pursue a ton of research and self-education for this project -- I need it as close to Plug and Play as we can reasonably achieve for a few hundred bucks.

The arc of our rainbow as envisioned is 16" wide and 4" thick and spans about 30', with the top of the arch hitting ca. 16'. It will be divided into 5 or possibly seven segments, each covered with a piece of Tyvek as a diffusing medium (as in the photo I posted). Here is what we need (vs would like) it to be able to do:

At a minimum: Light each segment in any RGB hue we choose, where the color is solid/even throughout the segment, and turns on and off via some kind of basic dimming curve rather than 0%/100%.
Ideal: Be able to adjust the brightness radially, so that intensity increases or decreases along a gradient from one edge to the other.

At a minimum: Create a classic rainbow effect with parallel stripes of different colors stretching over the whole length, using a basic dimming curve.
Ideal: Have the rainbow illuminate from one end to the other sequentially, as though it is leaping up and across the proscenium. Alternate - start with the stripe/color closest to the inside edge of the arch and add additional colors one at a time outward.

Stuff it would be awesome to be able to do but that is UNNECESSARY if it's at all difficult or super expensive: dancing effects for musical numbers, animation effect for witch casting a spell, "snowflakes falling," twinkling stars, custom patterns (tree limbs, clouds, architectural features), or letters ("SURRENDER DOROTHY" or "THE END")

With these additional details, focusing on the "minimum" requirements, what can you suggest?

With thanks -

Stuart R
 
The minimum is standard LED tape with a PWM driver. On the driver side we have one that is very popular because of the price and ease of use. As well as the dimming curve is very good. 5x8A Dimmer.
A dimmer like this would control everything at once so you would need one per segment. There is also the option of a 24 channel dimmer giving you the ability to split control to (8) RGB segments. 24x3A Dimmer.

One way to save on cost is using sign lights instead of LED tape. They are 3 LED segments with wire in between the segments. You can have them closer or further apart and if you have a deeper light box you would need less. Sign Lights

For the parallel strips the 24 channel dimmer would probably be a good option as well.

Now the awesome part. What you are describing is only achievable by pixel controlled LED Tape. We carry some and so do a lot of other people. The issue you run into is the cost goes up quite a bit. For a more budget friendly option I would recommend the holiday lighting suppliers. https://xlights.org/ is very popular with them for the control side, and again instead of using tape they use pixel nodes like these, Pixels.

If you want to dig deeper into what would be needed to build this with what City Theatrical has it would probably be better to take it off line. A warning about our LED tape though it is on the professional side of things so cost will be more then what you might be able to find elsewhere.
 
Tyvek, FWIW, is what they make FedEx envelopes out of -- the ones that aren't cardstock.

I could imagine it looking like that if you backlit it, yes.
 
I've worked on an extremely similar project before. I can't speak to rope lights, but we used RGBAW LED tape spaced about 2-3" between rows and were very happy with the results. You can use Ws2811 / Ws2812b if you want per-pixel control, but we opted for 5ch/box (RGBAW) or "dumb" leds to save on DMX. Excuse my rushed drawing, we did something similar to what's shown below. 4x rows of the LED tape spaced about 6" from the front paper. We used a textured "Tyvek" for the front material according to the scenic artists. It was essentially an opaque textured paper that allowed light through, without being too transparent. Looks exactly like what's in your picture. We found that the paper created enough diffusion so we didn't need to add any frost or anything in between. If you used a DMX Led decoder with enough channels, you'd be able to set the color of each box individually.
We are doing Chicago and thinking about stealing this idea below of an Art Deco piece that lives up Center with color changing LED lights in it.
See picture below. I'm thinking @LxNick 's idea of a DMX LED Decoder and some LED RGB tape is the way to go. Shouldn't cost too much. Maybe put a couple of LED PAR's behind it to back light the whole thing. I haven't done this sort of thing before do any of you have tips or suggestions? It looks pretty simple buy a DMX LED Decoder, Some RGB Tape, and attach power supply, address the DMX decoder... Is it really that easy? Any suggestions on better Tape or Decoders to buy? I appreciate any tips.
Untitled.jpg
 
All depends on the budget. City Theatrical and SuperBrightLEDs have some nice stuff, if quality is more important than cost. If cheap is important, I've done many shows where it was all purchased from Amazon. All of my personal gear is purchased from Amazon(Purchased to rent to small theater companies who weren't willing to pay the up front cost. I'd rent you my personal stock of power supplies/decoders for cheap, if you were in the Boston area)

The tape itself, if not permanently mounted in a stock set piece, should always be considered an expendable. One of the downsides of cheap amazon LED Tape is color consistency - while each continuous section will be pretty consistent, batch to batch is not necessarily. This also includes the factory splices - you may find that you end up with a reel that crosses between different production batches, and the color will be noticeably different between the two sides of the splice. On the other hand, I've had plenty of orders from amazon that were color matched just fine.

Adhesive strength is also a factor to think about - where the tape is pointing up, or partially up, the peel and stick adhesive on the back will usually work fine. If pointed down, you'll need a stronger adhesive. I usually recommend Contact cement, specifically this: https://www.homedepot.com/p/DAP-Weldwood-32-fl-oz-Original-Contact-Cement-00272/100125525 (ventilate your work area appropriately)

Edit: Yes, it really is as easy as you think it is.
 
It really is just as easy as LED Tape, decoder, and power supply. There are all sorts of install accessories as well but they are usually a personal preference. The decoder you linked might be overly complex for what you are trying to do unless you want separate control of the strips. If you want all of the tape to do the same thing then you can go with a smaller channel count but larger capacity.

There is really only one major thing to look out for when picking LED tape and a decoder and that is dimming method. There is constant voltage and constant current. Most tapes and decoders to not list if they are CV or CC so it is sometimes good to get the tape and dimmer from the same place. When going the budget route I like www.solidapollo.com they have decent prices and a good selection of options. You also want to make sure that there is enough amperage per output on the controller. Something to be careful of is RGB+X tape where there is an RGB chip and an alternating X chip (amber, white, etc.) because that X chip will most likely draw more amps. For example take our RGB+A LED tape, a whole reel is 4.2A but the R, G, and B draw .9a and the A draws 1.5A, this can cause your decoder to either fault or fry itself.

Most of the most useful tips are on the scenery construction side of things and how to get the tape to look the way you want. Do you want to see diodes? Do you want it in full view but a solid line? (LED neon is the best option here) Do you want it to be a gradual fade of color? Do you want it to be a bright hit of light with a quick fade?
 
@NJLX I wish I was in the area I would totally take you up on the rental offer.

@Harrison Hohnholt Yeah, I'm probably looking at Amazon products, I've purchased from Super Bright LED's in the past, and I'll definitely check out Solid Apollo (thanks for the tip). This is one of those "Hey what if we added a ____" sort of projects. So I'm looking to do the whole thing for like $200.

I LOVE the Neon look, but it's going to be way over my budget. I've got a store that only sells plastic about 5 minutes away from the school. I'll head down there and see if they have any frosted plastic material I can use to Mcguyver something neon-like on a budget. But, I'll probably end up building the set piece with several layers of plywood and hide the lights out of sight between layers so we can't see them.
 
From experience - if you use the whole 16 ft. length of tape, run power to both ends to avoid brightness falloff. You may have to do a little soldering.
Nice Pro Tip! Thanks Dave!
 
I bought some of these in 2014 and haven't had any problems with them, if you're looking for power supplies: https://www.amazon.com/gp/product/B003WOIVRU/?tag=controlbooth-20

Also these decoders: https://www.amazon.com/gp/product/B00B42M3RG/?tag=controlbooth-20
Many different brands under the same listing over the years, but I'm sure they're all from the same factory. Cheap and so far, reliable for me(used roughly 3 times a year 2014-2017, used maybe twice since then)

All of the LED tape listings that I've bought from amazon are now defunct, so worth looking around. Last time I was buying(~4 years ago) I had decent luck with ~$12/spool RGB tape.

Note whether you want waterproof or not - the non-waterproof is way easier to solder to, but with a little practice waterproof isn't much harder. The rubbery coating peels back from the end of the tape relatively easily and can be cut with flush cutters or a knife(careful not to nick the tape itself). Then re-waterproof with hot glue if necessary(not the best adhesive, but way easier than epoxy for covering your connections) or heat-shrink(much better for covering the connections, but not as easy to waterproof, if that's what you need).


I've used R111 before for diffusion, but that really only works if you're building a light box. A stiffer plastic product is definitely better for this application. I used these for under cabinet lighting in my old kitchen, if you can get a product like those plastic diffusers, it should work pretty well. Samples and testing are always good.
 
I used cheap LED tape with a power supply and DMX decoder bought from Amazon for a production of Dead Man's Cell Phone we did a few years back. I think we bought a 24 channel DMX decoder similar to the one Harrison linked above, but from a no-name brand, and a larger power supply to drive it. If you're looking to power multiple separate segments of tape, that's how I'd do it so you only have to run power and DMX to one point and then can run your tape connections out from there.

We made a false proscenium opening with opposing C channels made of built up plywood. (I think it was 3/4" ply, but you could maybe fit everything using 1/2" ply.) I don't have the drawings, but I threw together a quick MS Paint cross-section based on what I remember. I think the middle layer was set back roughly 2", which was shallow enough to maneuver and attach the tape, but deep enough that the light didn't scallop from the individual diodes. We attached the tape using hot glue, but I'd definitely go with NJLX's recommendation and use a permanent adhesive and consider the tape consumed on use. We also built and painted the three layers of ply together before attaching the tape, but I'd recommend leaving the outermost layer off until the tape is applied so you have space to work.

1644430779213.png
Dead man.jpg
 
I don't remember exactly what brands we used, but I think most of the stuff from Amazon comes from the same factory, just with different branding stickers. If you search 24 channel dmx decoder and 12v 30a power supply, that'll get you stuff similar to what we used for up to 6 RGB strips. Searching for 32 channel decoders will let you use RGBW or RGBA strips, and you'd want to confirm that the power supply is accurately sized to run your tape.
 
Has anyone compared cheap Amazon 24 volt LED tape vs 12 volt LED tape? I'm guessing 24 volt would be brighter. Or don't worry about it?

EDIT: Answering my own question, it looks like the key difference is 24 volt is more resistant to voltage drop over a long run and may come with higher pixel density than 12 volt. All things being equal 12 volt and 24 volt will be the same brightness. So that's the answer.
 
Last edited:
Has anyone compared cheap Amazon 24 volt LED tape vs 12 volt LED tape? I'm guessing 24 volt would be brighter. Or don't worry about it?

EDIT: Answering my own question, it looks like the key difference is 24 volt is more resistant to voltage drop over a long run and may come with higher pixel density than 12 volt. All things being equal 12 volt and 24 volt will be the same brightness. So that's the answer.
Specifically, you can get more power through the same cross-section of conductor on the tape with higher voltages. So if you can *get* 24V or even 12V with matching drivers, you'll be much happier, and likely have less need to double-feed the LED strip.

The christmas-lighting Xlights people tend to know the LED tape and related issues really well; worth chasing them down (on, say, Facebook), and listening in for a while if you're gonna do this a lot.
 
The christmas-lighting Xlights people tend to know the LED tape and related issues really well; worth chasing them down (on, say, Facebook), and listening in for a while if you're gonna do this a lot.
Most of what they have to complain about is the fact that tape outside on a house doesn't last very long and is much more difficult to replace compared to the nodes they like to use. There is something to be said about buying cheap gear, putting it outside and expecting no problems. Not saying expensive gear wont have failures but usually expensive tape comes with a warranty, especially if you are looking at outdoor/architectural centric suppliers.

In our testing the voltage drop across 24V and 12V tape is the same. One trick we use is running a single + line along the LED tape and soldering it in the middle of the tape. We use this a lot when you need to have your tape dead ending and power from one side.

The 24V advantage, when comparing tape from one supplier, is usually a reduction in amperage. Giving you the ability to run more LED tape from one driver. There is also the advantage of being able to remote the driver a bit further away and get less voltage drop on your wiring.
 

Users who are viewing this thread

Back