lighting whips

Les

Well-Known Member
As you can see from the first pic, the whip appears to have replaced an old asbestos whip, and the new one was wired in and heatshrinked to the new teflon to prevent it from slipping. I'm just somewhat concerned about this if I was to add it to a lighting inventory, as the leads are slightly exposed (No copper wiring is showing). Some other plans I have for these lights is to powder coat them and clean up the shutter's pressure plates. Other than that, the fixtures are in good condition with good shutters, reflectors, and sockets. (Not bad for $10.00 each on ebay. I have 4 of them).
I also replaced the old lens train with that of an Altman 360Q 6x12. Other than needing a good bench focus, the optics seem clear and focusable. The only downfall is that these lights are so old they don't have gobo slots. But they may still make ok specials or washes in a small theatre when in a pinch, and they'll sure beat parcans in a portable lighting system. That is, until I can save enough for some good 360Q's or Source Four's. I believe these are Kliegl's)
 

Attachments

  • Kliegl 002.jpg
    Kliegl 002.jpg
    26.6 KB · Views: 257
  • Kliegl 001.jpg
    Kliegl 001.jpg
    17.3 KB · Views: 243
  • Kliegl 003.jpg
    Kliegl 003.jpg
    23.8 KB · Views: 238
I would like to see a strain relief installed. Although the wirring looks good now, after some handling, the leads are going to wear through. If you can't find a proper strain relief, the worst case scenerio would be to friction tape and fiberglass tape the leads so that they are protected where they go through lamp base casing.
 
Yeah I was totally thinking the same thing. At first, I couldn't figure out a way to install a strain relief, because of the way it was designed - see pic, but I think that I could drill a hole in the side of the lamp cap and just relocate the whip's position, and having it exit through a metal clamp-down strain relief. Luckily I have tons of those laying around the house.

Thanks for the reply!
 

Attachments

  • Kliegl2.jpg
    Kliegl2.jpg
    25.9 KB · Views: 231
Yeah, some form of strain relief would be good. After some use the actually wire could become exposed, which would be bad.
 
Yeah I even checked out one and could tell that the wiring itself was getting alittle rough where it goes through the hole. Nothing my DeWalt and a 1/2" bit won't fix though!
 
Yeah I even checked out one and could tell that the wiring itself was getting alittle rough where it goes through the hole. Nothing my DeWalt and a 1/2" bit won't fix though!


Take it slow and use a lot of Threading oil. If you have the use of a drill press, I'd use that. The caps are made of Cast Iron, and castiron can be difficult to drill. It also has a a tendency to crack as it is ver brittle. So take it slow.
 
Not a problem! I have a fifth fixture like this that is beyond repair, so I'll probably use it as a test piece. Thanks for all your help!

Les
 
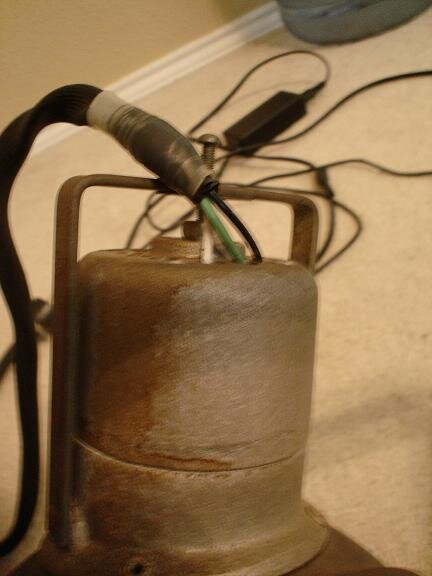
Heat shrink would be a bad thing to be entering the fixture. Consider how heat shrink functions... shrinks as it gets warm. Get it really warm, it tends to smolder once it is finished shrinking beyond the wall strength thus splitting and falling off if not staying in place and burning.


It’s a practice I follow that, if I sell a piece of gear, I’m liable for it’s safety... apparently you get what you pay for from this source and it’s as is. Should you electrocute yourself or burn down the building by way of using this gear, you have a lawsuit you could claim against this retailer thus the concept of only selling safe gear - much less gear that’s up to NEC specifications. Can’t sell asbestos gear, also can’t sell the gear as it was sold to you. Still for what you paid for it, what investment you put into it will be well worth the added cost in making it safe.

Friction tape would also tend to be a really bad thing to be entering the fixture - the rubber and adhesive in it tends to start fires when it gets Leko warm. Friction tape is fine near the plug, keep it away from the fixture.

(Gaffers tape in addition to not being UL listed for electrical wiring, also tends to smolder if not burn thus is also not to be used.)

The only type of tape you can use at the lamp cap and in a strain relief is a fiberglass or Teflon high temperature electrical tape such as #23 or #69 Scotch fiberglass electrical tape. Such tape works really well in high temperatures and the ½" stuff is easy to wrap and really good to be using with any strain relief type so as to protect against sharp edges and prevent bending too tightly near the clamp. Terminate the tape under the strain relief. Good concept is to start wrapping the conductors with the fiberglass tape, slide the fiberglass sleeving over the taped area without breaking the tape, than do a double layer over the fiberglass sleeving - this should help prevent the fiberglass sleeving from failing out of the strain relief.

You are required by code to have both a bushing and strain relief of the wires entering a lighting fixture. This be it as it will have been done with the asbestos - a knot as strain relief with brass grommet bushing, or better yet these days given smaller conductor OD’s, a two screw strain relief as you would normally find on such fixtures. Weather tight strain reliefs could also be used, except it needs to be a high temperature version using a Silicone strain relief and not a rubber one. Easier to use a two screw strain relief, and more normally done on a Leko of this type.

Properly done, this lamp cap even if radial style should have a 3/8" NPT two screw strain relief similar to any modern 360Q lighting fixture. This as from Altman is a 3/8" NPT two screw strain relief and not really something you can get other than from them or perhaps L&E. The 3/8" NPT hole will be smaller and in hole more properly sized for the cable whip and lamp cap. It will in general work best. Be very careful of the Altman two screw strain relief - it’s these days made in China and the casting is normally really rough and sharp on all edges by way of being much less in quality from what it used to be. A trip thru a wire wheel or at least time with a file so as to smooth out the rough edges cast or stamped steel is very necessary all about the strain relief for all Altman brand 3/8" NPT strain reliefs. Also some high temperature thread locker on the screw threads would be useful as the class of fit on the nut is not very similar to that of the cast threads - in other words, it’s really loose. If at all possible, a internal tooth lock washer for 3/8" NPT would be recommended for use here. Good challenge to get tight enough verses strip the threading. This or break the strain relief in getting it tight enough. A high temperature thread locker and if at all possible will allow for a little less tightening and thus a little less chance that you will break the strain relief in getting it really tight. Buy extra strain reliefs just in case.

The other more normally used but not fitting the cord as well solution would be to do a store bought ½" NPT two screw strain relief sold for use on Romex type cable - though I could never figure out why a oval shaped cable would benefit from a rounded or D-shape strain relief. Need a 7/8" dia. Hole for this and a step bit would be preferred for cutting any holes in this casting. If you go low budget, the local hardware above solution will work fine and be code compliant for this type of wiring. A bit better quality in such strain reliefs all around, but given your fixture, I don’t recommend it.


As with the recommendation of taking it slow for the ½" bit, take it slow with the step bit - probably around 400rpm on a cordless drill and use cutting oil on the bit. However, as opposed to the concept of drilling out for ½", that would be a bad idea with a standard bit unless you both countersunk or filed away the sharp edges and also used a soft metal grommet or silicone grommet, than tied a UL knot around the conductors. Not just a question of hole, it’s also a question of surfaces that even if smooth and rounded, are softer or as soft as what is passing thru. Just drilling for a larger hole is a bad idea short of refining the hole, than still bad unless using grommets.
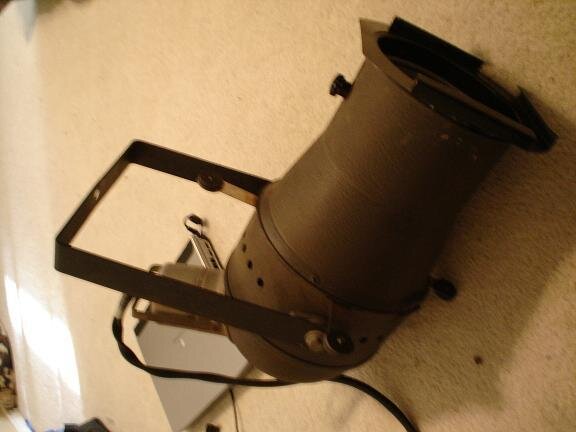
What brand is this fixture Kliegl or Major? Very curious lamp cap both in size and four screw adjustment type. Never seen a four screw bench focus adjust lamp cap... Much less it’s depth is strange. Center hole also seems to be missing something - this should be at least in theory the lock-down for the adjustment screw. Or it could be that and a sub-cap yoke mounting hole. Seems at very least with this center hole, you are missing something here. There should be some threaded screw hole to lock down the focus at very least.

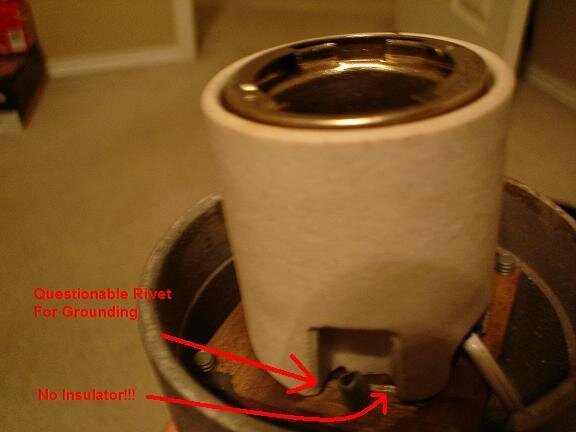
As shown in the later picture, totally against code to do as done - the place that sold you the fixture didn’t have a clue thus you should be very suspicious of what other “good ideas” they had in wiring the fixture and it’s condition.
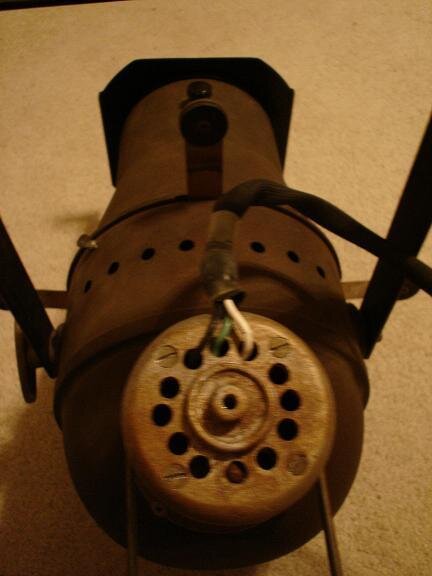
Take the center ground hole and drill it out for a 3/8" NPT hole - or if necessary for ½" NPT and in either case potentially, you will have to do some rivited sub-plates if too close to the cooling holes you won’t be using. You would have to sandwich your hole between two plates shaped to fit in the lamp cap so as to provide some support for the strain relief fitting. Easiest is say two pieces of 16ga steel that are riveted into place with that 7/8" hole in it’s center if using a ½" NPT fitting. Otherwise best yet and hopefully fitting within the gap between holes, the 3/8" NPT strain relief given the proximity of other holes would be recommended. Don’t worry about covering up these three holes... two of them will already have been covered by the asbestos wiring. Don’t go thru the side of the lamp cap to wire the fixture... just not done and often very much the wrong place to wire from by way of how it’s designed.

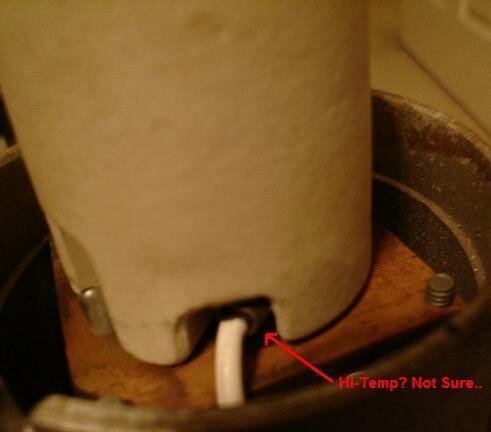
If you are going to be using the 200c wire provided (without the added fiberglass over it), I would also recommend sleeving it for a 3" to 6" length with some #12 silicone based fiberglass sleeving (McMaster Carr). This would prevent contact with the wire to hot and potentially moving screws cutting or melting thru, and also add a level of heat resistance that so if the 200c wire melts, it’s still insulated. Slide the silicone sleeving over your taped crimp terminals and fiberglass E-tape the ends of the conductors as they terminate. This is similar in practice to most modern lamp bases - a individual conductor protection of the wire as it leaves the lamp base. Just good safety.


So, back to being suspicious... Ground wouldn’t be very important in how it’s wired as to what form of crimp ring terminal used - wants to be un-insulated of course, and it would probably be good to have some form of lock washer on it. Give a tug to this wire to ensure it won’t pull loose. This lock washer need no matter if threaded hole in the lamp cap’s base mounting plate or thru-bolted - but it must be that the ground goes to that lamp base mounting plate. Ground wire goes to the lamp base mounting plate - not somewhere to the body of the fixture.

Given this fixture had at best better be using a medium pre-focus lamp base (P-28s), the high temperature 200c wire feeding the lamp base (shown) need to go to ring terminals that are high temperature type. Normal zinc plated ones that are just copper are not sufficient for high temperature needs - such a ring terminal under a lamp base needs to be steel/high temperature. You also need a silicone bronze lock washer if you want to have a really good prevention from coming loose. This given it’s not a really old (grey in color) GE brand of lamp base where the screws to the lamp base don’t come loose thus you would not be able to add a lock washer.

The crimp barrel part of your high temperature crimp terminal would also tend to want to be fiberglass electrical tape insulated. Such lamp bases when not already coming with the whips attached were for these fixtures designed to have a sort of ferrule/washer combination which are no longer really available - or at least really rare. The design of a Medium Pre-focus lamp base was not designed for ring terminals thus the use of fiberglass electrical tape to insulate the barrel part is necessary due to the mis-shaped hole pattern to the lamp base.

Also the lamp base needs an insulator pad between lamp base and the lamp base mounting plate. This is a must. Not a huge fan of what’s normally available as insulators - better off with a 1/16" thick ceramic fiber insulator pad but with such a pad it might become problematic due to moisture resistance. All a question of what’s going to become brittle due to heat verses what has moisture resistance.... some form of under the lamp base pad at least is necessary so as both insulate against electrical contact and provide some form of cushioning to the lamp base porcelain. You either want something that’s factory by way of these days looking like a circuit board type material, or something that looks like asbestos but has much smaller fibers thus being ceramic fiber. McMaster Carr item I’m a big fan of...

Anyway, your lamp base screws need to be brass - no zinc plated steel screws will work as well.
Ensure while you are in there that the screws holding together the lamp base are tight and that there is no discoloration of the lamp base, pitting or any other stuff - the lamp base needs to conduct well, otherwise you are just throwing away money on lamps. In the past has been covered how to re-surface P-28s lamp bases with silicone fiber type Demmel and brass wire wheels, and further what to look for. Given how these fixtures were wired, a re-read of such sections and what in general to look for on older fixtures would be advisable.
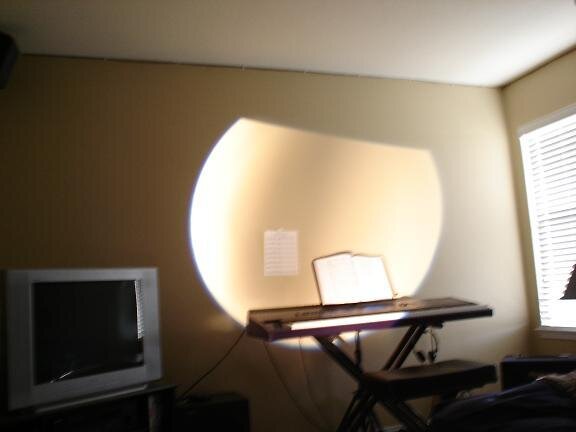
Also, your bench focus photo looks really bad with that off center elongated dark spot. Should be able to get at least a round dark spot at most or at best a very blue/white full field without any dark spots. Yes, these fixtures would tend to be best in supplementing your inventory so as to free up other fixtures for stuff like pattern projection. Use them for especially such looks in the amber range - go a little less saturated in the amber range and they will be just fine.

Other details such as not using any zinc plated steel screws about say for mounting the lamp base, instead the origional brass screw or better yet, stainless steel screws to mount lamp base to the base mounting plate. I’m also a big fan of Teflon washers between screw and porcelain - added shock resistance and a cushion as it were. High temperature thread locker is fine to use here, just not on any electrical connections.


Good project, what's the focal length of the fixture? Single lens would mean the next size smaller in size - meaning a 6x12 single lens is the equivalent of a 6x16 by way of memory of past experience. This seemingly is what you have from looking at it.
 
Hey Ship, thanks for your detailed reply. You brought up alot of useful points that I wouldn't have otherwise thought of. First of all, I noticed that there is no insulator pad between the lamp base and the mounting plate (youch!). I'm not sure if the other three do, but I assume they don't. At one time, I had a bunch of insulator pads from 65Q Fresnel's laying around that would have worked perfectly, but I'm not sure if I can find them anymore. The lamp base is a prefocus type, and this one in particular looks to be in good condition, with no pitting, corrosion, chips, cracks, and the like. But I will be sleeving the supply leads into the base with high temp sleeving like you suggested. After that I will re-crimp using high temp connections as well.
And thanks for mentioning the ground! It is attached to the mounting plate like you suggested, but it appears to be riveted in place. Definitely a scene shop fix. (just like the rest of the wiring, really). I was going to use Romex style strain reliefs, but the only ones I have are about 3/4". Way too big. Especially for going through the top of the base, where there is only about 1/2" of room. There is about 3/16" of space between every cooling hole. I may look into the strain reliefs intended for a 360Q leko. I think even the 65Q fresnel-type (metal) would be too big unless off-centered from the hole, which maybe do-able in using a die grinder. I agree that the whip should not exit through the side of the base. That was my original plan (because it's easiest) but would change the overall design of the fixture and potentially create some problems.
You mentioned something missing from the top of the base assembly. The strange center hole is actually a threaded hole which facilitates a slot-style screw that locks the base to the fixture by means of a movable bracket. Within this hole though (down at the very bottom) is what looks like an allen-head screw or stud. This is probably what stabilizes the base mounting plate from the center. The four holes used for bench focusing is odd. I haven't tried them yet, but I will once the fixture is safe to operate again.
I believe these are Kliegl. I went to their website, and in one of the catalogs I saw something almost identical to these. The only difference is that the ones in the catalog appeared to have a 6" stepped lens. These came to me with a single 6" plano-convex in each. These didn't look very good in terms of optics, so I slid in a complete 360Q 6x12 lens train for kicks. This actually gave pretty good results, provided it will bench focus somewhat. Since the 360Q lenses were 6x12, I assume this fixture has a 12" focal length as well.
It's going to be quite the project to get all four of these back up to code. Luckily, all the parts I need appear to be of the 5-cent type.
I wish I could come across some good old 360Q's (any age) to work on but the only ones I have seen on ebay (In larger groups) is some older brown ones that "floobydust41" is bidding on. Usually I lose hope when he bids on something I want because he tends to always get the cool stuff.
Anyway, thanks again!!!
 

Attachments

  • Kliegl3 001.jpg
    Kliegl3 001.jpg
    21.5 KB · Views: 179
  • Kliegl3 002.jpg
    Kliegl3 002.jpg
    15.4 KB · Views: 183
Hey, if you want funky old fixtures to work on, I have a bunch of old Century Strand die cast radial units (we call them "Top Loaders") that I am decommissioning. I would love to get rid of them. I have 6x9s, 6x12s, 4.5x6s and a few 6x16s. They are all in decent working order. I would happily be rid of them for whatever seems fair.
 
should E-bay or PM them. Unfortunately while a excellent offer at about $45.00 each, Controlbooth is not the place to do business or offer goods. A legal and software question in how it's set up as a website.

That said, as this was and is in part very much not attempt at sales, more mention of similar product "by the way" type of thing. I personally have no problem in occasionally seeing such a opportune offer - contact icewolf08 directly by E-Mail or PM directly on taking him up on his fixtures would be all I would ask. Take it off line for any follow ups.
 
Riveting the ground is standard practice in most places. Only problem is with vibration and focusing/wires moving. Before you remove the rivet, it could be fine. Give a twist to the ground at it’s terminal. IF it moves, replace it. IF it does not move, it’s probably fine but I wouldn’t choose a rivet for anything I ground in the future.

The insulators off a 65Q will probably or possibly be fine enough. They tend to become brittle so if “used” give a break test to it. Circuit board material could also be used instead of the ceramic fiber material I mention, but a 1/16" thick ceramic pad will work best with heat but is kind of like felt in being hard to deal with. Another option if doing a 750w lamp in these fixtures (as a concept in not checking specs.) Is to do the 65Q insulator or a silica based circuit board insulator, with fiberglass E-tape rolled so it’s double sided so as to attach the fiberglass insulator in heat sink position to the lesser temperature board.

Re-crimping might be ok or might be a bad idea. Give a tug after crimping and look at what the crimp looks like in conductors not being supported. More a question of what type of crimp terminal is used overall in heat resistance. Hopefully if you tug on the original crimps and they are high temp, you won’t need to re-crimp. Never really good practice to re-crimp any terminals.

A 3/8" NPT hole will probably fit sufficiently - it’s the same strain relief as used on a 360Q as a 65Q. Hole size is around 5/8" or 9/16" - don’t remember. Use a step bit to cut the hole, it will do a better job. Die grinder will work to some extent but if it’s an aluminum cap won’t work so well short of the proper aluminum bit and even than gumming up. Much simpler to use a step bit.

Kind of thought the center was a lamp base plate lock down hole which would be threaded. That movable bracket also in theory holds the lamp cap to the fixture correct? I would replace it with a wing nut if feasible. Four screw... it will be different in bench focusing and more tedious but probably easier overall in fine tuning in the direction you wish the filament to go. Don’t forget to constantly open the instrument in inspecting where the lamp actually is so as to prevent bottoming out against the reflector and killing off your lamp. I found last time I did some similar radial fixtures, getting out of adjustment left to right as opposed to up to down while attempting to focus was the largest problem. If at all possible, start with a un-lit pre-focus of the lamp centered in the reflector and the filament theoretically also centered. Than adjust up to down first in not worrying about the centered hot spot as much initially. Than once you get a rough hard edge, fine adjust left to right to get centered. Granted you want to roughly get centered in order to get the hard edge and flat field but don’t start screwing much left to right initially, more go up to down. This and constantly open the fixture after adjustment and see where the lamp physically is. Very tricky but it’s feasible to get a totally flat field as a goal.

Stepped lens might be origional, easy enough and doesn’t effect it’s use to replace with a PC lens as long as the optics are the same. Single PC lens doesn’t surprise me - normal to such fixtures. If similar to ones from Major I have dealt with in the past, a sindle 6x12 lens is about a 6x16 in focal length of a lens train. Still as long as your Altman lens train works, give it a shot in seeing if you can bench focus sufficiently back to 6x12. Perhaps first bench focus to what was provided, than swap lens trains once the lamp is centered sufficiently. Should as a theory/concept work as long as the focal center is the same. Might not be the same barrel length or position of lens length on the single lens however. 50% odds a lens train will work at best and doubtful it will focus given where the beams of light cross. Very much worth a shot in seeing if it works once bench focused.


No major differences between a black and olive drab 360Q - if given the option, bid on what gear you have and can get. Bird in the hand type of thing. Just as after you get these tanks up and running properly you will gain a certain amount of respect for them, green verses black 360Q fixtures will be a luxury in efficiency and won’t matter the color. With properly serviced and maintained gear, the color doesn’t matter in that beyond lamp base and reflector, plus some bad lots of “green lenses”, black to olive drab there is no major improvements. What’s made even now still in a 360Q for all intensive purposes is what was made 20 years ago.

Have fun, master the fixtures and provide your tips to future people asking about them - pass on your experience is payment to those who taught me what I do for my living.
 
Last edited:
should E-bay or PM them. Unfortunately while a excellent offer at about $45.00 each, Controlbooth is not the place to do business or offer goods. A legal and software question in how it's set up as a website.
That said, as this was and is in part very much not attempt at sales, more mention of similar product "by the way" type of thing. I personally have no problem in occasionally seeing such a opportune offer - contact icewolf08 directly by E-Mail or PM directly on taking him up on his fixtures would be all I would ask. Take it off line for any follow ups.

Sorry 'bout that Ship. We have move to the PM land.
 
Again, not a website for commerce at the moment, but I don't see a problem with an occasional mention or post such as this off the cuff and timely. This no matter if vendor/theater supplier taking part on the website in doing a tactful plug to offering the gear or in sending gear to a good home.
 
Last edited:

Users who are viewing this thread

Back