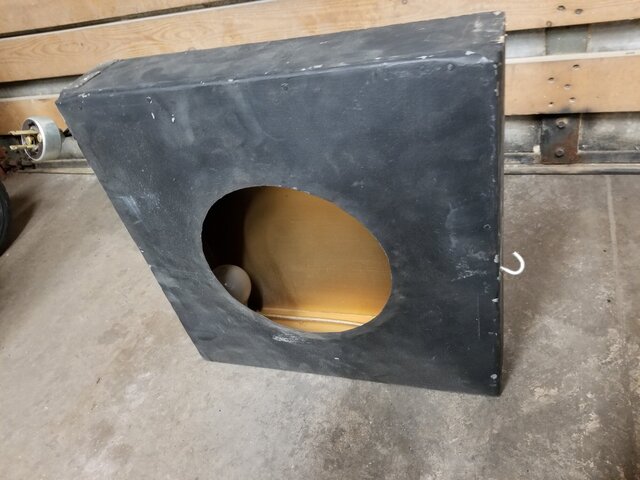
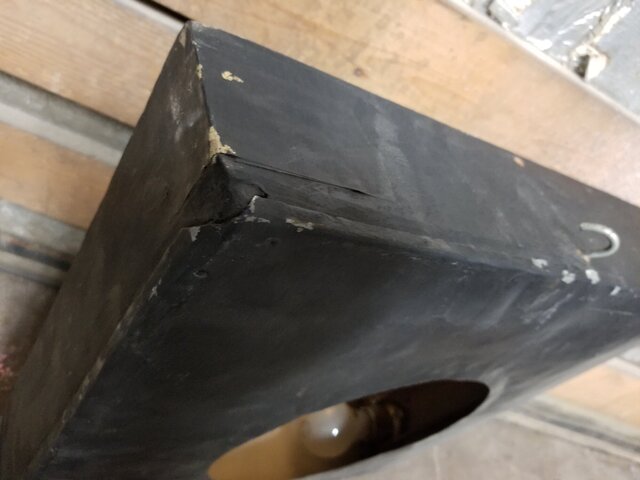
Wood 1x4 Pine, framed by bent and lead soldered 20ga tin steel sealed boxed 16" square frame 3.1/2" thick. Very 1920's or earlier in lead soldered cap and edges on the framing, but spot welded corners so possibly later? Think wood as a mounting means for lamp socket mounting added after welding for obvious reasons.
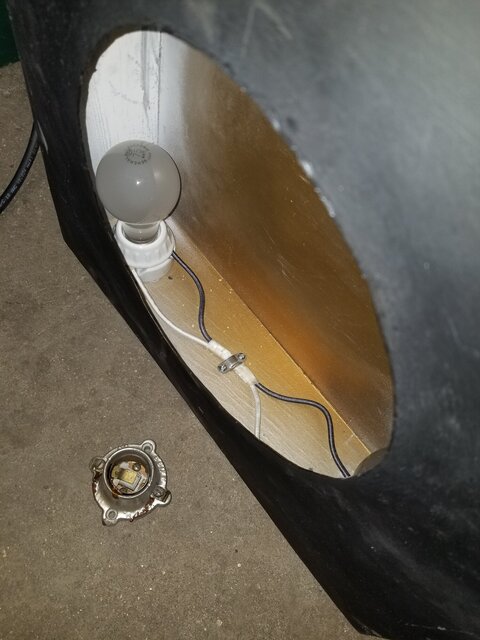
8" opening lit by 4x 75 Watt incandescent A-Lamps in the corners.
Two rigging points which are on center from the top and rear top. (Interesting in comparison to drawings I have seen in rigging from edges in books for such a fixture.) Wood eye screw types screwed into the lumber inner frame. Very light gauge eyebolts (and not throught bolted) in only1/8" and zinc plated and possibly replacement rigging eyes, but no holes to indicate other rigging points..
Wiring power in thru the bottom of the fixture with short whip and L1-15 plug. Suppose trailing from the bottom is easier than managing cable from the grid, though there is indications of rigging from both sides = cable up/cable down in the past.
Short whip for the Magic Moon I can understand - in the days before panel mounted plugs, the shorter whip in black spot behind the scrim would mask the plug connection size dark spot in being closer to the light source behind the scrim.
Cable bottom or top feeding the fixture from the bottom or top would be an either or thing in seen or not thru a scrim - though easier to cable manage from the bottom.
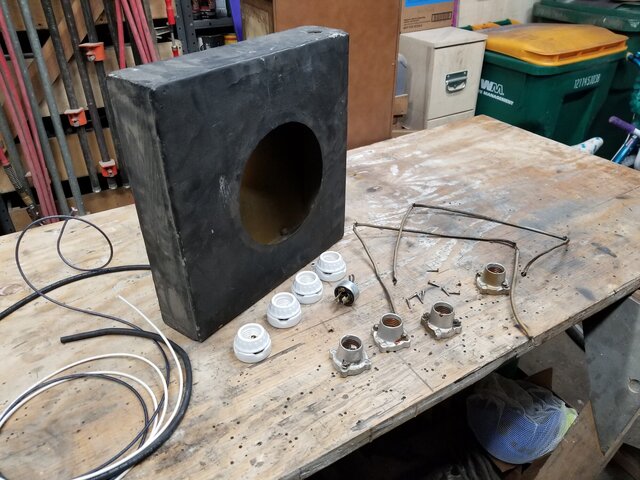
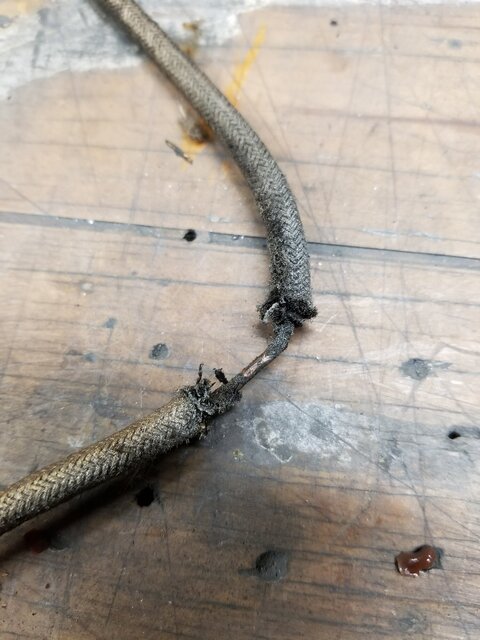
Wiring in the fixture (kicking myself in I have a note of the type of wiring but cannot find it - or in a corrupted/re-written file.) 14ga, thick jacket, knob & tube household wiring something similar to solid rayon covered 1/4" dia wiring from 1914 thru the 30's in use.
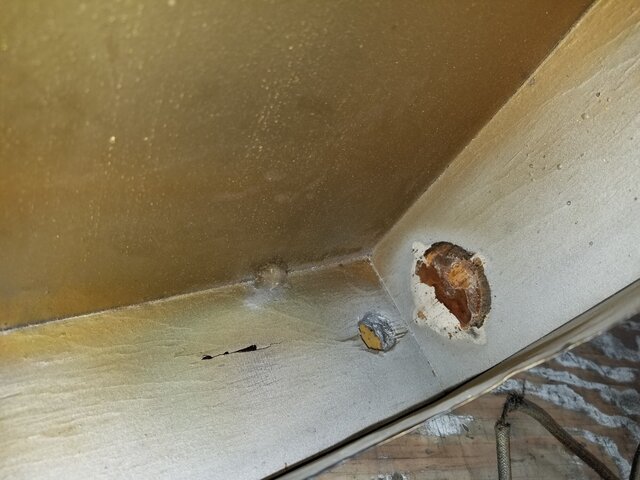
Half of the terminals on the lamp sockets were loose, letting conductors fall out or in general loose. Lamp sockets the 2" square Porcelain surface sign mount - not the proper lamp socket for such a fixture where terminals are exposed.
Installed by #8x7/8" flat head wood screws - not far into the wood & one fell out.
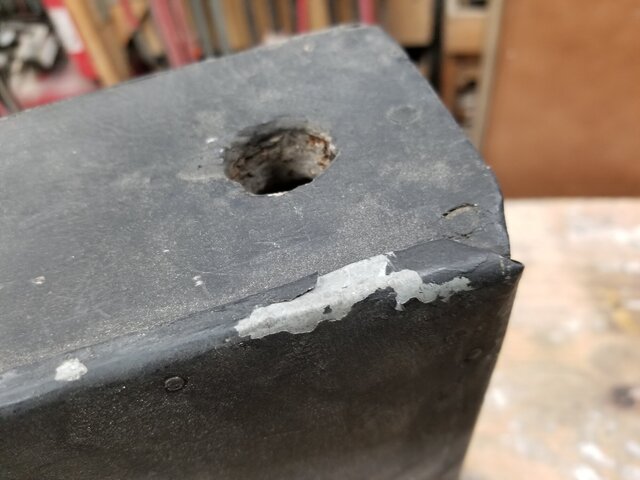
Interesting, an indication of melted silicone on or around and under some lamp bases = someone did some work on the fixture at some point. Nothing substantial, and the low temperature silicone bled away in making a safe fixture to use for a time perhaps for the effort. Well intended effort, but as normal for the theater.... just one step above the pay grade in work done in seeing. (Stuff like EGE lamps installed in 6" Fresnels.)
At the same time perhaps a goldish spray paint was added to the silver spray to the inner frame.
Leviton #9880 surface mount lamp socket was available at the time and will have been a more proper lamp socket to use in safety. Don’t know if from c.1925 factory or who ever was working the fixture afterwards put the wrong lamp sockets into the fixture... not important. In giving back to the theater “restored” it will also have to be code compliant as best possible to historical needs (not adding a ground), but compliant with wiring standards. No exposed lamp socket terminals for instance.
I will re-wire it 12ga. SF-2 wire, and a 16/3 SOOW cord in clipping the ground - nothing to attach to on inner frame & would have to tap antique outer shell otherwise, I’ll probably add a two screw clamp inside the fixture as a stop. 12ga wire inside the fixture so I can un-support it between lamp sockets as was done. 16/3 SOOW, because it’s the minimum gauge allowable.
Lamps will be re-installed though I will ask my boss after done... do I need to add LED Color Temp. Changing tape to this? TBA in just restoring or making something that could be put on a dimmer curve inside the museum this theater is starting to grow by way of my restoration. How to rig it also than will be a question. Though I believe I have stored up some other than zinc antique plated eyebolts from the past which might help.
It’s basically a light box with an open hole in it’s center. How it was rigged and used is the important part of the creation. Magic Moon - a moon that moves during the show back in c1925 and before... Important lighting fixture for period design.
8" opening lit by 4x 75 Watt incandescent A-Lamps in the corners.
Two rigging points which are on center from the top and rear top. (Interesting in comparison to drawings I have seen in rigging from edges in books for such a fixture.) Wood eye screw types screwed into the lumber inner frame. Very light gauge eyebolts (and not throught bolted) in only1/8" and zinc plated and possibly replacement rigging eyes, but no holes to indicate other rigging points..
Wiring power in thru the bottom of the fixture with short whip and L1-15 plug. Suppose trailing from the bottom is easier than managing cable from the grid, though there is indications of rigging from both sides = cable up/cable down in the past.
Short whip for the Magic Moon I can understand - in the days before panel mounted plugs, the shorter whip in black spot behind the scrim would mask the plug connection size dark spot in being closer to the light source behind the scrim.
Cable bottom or top feeding the fixture from the bottom or top would be an either or thing in seen or not thru a scrim - though easier to cable manage from the bottom.
Wiring in the fixture (kicking myself in I have a note of the type of wiring but cannot find it - or in a corrupted/re-written file.) 14ga, thick jacket, knob & tube household wiring something similar to solid rayon covered 1/4" dia wiring from 1914 thru the 30's in use.
Half of the terminals on the lamp sockets were loose, letting conductors fall out or in general loose. Lamp sockets the 2" square Porcelain surface sign mount - not the proper lamp socket for such a fixture where terminals are exposed.
Installed by #8x7/8" flat head wood screws - not far into the wood & one fell out.
Interesting, an indication of melted silicone on or around and under some lamp bases = someone did some work on the fixture at some point. Nothing substantial, and the low temperature silicone bled away in making a safe fixture to use for a time perhaps for the effort. Well intended effort, but as normal for the theater.... just one step above the pay grade in work done in seeing. (Stuff like EGE lamps installed in 6" Fresnels.)
At the same time perhaps a goldish spray paint was added to the silver spray to the inner frame.
Leviton #9880 surface mount lamp socket was available at the time and will have been a more proper lamp socket to use in safety. Don’t know if from c.1925 factory or who ever was working the fixture afterwards put the wrong lamp sockets into the fixture... not important. In giving back to the theater “restored” it will also have to be code compliant as best possible to historical needs (not adding a ground), but compliant with wiring standards. No exposed lamp socket terminals for instance.
I will re-wire it 12ga. SF-2 wire, and a 16/3 SOOW cord in clipping the ground - nothing to attach to on inner frame & would have to tap antique outer shell otherwise, I’ll probably add a two screw clamp inside the fixture as a stop. 12ga wire inside the fixture so I can un-support it between lamp sockets as was done. 16/3 SOOW, because it’s the minimum gauge allowable.
Lamps will be re-installed though I will ask my boss after done... do I need to add LED Color Temp. Changing tape to this? TBA in just restoring or making something that could be put on a dimmer curve inside the museum this theater is starting to grow by way of my restoration. How to rig it also than will be a question. Though I believe I have stored up some other than zinc antique plated eyebolts from the past which might help.
It’s basically a light box with an open hole in it’s center. How it was rigged and used is the important part of the creation. Magic Moon - a moon that moves during the show back in c1925 and before... Important lighting fixture for period design.