Notating Cutlists

bobgaggle

Well-Known Member
I'm having a problem clearly notating cutlists with miters.

My usual notation:

4 @ 36" L-L 45-45 (this returns a trapezoid, 36" on the long side)

or

4 @ 36" L-S 45-45 (this returns a parallelogram, 36" from acute angle to obtuse angle)

or

4 @ 36" -L 45 (one end square, one end 45, 36" to the longest side)

This is pretty standard in the shops I've worked in. My problem comes when I need to miter and bevel the same piece. Not a compound angle, one end mitered the other beveled. I don't know how to notate this. Is there a standard way this is usually done? Maybe 4 @ 36" M-B 45-45? But this doesn't really tell the guy where to measure from to get an accurate length...
 
I usually have the best luck with little diagrams to show exactly what I'm looking for, but here goes with a text-based solution. Disclaimer- I do not make cutlists for production shops, so I have no idea what standard notation looks like and am mostly going off of what you've written above.

First notate the direction of the miter (right or left, based on which direction the saw turns to perform the miter) and whether they measure from the short or the long side, then notate whether you're measuring to the short or the long side of the bevel (and thus, which way you cut it). Place the 'L' or 'R' for directional notation in parentheses or brackets to differentiate it from the 'L' or 'S' notating short or long.

So 4 pieces measured 36" from the long side of a 45 degree miter cut to the left to the short edge of a 45 degree bevel cut would be notated thusly: 4x @ 36" M (L) L - B S 45-45.

8 pieces measured 62" from the short side of a 30 degree miter cut to the right to the long edge of a 27 degree bevel cut would look like this: 8x @ 62" M (R) S - B L 30-27. (maybe always have your operators measure from the long side of the miter, because measuring from the short side is a pain in the a$$ and takes a lot more time)

You'd probably want to set up two conventions for cutting these particular pieces- that your operator cuts the miter first, then the bevel, and does not change the orientation of the board between cutting the miter and measuring and marking for the bevel. Assuming you have a dual-bevel miter saw setup, this should be quite simple. If you have a single bevel saw, then such an operation would involve cutting the miter, measuring and marking one face, transferring the mark to the edge of the workpiece, then using a bevel gauge to accurately transfer the mark to the other face of the workpiece so that an accurate bevel could be cut.

Hope that's helpful, good luck finding a workable solution!
 
I would just do a quick ISO drawing and drop the dimensions onto it. It will take a bit more time but you'll get what you want. That is a rather rare thing in my book, but then again there is always that "one" piece that you have to do that 300 times.
 
That is a rather rare thing in my book, but then again there is always that "one" piece that you have to do that 300 times.

Well its the first time I've run into it since I've started working here, and luckily its only 2 pieces that need it, but I couldn't quite figure out how to convey it clearly. I ended up just walking over and telling the guy what to do...
 
Well its the first time I've run into it since I've started working here, and luckily its only 2 pieces that need it, but I couldn't quite figure out how to convey it clearly. I ended up just walking over and telling the guy what to do...

I always viewed that type of thing as a red ink thing...
 
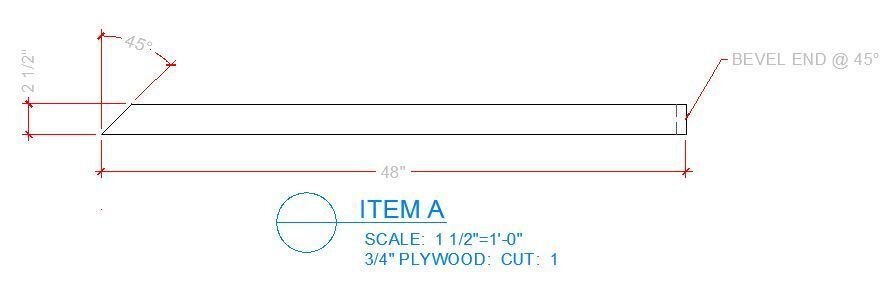
As a Detailer in the scenic world, i would simply show a plan view, dimension, show the angle on the one end, then call out the angle of the bevel on the other end. Make sure that material call outs are shown, then show an assembly view identifying where the piece lives in the build.

SS CUT LIST.JPG
 

Users who are viewing this thread

Back