HI All
I thought I'd share a project I worked through when we put up The Wizard of Oz this year. A variable speed on cue elevator trap door on the cheap.
Pictures and videos are attached or linked below.
I wanted my witch to appear out of no-where and melt so I knew I needed a trap (done that before) but I needed a way to control her to get her out (up) fast and in (down) slowly for the melting scene. I needed a variable speed elevator trap door. I only have 1.5meters of room under our stage so space is limited. Our stage deck lowers in sections (1.2x2.2meters each) so I dropped two sections down to their lowest points and built a 4.4 x 2.2 meter false stage plug with a round opening for a trap door.
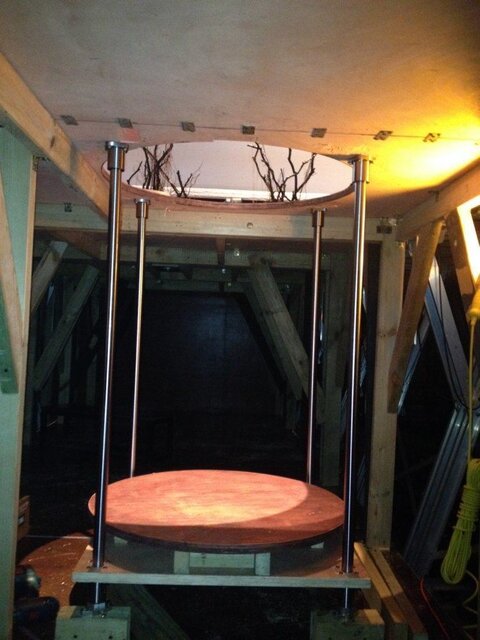
The design of the trapdoor was a round plug to sit in the hole in the stage floor, which was in turn mounted to its own platform that could be raised and lowered.
Hardware for the trap mechanism included …
- 4 stainless steel, brushed posts about 3.2cm diameter
- 8 flanges to hold the posts in place (4 top and 4 bottom)
- Glide flanges with vertical bearings for guiding the actual trap platform which carries the trap door up and down
- One fixed castor to ride under the trap and PUSH the trap upward or carry it downward attached to…
- One 2.6 meter length of steel pipe used for the lever (7.5cm diameter, 6mm wall thickness).
- one 2”x6" upright brace for my pivot point.
See attached pics and video to see the final product.
It took about 15 hours to put this project together and I spent about 1000 USD on the entire project. A moderately expensive effect, BUT I have all the component pieces to throw together as needed for future shows.
To finish the effect for the witch entrances and exits, I added flash pots, a smoke machine, a C02 fire extinguisher and a strobe lighting effect with our Martin intelligent lights. For the melting scene, I had Dorothy throw sequins on my witch, and of course a shot or two of well placed smoke from below.
I added a live video monitor under stage so the crew could see what they were doing. I mounted an ipad in the catwalks pointed at the stage and an apple tv with monitor below deck.
This was a necessary safety feature for my kids so they could see and ready themselves when it was time to cue up the witch exits (i.e. before she steps on the trap, the upright support leg for the trap must be removed and of course my three boys have to get down on that lever and hold the trap in place as she steps onto it from above. This took practice to perfect. I had my crew sit with the performer face-to-face and talk it through step by step and look her in the eye everyday and tell her “We’ve got your back.” As the actor realized the crew was going to hold her up, she released her concern and focused on playing her part. My stage-manager wrote in a sequence of 9 or 10 different warnings and standbys for each entrance and exit. Once they got the sequence it was a precision and beautiful operation to listen to on comms.
It took…
- three strong boys to operate the lever for the trap (my witch was about 118 lbs) and the trap itself on the ‘floating’ platform was 40 lbs but that was counter-weighted below on the lever. But I needed those three strong guys to rocket the witch upward on cue and bring her in safely.
- One student on the hinged upright leg to pop into place once the trap was in the upright position so performers on deck can walk on the trap and again to release the leg when it was time to cue up to bring her in.
- One student on clear-com headset for comms. w/ the stage-manager
- One to assist the actor who played the witch get on and off the trap below deck with her costume, broom, hat, etc… (Our smoke operator always ‘pre-loaded’ the witch’s costume.. cape & hat, with a shot of fog. Cool effect.
- One to operate the flash-pot igniters on cue.
It took several hours to train the crew to operate the apparatus and we notched in a good 20 minutes of ‘rehearsal’ per day to get the crew and the actor focused in on the procedure. Safety was obviously key. I laid it out very directly with the kids. One mishap and our performer was going to end up with an injury which could happen in various ways. I had them go through possible injury points through mishandling. They wrote them down… memorized them, and found solutions and work-arounds to avoid those problems. We worked it out and they did a perfect job. Very proud of my freshman crew-members and glad I had three big brutes for muscle and an OCD girl on headset. We called them the gang of seven. J
I hope this comes in handy for some of you. I’m proud of this solution and as you can see, the final result was very cool.
Link to videos of trap door in action.
- http://www.concordiashanghai.org/wp-content/uploads/2014/05/trap_1489.mov
- http://www.concordiashanghai.org/wp-content/uploads/2014/05/trap-2_1490.mov
- http://www.concordiashanghai.org/wp-content/uploads/2014/05/trap-3_1491.mov
Best
Chad
![photo 1[1].JPG](data:image/svg+xml;charset=utf-8,%3Csvg xmlns%3D'http%3A%2F%2Fwww.w3.org%2F2000%2Fsvg' width='480' height='640' viewBox%3D'0 0 480 640'%2F%3E "photo 1[1].JPG")
![photo 1[2].JPG](data:image/svg+xml;charset=utf-8,%3Csvg xmlns%3D'http%3A%2F%2Fwww.w3.org%2F2000%2Fsvg' width='640' height='480' viewBox%3D'0 0 640 480'%2F%3E "photo 1[2].JPG")


I thought I'd share a project I worked through when we put up The Wizard of Oz this year. A variable speed on cue elevator trap door on the cheap.
Pictures and videos are attached or linked below.
I wanted my witch to appear out of no-where and melt so I knew I needed a trap (done that before) but I needed a way to control her to get her out (up) fast and in (down) slowly for the melting scene. I needed a variable speed elevator trap door. I only have 1.5meters of room under our stage so space is limited. Our stage deck lowers in sections (1.2x2.2meters each) so I dropped two sections down to their lowest points and built a 4.4 x 2.2 meter false stage plug with a round opening for a trap door.
The design of the trapdoor was a round plug to sit in the hole in the stage floor, which was in turn mounted to its own platform that could be raised and lowered.
Hardware for the trap mechanism included …
- 4 stainless steel, brushed posts about 3.2cm diameter
- 8 flanges to hold the posts in place (4 top and 4 bottom)
- Glide flanges with vertical bearings for guiding the actual trap platform which carries the trap door up and down
- One fixed castor to ride under the trap and PUSH the trap upward or carry it downward attached to…
- One 2.6 meter length of steel pipe used for the lever (7.5cm diameter, 6mm wall thickness).
- one 2”x6" upright brace for my pivot point.
See attached pics and video to see the final product.
It took about 15 hours to put this project together and I spent about 1000 USD on the entire project. A moderately expensive effect, BUT I have all the component pieces to throw together as needed for future shows.
To finish the effect for the witch entrances and exits, I added flash pots, a smoke machine, a C02 fire extinguisher and a strobe lighting effect with our Martin intelligent lights. For the melting scene, I had Dorothy throw sequins on my witch, and of course a shot or two of well placed smoke from below.
I added a live video monitor under stage so the crew could see what they were doing. I mounted an ipad in the catwalks pointed at the stage and an apple tv with monitor below deck.
This was a necessary safety feature for my kids so they could see and ready themselves when it was time to cue up the witch exits (i.e. before she steps on the trap, the upright support leg for the trap must be removed and of course my three boys have to get down on that lever and hold the trap in place as she steps onto it from above. This took practice to perfect. I had my crew sit with the performer face-to-face and talk it through step by step and look her in the eye everyday and tell her “We’ve got your back.” As the actor realized the crew was going to hold her up, she released her concern and focused on playing her part. My stage-manager wrote in a sequence of 9 or 10 different warnings and standbys for each entrance and exit. Once they got the sequence it was a precision and beautiful operation to listen to on comms.
It took…
- three strong boys to operate the lever for the trap (my witch was about 118 lbs) and the trap itself on the ‘floating’ platform was 40 lbs but that was counter-weighted below on the lever. But I needed those three strong guys to rocket the witch upward on cue and bring her in safely.
- One student on the hinged upright leg to pop into place once the trap was in the upright position so performers on deck can walk on the trap and again to release the leg when it was time to cue up to bring her in.
- One student on clear-com headset for comms. w/ the stage-manager
- One to assist the actor who played the witch get on and off the trap below deck with her costume, broom, hat, etc… (Our smoke operator always ‘pre-loaded’ the witch’s costume.. cape & hat, with a shot of fog. Cool effect.
- One to operate the flash-pot igniters on cue.
It took several hours to train the crew to operate the apparatus and we notched in a good 20 minutes of ‘rehearsal’ per day to get the crew and the actor focused in on the procedure. Safety was obviously key. I laid it out very directly with the kids. One mishap and our performer was going to end up with an injury which could happen in various ways. I had them go through possible injury points through mishandling. They wrote them down… memorized them, and found solutions and work-arounds to avoid those problems. We worked it out and they did a perfect job. Very proud of my freshman crew-members and glad I had three big brutes for muscle and an OCD girl on headset. We called them the gang of seven. J
I hope this comes in handy for some of you. I’m proud of this solution and as you can see, the final result was very cool.
Link to videos of trap door in action.
- http://www.concordiashanghai.org/wp-content/uploads/2014/05/trap_1489.mov
- http://www.concordiashanghai.org/wp-content/uploads/2014/05/trap-2_1490.mov
- http://www.concordiashanghai.org/wp-content/uploads/2014/05/trap-3_1491.mov
Best
Chad
![photo 1[1].JPG](https://www.controlbooth.com/data/attachments/9/9369-57c61b5147f8758a4538df691a51e15b.jpg "photo 1[1].JPG")
![photo 1[2].JPG](https://www.controlbooth.com/data/attachments/9/9368-a750dbffb14db413e981a8d7065ff5fc.jpg "photo 1[2].JPG")