My curved staircase.

SHCP

Well-Known Member
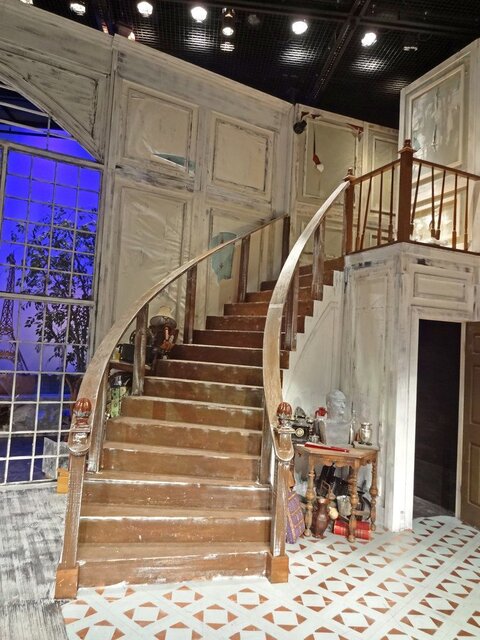
I thought I would post pics of the curved staircase I am working for The Miser.

It's a modular design, with treads that are 1' at the outside and 6" on the inside. The riser has a 14" overhand that bolts to the rear of the lower step's 7" rear support, making a 7 1/4 inch rise for each step. Its working out very well. The platform is at 9'.
I added plywood shear support to the back of every 4th stair support. It is very stable.
Now I just have to figger out the railing....
Tim

https://docs.google.com/a/shcp.edu/document/d/1l5KPnWk34JpIpcc6VEU-yIQtnrSUeL9e4-1tz97uenU/edit

MahoneyStaircase.jpgCurvedStep.jpgCurved Staircase.jpg
 
Decide on whatever profile for your handrail. Figure the total run you will need and add a little. Take two sets of handrail and rip them in an alternating progression. The easiest way is to use the width of the saw kerf of your table saw. Make alternating rips so you can assemble one handrail from the rips. Place a series of nails on the steps so as you assemble it takes on the exact curve as built. Then just start glueing and clamping. It's not quick and requires so very good measuring but is still simple math.
 
Decide on whatever profile for your handrail. Figure the total run you will need and add a little. Take two sets of handrail and rip them in an alternating progression. The easiest way is to use the width of the saw kerf of your table saw. Make alternating rips so you can assemble one handrail from the rips. Place a series of nails on the steps so as you assemble it takes on the exact curve as built. Then just start glueing and clamping. It's not quick and requires so very good measuring but is still simple math.

Thanks very much! I will post images as the set progresses.
Tim
 
Really neat stair, well done! Now, for the railing. This method may or may not work for you, but I have made a number of curved and sprial railings over the years, from 1" diameter to 6" diameter, using Schedule 40 pvc pipe. The method is simply heat forming, exactly the same way commercial electricians bend custom shapes in PVC conduit. For the larger lengths and diameters I used the heat oven from our vacuform machine, to heat a 3' to 4' length at a time. You can use a row of 6 to 10 150w heat lamps, the re purposed heat element from a room heater or....(use your imigination, but NO DIRECT FLAME!!!!) The method is simple, get a pipe about 2' longer than the finished rail. If you have to make it in pieces, you will need to make short wood internal splice dowels. Fill the pipe with sand and close the ends with gaff. The sand prevents kinking or sagging and helps hold the heat so you have time to do the forming. Next, using 1/8" luan or maso, make a 6" to 12" wide temporary ramp on the rough built step unit to match the slope and curve of the desired railing. Heat up the pipe and sand until it is soft enough to bend. Work in sections to suit your heat soure Place it on the ramp with about a foot of over hang at each end and curve it to the shape. Put blocks on each side to help hold it in place until it cools then repeat for each section. The ends never curve smooth, so plan for an extra foot at each end, then cut it where the curve is still smooth before joining or adding finials. Once formed, the pipe is very strong and you can screw or bolt hardware to it. Spindles can be counter sunk into it. Once we drilled a 1/2" hole in the top of the rail above each spindle, used that as an access hole to screw through the bottom of the rail into the top of the spindle. The hole was later filled with Bondo and sanded smooth. Once the rail is installed, you can dress it up in many ways with trim. Ethafoam cut to half round, many small decorative wood trims are flexible enough to bend along large curves, etc.

Hope this helps. Questions? Just ask.
 
Last edited:
Great advice! Thanks!
Tim

Really neat stair, well done! Now, for the railing. This method may or may not work for you, but I have made a number of curved and sprial railings over the years, from 1" diameter to 6" diameter, using Schedule 40 pvc pipe. The method is simply heat forming, exactly the same way commercial electricians bend custom shapes in PVC conduit. For the larger lengths and diameters I used the heat oven from our vacuform machine, to heat a 3' to 4' length at a time. You can use a row of 6 to 10 150w heat lamps, the re purposed heat element from a room heater or....(use your imigination, but NO DIRECT FLAME!!!!) The method is simple, get a pipe about 2' longer than the finished rail. If you have to make it in pieces, you will need to make short wood internal splice dowels. Fill the pipe with sand and close the ends with gaff. The sand prevents kinking or sagging and helps hold the heat so you have time to do the forming. Next, using 1/8" luan or maso, make a 6" to 12" wide temporary ramp on the rough built step unit to match the slope and curve of the desired railing. Heat up the pipe and sand until it is soft enough to bend. Work in sections to suit your heat soure Place it on the ramp with about a foot of over hang at each end and curve it to the shape. Put blocks on each side to help hold it in place until it cools then repeat for each section. The ends never curve smooth, so plan for an extra foot at each end, then cut it where the curve is still smooth before joining or adding finials. Once formed, the pipe is very strong and you can screw or bolt hardware to it. Spindles can be counter sunk into it. Once we drilled a 1/2" hole in the top of the rail above each spindle, used that as an access hole to screw through the bottom of the rail into the top of the spindle. The hole was later filled with Bondo and sanded smooth. Once the rail is installed, you can dress it up in many ways with trim. Ethafoam cut to half round, many small decorative wood trims are flexible enough to bend along large curves, etc.

Hope this helps. Questions? Just ask.
 
Re: My curved staircase. Now with Railing!

I appreciate all the input. It really helped me with my process.

Here is what I did to create my railing:

I took a 1/2" x 5' strip of masonite and screwed it to the outside of the threads, at the outer edge of the top corner, making a curve that followed the stairs up to the top. The maso bent well, and yet still gave me some flexibility and an even curve, (albeit with some convincing). I just kept adding strips until I had a guide that followed the outer edge of the treads the way up the stairs.

Then I took some 1/2 inch plywood and had a helper push it down onto the face of the staircase, overlapping the edge and maso by about two inches. I then took my scribe and drew and line along the bottom, keeping about 1" away from the maso guide.

This left me with the correct outer curve drawn onto the bottom of the plywood.

I then jigsawed out the curve.

I then made a 6" guide block (the width of my railing), and again scribed along the inside of the curve, to make the inner railing, which I cut out.

This left me with a 6" strip of curved plywood that sat perfectly along my 4" posts. The curve was repeatable for making the whole rail in sections out of the plywood. I had to cut out about 5 identical strips. I seamed and attached the bottom curve right to the tops of my posts, bending it and flexing it up the stairs, and then added some 1/2 " thick, 6" wide maso spacers along the top of the ply. I then added the second layer of plywood curve and screwed it to the posts as well.

I repeated the process for the inner rail, which because of the tighter radius, fought me like a banshee. But although it need much more "convincing" to bend and flex, it still fit really well. If I used a better material than plywood, I may have had an easier go. But I knew the strain it would be under, and wanted the stability of plywood.

Then I sanded it down, and plan on filling the gap with strips of whatever I find, most likely gaff tape. The Miser set is pretty forgiving as far as details, since it is meant to be run-down.

I will post pics of the finished set.

Thanks for your help,
Tim
MahoneyStaircaseRailing2.jpgMahoneyStaircaseRailing3.jpgMahoneyStaircaseRailing4.jpg
 
Re: My curved staircase. Now with Railing!

Nice Railing. Piece laminating is a great way to do this, glad you found it.
 
Re: My curved staircase. Now with Railing!

Finished Staircase. Set is not complete, but pretty close. Now I just need to finish the lighting and dressing.
MiserSet10.28.12.jpgMiserSet10.28.12b.jpgMiserSet10.28.12c.jpgMiserSet10.28.12d.jpg
 

Attachments

  • MiserSet10.28.12d.jpg
    MiserSet10.28.12d.jpg
    149.9 KB · Views: 3,833
Re: My curved staircase. Now with Railing!

Job well done! That is definietly one for your portfolio!
 
Re: My curved staircase. Now with Railing!

Nice job, it's always fun when you finish a tough project.
 

Users who are viewing this thread

Back