...
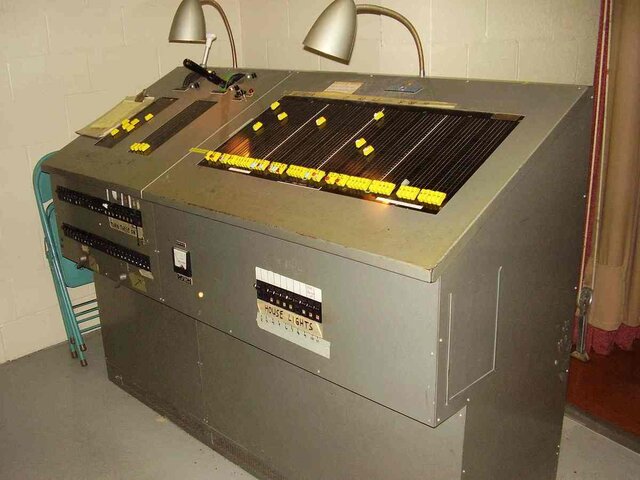
I have essentially no experience with lightboards. Basically, how was this one supposed to function? How do the two small sets of sliders on the left relate to the 60 sliders on the right? And what should the two large levers on the left do? And are the switches on the lower front of the
unit basic
circuit breakers?...
Disclaimer: Some of the following may not be 100% accurate, as I can't read any of the dyna-groove labels, or most of the handwritten
masking tape labels, but here goes...
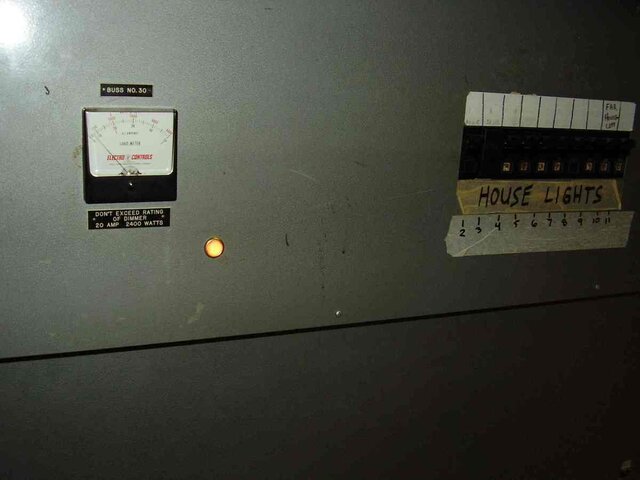
The "switches" on the front ARE
circuit breakers. It appears the ones above the "turn these on" are constant
power for "PA
System," "
stage screen," and "Keep On." (If only
everything were labeled with
P-Touch labels!)
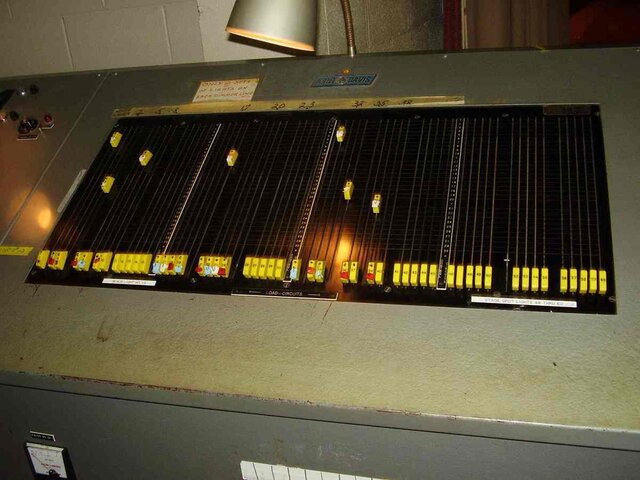
Slider
Patch Panel. The sixty sliders on the right are the lighting circuits, but I bet there really aren't that many. Boards like this were often built to
stock sizes, or over-sized for future expansion which never happened. The female
connector to which you
plug in a light should have a number 1-60. You then find that number's slider and, by moving the slider upwards and letting it go on the horizontal 1-12, you've "selected" which
dimmer will control that
circuit. The sliders often want to stick at odd places, you generally lift the handle slightly and often have to jiggle it to get it to lock into the
dimmer you want it to be. If you slide the slider to slot#30, then press and hold the
button on the
meter (or maybe turn ON the
meter's
circuit breaker) the
meter will tell you how many watts you have on that
circuit. It's possible to assign every
circuit to any one
dimmer, and thus over load the
dimmer and trip it's
circuit breaker immediately. I'm pretty sure each of the twelve dimmers is only 2400watts, and it's possible that the total load on dimmers 1-6 can only be a total of 6000watts, likewise with dimmers 7-12.
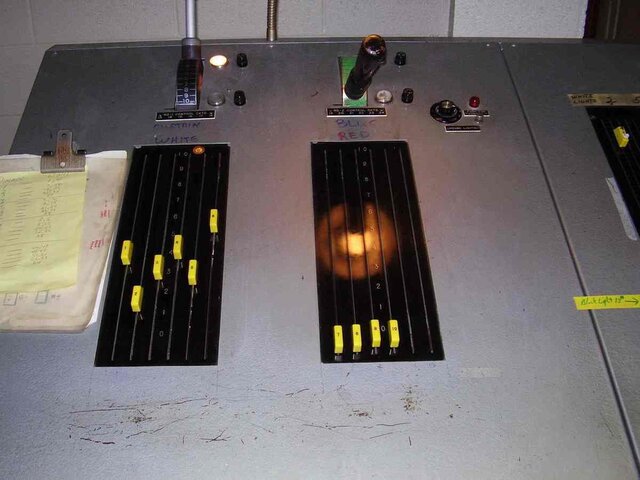
One the left side: The large handle [labeled CURTAIN WHITE] above dimmers 1-6 is the master for those dimmers. Setting
dimmer#1 at 5 (50%) and bringing the master to 5 (50%) also, will bring the lights on
dimmer#1 to 25%. Repeat for dimmers 2-6. The other master [labeled BLUE RED] above dimmers 7-12 works exactly the same way.
I admit to having no clue what the 2 large handled switches are with the hand-drawn arrows at 2 o'clock, I'm guessing it's some sort of transfer or possibly repatch capability, but probably doesn't work, hence the
masking tape labels.
In your first post you said "The
venue’s personnel will provide some basic instruction..." so I'm sure they know how to work the
system to it's best advantage. You probably won't have to change anything on the slider patch. Be aware when fading just one
dimmer the brush inside will sometimes lose contact and the lights on that
dimmer may flicker off and back on, no real way to avoid this, I'm sure the brushes are old and worn.
This board was designed to basically operate thusly: With no lights on and both masters at 0 (00%) set the desired levers for dimmers 1-12, then
fade up both masters to 10 (100%). [Single scene preset] At the end of the scene,
fade both masters out and reset dimmers 1-12 to new levels, and
fade the masters back up. The two masters don't have to work together however. Another thing, if you need a quick
blackout, DO NOT slam the masters! This is very hard on the mechanics and electrical contacts. There should be a
switch or
breaker for each master and it's much better the
switch OFF then gentle bring the handle to zero, then turn the
switch back on. That may be what the big switches on the front are for. At 2 o'clock they work as I've described above. At 12 o'clock, they're OFF. At 10 o'clock, they may act as 2 6000w dimmers, but you have no
power to dimmers 1-6 if
switch on the front is not at 2 o'clock.
This all sounds more confusing than it really is. The board will be a challenge, and many would scoff at it, but this type of control was how it was done in every
theatre in the US from 1900 until 1975, including every Broadway musical. Many would argue that learning lighting on a
system like this makes one a better designer when using a
Light Palette, which actually uses many of the same concepts (
tracking vs. non-tracking).
I'm sure the
venue personnel can and will explain all this in better detail than I can. Good luck, have fun. Never let them see you sweat.