Building a curved ramp

Eriksrocks

Member
Hello! I was hoping you guys could help us with some advice on how to build a curved ramp. I tried searching for something like this but to my surprise I couldn't find anything. Rather than try and explain it I think it will just be easiest to show you the shape we are trying to build:

proxy.php


The obvious problem is that even if we had a piece of plywood big enough, the top surface can't be cut out of one single flat piece of wood because it has a sort of twist to it to remain flat/parallel with the stage at the top and bottom edges. I imagine this type of stuff is built all the time, so what's the best way to go about it?

I'm mainly concerned about how to do the surface - it's going to have to be made out of multiple pieces, but how? Tessellate it using triangles? Use a bunch of rectangular slats of equal size that follow the arc up?

It has to be made out of wood and be able to support several people. I wish we could do metal but we don't have the skills or materials.

Attached is a PDF with plan and section views if they are helpful.

Thanks so much!
 

Attachments

  • Theophilus.pdf
    80.3 KB · Views: 954
The easiest way to approach non-rectangular ramps is usually to build a series of frames of increasing height to act as legs, spacing them about 2' apart, and then running stringers between them on-site, cross bracing as needed, then applying a plywood deck.

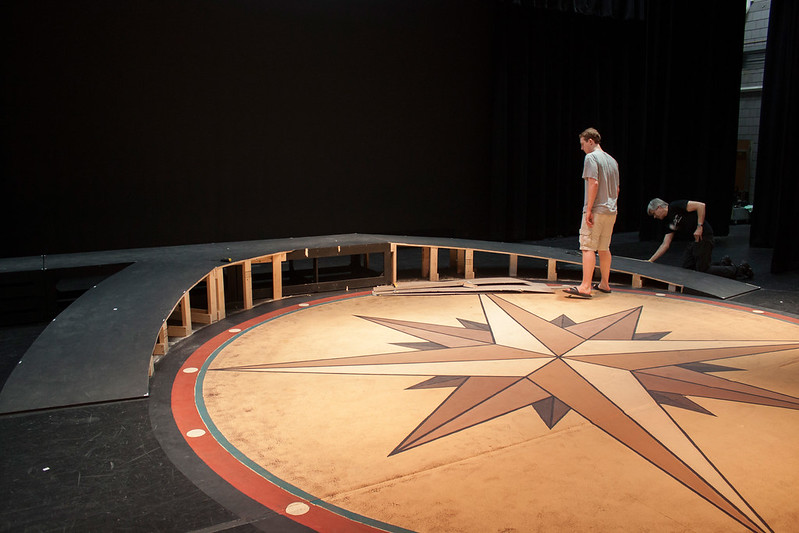
For a curved, concentric circle (helix) ramp like this, I would make the frames (rake gates) the same width as the ramp surface, so as to have a starting point for attaching facing later. I'd use the center of the ramp as the radius to measure from, and figure out how long the ramp will be horizontally (diameter times pi, divide by 360, and multiply by number of degrees included by the ramp). This, with the height of the US platform, will let me figure out the average angle the ramp is inclined. The top of each rake gate would then be beveled at that angle, so that the plywood doesn't keep hitting little plateaus every time it crosses a rake gate. The horizontal length will also let me figure out rake gate spacing and heights (I'd probably start the gate spacing from the top end). A spacing slightly under 2' at the outer circumference may be helpful in getting plywood seams to land on gates. The last few gates might need to be various widths of 2x on edge.

Put a nail in the center of your compass rose on the stage floor, and use a string and a stick of chalk to 
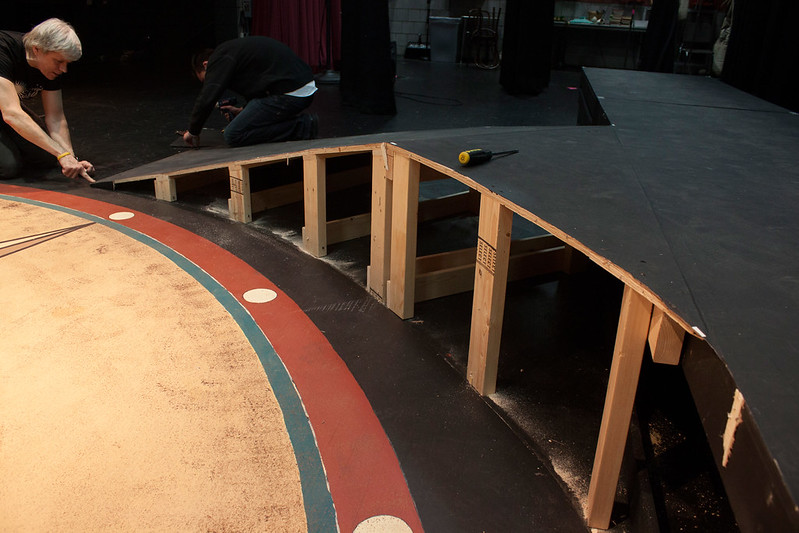
swing the arcs where the ramp will be. Place the rake gates, and use the same string to make sure they're directly in line with the circle center, as rays from the center point. Anchor them to the floor as you go.

Once the gates are in place, add the stringers between the gates. For this, a compound miter saw will be most handy. If your gates are, say, 5 degrees apart, you'll need to cut each end 2.5 degrees, forming a trapezoid as a top view. You'll also need to cut the ramp incline angle in each end, forming a parallelogram as a side view. The inner stringers will be shorter than the outer ones, and the incline angle may be slightly less for the outer ones compared to the inner ones, depending on how big of diameters and widths you're working with - skinny, big diameter circle ramps will have less of a difference than wider ramps and smaller diameters. If your gates are evenly spaced, and accurately placed, you should be able to use the same angles and inner/outer cut lengths between all the gates, at least until you get down to the floor. Keep in mind that the inner stringers need to be placed a couple inches back from the edge of the gate, so that the stringer's straight line doesn't cross into the concave part of the curve.

The plywood will need to be cut in pie-pieces, using the same string-and-chalk (or better yet, a long board) to lay out the arcs and align the square joint ends with the center point. For the shape shown, I think you could get away with simply using the same radii as the footprint, but be aware that the incline will consume more linear footage than the footprint (difference between triangle side and hypotenuse). Cut a couple plywood pieces and test fit them before cutting the rest, in case you have to adjust.

Your profile says 'High School student' - don't be afraid to approach a geometry or trigonometry teacher for help, or find a drafting instructor and say 'I've got a true-size-and-shape problem to work out....'

If you do have to leave some tapered gaps between plywood sections, you can cover the entire thing in a layer of luan for a smooth finished surface, and flush-trim router the edges, or jigsaw it, either very carefully in place, or by tracing, removing, cutting, and replacing. The luan might be a good idea to plan in from the beginning - at the very least, it's a good way to make the transition to the floor as minimal as possible. If you do include it, don't forget to compensate for its thickness when you're figuring gate heights.

One last concern is that your stage right ramp looks to be much shorter, and therefore steeper, than stage left. A ten degree incline doesn't look like much, but it's very noticeable when you're walking around on it. Depending on the action of the show, the steepness may or may not be a problem, but be ready to add traction if needed.

Sounds like a fun project - it'll take some time and careful work to do well, but you'll have something to show off when you're done.


PS - after posting the above, I noticed your dimensioned drawing. Given that the upper end height is only 18", leaving not a lot of room for stringers and crossbracing, and since the ramp surface is one big crossbrace (plus the anchoring effect of the top regular platform), I might be inclined to add more gates to the lower half or so of the ramp, and forgo the other framing members between the closer spaced gates, relying on the plywood to span the gap.
 
Last edited:
Wow, thanks for the amazing response! I'm a bit too tired to try to understand it all right now, but I'm sure we'll be able to figure it out. One question: You say the plywood will have to be cut in "pie pieces". Should these pieces actually come to a point at one end, or are they more like segments of the curve with different size arcs on each end, like this (curvature exaggerated for clarity)?

proxy.php


I'm also a bit confused on what you mean by stringers - do these pieces run between the gates parallel to the circumference of the arc, for lack of a better way to describe it, or do they run parallel to the radius, from the inside of the ramp arc to the outside, or...? Are they plywood like the stringer for a staircase, or are they 2x-type lumber? I'm having trouble visualizing exactly what these look like, where they go, and the cuts we need to make.

Thanks again!
 
Last edited:
WOW ! Great Response FatherMurphy ! Perfect explaination and very easy to follow. These kinds of posts are really what CB is about < to me>.

Erik, Yes typically any piece of wood that spans between two support structures would be reffered to as a " stringer ", sometimes a "spreader" < in furniture >.
Cool project! send in some pictures when your done with it !
 
Yes, the drawing in your second post is what I meant by 'pie shaped', and Van's definition of 'stringer' is the same as mine. The stringers would go from gate to gate, one set running from inside corner to inside corner, and another set running from outside corner to outside corner (additional sets in between those two are optional, depending on how wide your ramp is). I'd use whatever lumber you usually make platform frames from, either 2x4 or 1x6 (or 1x4 for shorter spans) are valid choices.

One followup thought is that depending on how the plywood lays out, it might be worth seeing if you can get 5x10 sheets of plywood, instead of the standard 4x8s. The pie pieces might end up such that you can get only one from a 4x8, but might be able to get two from a 5x10. The extra cost and hassle of finding the bigger sheets might be balanced out by having less waste.
 
You'll probably get some helpful stuff if you go search for "how to build skateboard ramps". What you've got here ain't that different from a lot of stuff that I have seen in various skateparks.
 
You'll probably get some helpful stuff if you go search for "how to build skateboard ramps". What you've got here ain't that different from a lot of stuff that I have seen in various skateparks.

Or sk8rsdad...
 
Don't get me started! I'm still jealous of the concrete terrain that sk8rsdad has shown us in pictures before.

Time for a late night curb session again. Find it, grind it, leave it behind.
 
Father Murphy has a great system and explanation. Perhaps to make the math easier would it make sense to lay it out with tape or drawing on the floor with chalk, then lay the pieces out and build off the marks. Personally I would lay out the plywood tops and let them dictate my framing layout. I like the idea of 5 x 10 if it can be found, plus overlaying it with luan is a good idea. It will cover a multitude of mistakes.
 
Thanks for all the responses! We already had the ground plan taped out on the stage, so what we ended up doing was laying down our 4 x 8 plywood and then tracing out an arc using the nail and string method, guestimating the size so that each pie piece would be 1/4 of the entire arc and so we could fit two pie pieces on each 4 x 8 sheet (there ended up being more than enough room). We slightly over-estimated to account for the hypotenuse, and our director doesn't care exactly where the DS edge of the ramp lands so doing it this way was fast and worked fine.

Once we had one piece cut we used that as a template to make three more copies. So for the SL ramp we will have 4 pie pieces, supported by a board bolted in to the US platform at the top, 3 gates along the arc with the edges of the pie pieces meeting at each gate, and then the last piece also supported by the floor.

I'm hoping that the screws going into the gates will have enough holding power to twist away most of the gaps that will occur between the pie pieces, and luan will cover the rest.

I'll update with photos when we're done!
 
Well, show was last weekend, so I thought I would come back to post some photos and say thanks.

FatherMurphy, your method couldn't have been better. It worked almost flawlessy and we actually didn't need any luan - the plywood pieces had enough give in them to bend the required amount when they met at the gates. As a result we ended up with a nice, flat, gapless surface for each ramp with only the 3/4" plywood. Faced with luan on the sides, taped, and painted black, they looked quite simplistically beautiful - almost perfect geometric shapes. We did end up having to add some center supports in between plywood pieces on the larger ramp, due to flex in the plywood. However, we only used stringers on the back side of the longer ramp, and the smaller ramp didn't need stringers at all.

Now on to the photos! I also designed the lighting for this show and the compass design on the floor, so I thought I would show a couple of shots from the show itself as well. At the bottom are some photos depicting the actual construction of the ramps. Our construction wasn't perfect, but it worked wonderfully during the show and they looked great.

Thanks again for all your help!


Yeah, that turned out great. I've got a soft spot for compasses like that. The whole thing is gorgeous though, it's got a sophisticated simpleness that looks like it would have been a great show to see.
 
Thanks for posting the pics, and glad I could be of help!
 

Users who are viewing this thread

Back