
You are using an out of date browser. It may not display this or other websites correctly.
You should upgrade or use an alternative browser.
You should upgrade or use an alternative browser.
Building/buying rack faceplates for punch outs
- Thread starterIAmLumenator
- Start date
FACTplayers
Active Member
They are very inexpensive on eBay, Sweetwater, and Amazon. Just search "blank rack panels".
For that matter, getting custom plates and panels through an AV dealer isn't all that expensive depending on what you want. Company I work for sources all our custom plates and panels through Whirlwind, though there are others out there. They also take care of any labeling or color coding we may need on our panels.
Well that's neat. Do you provide them with cad-type drawings or do they know your rig intricately enough to help you put connectors in appropriate places?
Go to their website. They have software that runs you through the process.Well that's neat. Do you provide them with cad-type drawings or do they know your rig intricately enough to help you put connectors in appropriate places?
Sent from my Nexus 5 using Tapatalk
Well that's neat. Do you provide them with cad-type drawings or do they know your rig intricately enough to help you put connectors in appropriate places?
We send them CAD drawings, thought there are other ways. Some manufacturers have proprietary software programs you can use. I'm not aware of Whirlwind having a program for this, but generally a diagram is all they need. Could be drawn up on a napkin for all they care, so long as the pertinent information is available for them to complete the fabrication.
Here's what Whirlwind advises for custom gear, though this is skewed more towards full systems than just an individual panel:
Multichannel distribution systems are generally constructed of but not necessarily limited to the following basic building blocks:
Follow these simple guidelines to ensure that the system you want is the one we deliver.
- Input and/or output boxes, panels and wallplates
- Multipin - multipin interconnect cables (C Series)
- Inline multipin to connector fanout (FM series)
- Chassis multipin pre-wired to tails (PK series)
- MASS Punch termination punchdown blocks and panels
- Labeling and engraving
Below, you will find the basic components necessary for specifying your custom wiring system. Follow the links and refer to the component part number charts as an aid in determining the options available when constructing your diagram.
- MAKE A DIAGRAM. Include all of the boxes, panels and cables. Specify each connector type and gender, all lengths of cables and indicate all labels or engraving.
- Follow these design rules to ensure system and connector compatibility:
- When specifying connectors, a male connector must always mate with a female connector.
- Male connectors are those with exposed contacts (pins) and female connectors are those with recessed contacts (sockets).
- For Whirlwind W3, W4, W5 and W6 MASS and MicroMASS connectors which have both male and female contacts, it is necessary to change connector gender terminology to “Wired as OUTPUT” (O) and “Wired asINPUT” (I). An OUTPUT MASS connector must always be matched by anINPUT MASS connector.
- Remember, the total number of input and output channels cannot exceed the capacity of the multipair cable and multipin connectors you are specifying. It seems obvious but can slip by when changes are made. If you specify 32 inputs with 16 returns (48 total channels), you can't use a W3 with its maximum capacity of 40 channels.
But remember, the design of your custom system is only limited by your imagination and “wish list”. Visit the Whirlwind Custom Shop to get some ideas and view some examples of our capabilities.
In addition, our design specialists are always available to help guide you through to your dream system. Contact them at:[email protected] or call toll free, 800-733-9473 Mon - Fri Eastern Time.
Here's a good overview of some of the things they can do, though their capabilities are certainly not limited to these styles and options:

cbarrett92
Member
I hope this doesn't violate the TOS (If it does, I sincerely apologize!), but here is company I have had good dealings with. Redco Audio has an easy to use panel designer and they really do good work.
http://www.redco.com/Redco-Custom-Panel-Designer.html
If you have any questions contact Chris Stubbs and he can answer any question you have.
--
This may sound spammy, but I have had many orders with them, and have always been happy. They are also a small company, and I enjoy supporting those types of businesses when I can.
I hope this doesn't violate the TOS (If it does, I sincerely apologize!
As long as you aren't a representative of Redco, you're fine.
")
Sent from my Moto X

themuzicman
Well-Known Member
A lot of the NYC audio shops use things like this: http://www.middleatlantic.com/rackac/ucp/custom.htm, some use the 2U variation on this for NL8 and large connectors, and everyone else uses a slightly different variation that is 1U and can house 3 rectangle plates you mound various adapters in. If you've worked a touring musical changes are you'll see this type of rack faceplate because it allows racks with any configuration of inputs to be quickly built for tours and shows.
BillESC
Well-Known Member
Bill, what method do you use to make labels for the panel?
We can etch which is the best or use vinyl which costs less.
You can purchase blank panels from a number of sources and build your own or have someone do it for you based on drawings you send them.
When you have the work done by a third party there are often several options such as whether you want the panel just punched for you to fill with connectors or if you want them to install the connectors for you. You can also often order panels with engraved labeling if they offer that option (with or without ther connectors installed).
One comment is that for punched plates I prefer to use flanged blank panels rather than flat panels, it provides a little more support once they're punched. I also watch how large the poanels get, if you have a large panel with a large number of holes in it you may want to consider adding supplemental stiffening to the back of the panel.
Common provideers of custom panels are Whirlwind, RCI Custom Products, Middle Atlantic, TecNec Distributing, Panel Authority and many others.
One alternative to custom rack panels is the modular panels offered by Ace Backstage, Switchcraft and AVP that have standardized cutouts and a variety of available modular inserts (see http://www.switchcraft.com/productsummary.aspx?Parent=740 for an example). I have started using more of these as they can be readily modified or expanded if anything changes in the future.
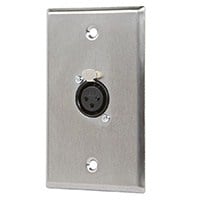
Bill what do you use to punch you holes? I prefer rear mounting connectors, but the punches I have used don't leave as nice of a hole as I would like, so I end up front mounting like your pictures. Do, you fine the same results, or is it just your preference to front mount?
(I mean the difference between picture A and picture B).
Picture A
Picture B
It seems like the latch might not always work properly if the body is inside.
Picture A

Picture B
It seems like the latch might not always work properly if the body is inside.
Generally, front mounting a connector has one significant advantage, it will hide a slightly inaccurately machined hole, whereas a back mount will show that up.
front mounting is also more tolerant of different depths of panel, rear mounting has a fairly limited scope making it most useful on steel, aluminium and some plastics only.
Other that that, mount from the back always...
front mounting is also more tolerant of different depths of panel, rear mounting has a fairly limited scope making it most useful on steel, aluminium and some plastics only.
Other that that, mount from the back always...
Similar threads
- Replies
- 12
- Views
- 1K
- Replies
- 0
- Views
- 373
- Replies
- 2
- Views
- 794
- Replies
- 8
- Views
- 2K
Users who are viewing this thread
Total: 1 (members: 0, guests: 1)