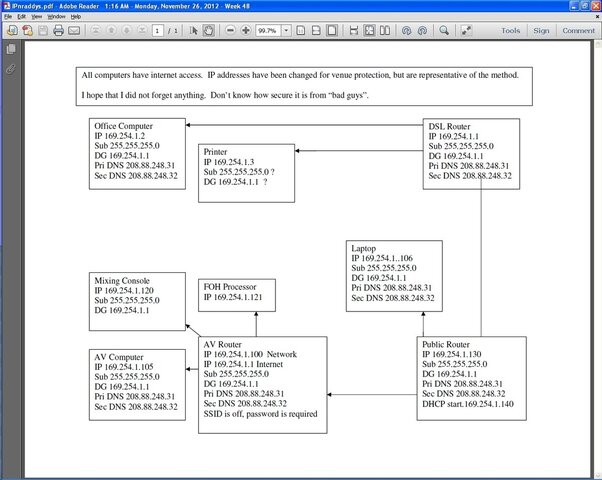
Wireless by Tom Boisseau - Version 2
Networking with LS9 & Windows XP or Vista
FIRST THINGS FIRST! Go to:
Firmware and Software | Downloads | Yamaha . Download the latest version of “DME-N
Network Driver”, “Studio Manager”, and “LS9 Editor” and install them IN THAT ORDER on your PC. Then download the latest version of the “LS9 Firmware”. Install the firmware by loading the file to the root directory of a thumb drive; insert the thumb drive into the LS9 and
power up the LS9. The LS9 will detect the file. When prompted, push the “INC”
button on the LS9 to begin the update. [Note: “DME-N Driver Installation Guide” and “Editor Installation Guide”are also available at the above site and may provide additional insights.]
DME
NETWORK DRIVER SETUP
- Click on “Start” menu of your computer and then click on “Control Panel”
- Double click on the “DME
Network Driver”
- Click on “New”
button (The middle section should allow for data to be entered).
- Enter “Device Name” (I.E., “LS9”)
- Enter “Device IP
Address” (MUST be same
address as on the LS9) [default = 192.168.0.128]
- Enter “Device
MAC Address” (MUST be same
address as on the LS9) [mine is = 00 A0 DE 25 AF 78]
- Select “Device Port No.” as “1”
- Click “Apply” then click “Save and Close”
NETWORK SETUP
- Click on “Start” menu and then click on “Control Panel”
- Double click on “
Network Connections”
- Right click on “Local Area Connection” and then click on “Properties”
[For wireless networking right click on “Wireless Network Connection”, click on “Properties” & follow same steps below]
- Select “General”
tab, scroll to & click on “Internet
Protocol (TCP/IP)” (for Vista use “(TCP/IPv4)”) & click on “Properties”
- Select “Use the following IP
Address” and enter a Static IP
Address [NOTE 1]
(I.E., 192.168.0.130) ***DO NOT USE THE SAME NUMBER AS THE
CONSOLE*** [NOTE 2]
- Set the Subnet Mask (I.E. 255.255.255.0) and click on “OK” (Use the same number provided on the
console)
- Click “OK” on “Internet
Protocol (TCP/IP) Properties” box
[For wireless networking click “OK” on “Wireless Network Connection Properties” box]
- Click “Okay” (if “Okay” is not present click “Close”) on “Local Area Connection Properties” box
- Close “
Network Connections” box
[For wireless networking click “OK” on “Wireless Network Connection Properties” box]
- Restart Computer [not always necessary]
- Turn off all Firewalls. (I.E., Norton, Symantec,
etc… & Turn off Windows Firewall. [not always necessary]
STUDIO MANAGER SETUP (steps with * may need to be repeated each time Studio Manager is launched)
* Launch Studio Manager
- Select “File”, then “Setup” then “Modify Workspace”
- Add “LS9” from “Device Editor” to the “Workspace” [NOTE 3]
* Select “
MIDI Ports” and “check” identical (the same) “Input Port” & “Output Port” & click “Apply” [NOTE 3]
* Click “OK” on the “Setup for …” box
* Double-click on the LS9 Icon and open LS9 Editor
* Click on “File” and select “
System Set Up”
* Select identical (the same) “Input Port” and “Output Port” [NOTE 3]
* Enter “Administrator Password”, if you have set one, (same as on the LS9) and click “OK” [NOTE 3]
* Click on “Synchronization” and select “Re-Synchronizing”
* Select “
Console -> PC” or “PC ->
Console” and click “OK” (WARNING: It is most always best to select “
Console -> PC”)
After “Re-Synchronizing” is completed, you should be good to go!
NOTE 1: It may be necessary to change this setting back to “Obtain an IP
address automatically” in order to later connect to the Internet or certain networks.
NOTE 2: If you have already set up your PC for control via a “wired”
Ethernet connection or have already set up your PC for wireless connection, you will need to enter a different Static IP
Address so the two do not conflict (I.E., 192.168.0.131).
NOTE 3: Click “Set Default” to make LS9 default
console, other wise you must repeat these steps each time you launch Studio Manager.
NOTE REGARDING DIRECT CONNECTION CABLES: You may use either a “Standard”
Ethernet cable or a “
Crossover” cable for a direct connection between an LS9 and a PC. (NOTE: Some of
Yamaha’s other consoles require a
crossover cable for direct connection to a PC).
NOTE REGARDING ROUTERS: When connecting THROUGH a
router, use a “Standard”
Ethernet cable to the PC and either a “Standard” or “
Crossover” cable to the LS9. Connect these cables to the
router outputs ports ONLY (LAN ports). Do NOT connect to the port on the
router labeled “Internet” or “WAN”. The steps above are the same whether you use a direct connection or connect through a
router.

 is trying to say is....