
Around six months ago I bought some c.1911 and other accessories as well as some lighting fixtures of the same date as with others later. Photos have been posted over the year of some of the more amazing say clock work accessories. Big problem got solved early on in area to display the gear at work, and also make room for more gear from the buy. Bigger problem remained in given the amount of the accessories, I could either display the old lights as they are with accessories or buy more in duplicate to mount the accessories. Baby threw into scrap any concept of buying lights for now, much less old lights are mostly over priced in being classic. Old stage lighting should also be displayed without accessories to them if on display. Decided, a c.1928 6" PC fixture wasn’t that hard to reproduce, I would make my own instead of paying money for duplicates. Turned out to be a long and very hard process in even using modern techniques but each part hand stamped and made, than custom fitted. Still... six of them one day away from finally being done - just a trip to the paint shop for the yokes and mounting brackets and they can be mounted finally... and I can close up shop for the winter in parking my car in it.
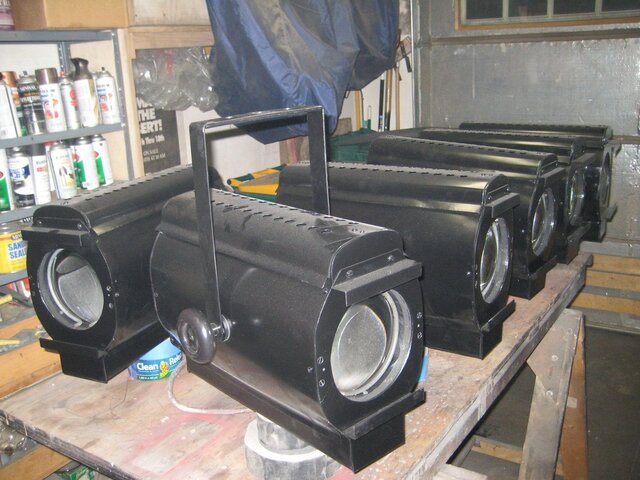
Photo attached of the c.2012 copies of how it was done in two Major and Madelite versionsions copied from c.1928-1911 lighting PC fixtures to mount the accessories. Learning process and even though the blanks are toast, I know how to do this. Fixtures totally work and are up to modern grounding and wiring standards. More photos if wanted of details. In filament adjustment screw I even improved the design so as to mount the only old lamp still sold, the G-30 400G30/SP lamp. A little more elevation in the height mechanism makes that possible given a styled after but new lamp socket design for it. Fixtures will work on show site as per older ones in proper wattage, only they will also do the ““prop light”” concept in lower wattage lamp too without the socket extender. Done and onto some Bantam Superspots I got in bulk but need some essential parts that will be hard to do and a concept of why they were done the way they were. Got some experience with this brand and will figure it out with time. Mostly... work shop closed up for the season this weekend will do Me, Wife and Baby well in time spent out of the garage.
Given many of the effects accessories are scene machine projected slides, there will be options for where I work to present cut glass gobo's as it were to fit into these scene machine slides. Once the fixtures are hung, I suspect the slides will be easier to get in say one as per antique in like forest or castle effect that will have been used and one with a corporate logo for who made it will be easy to get made. TBA something to work on.
Gonna be amazing this new display room for accessories as with once I rehang the main inventory in making room for like 20x more lights to add.
I physically made these fixturs from scratch - all parts of them other than wooden parts sent out to be turned by a friend's dad or limited welding needed (rear of the fixture not shown.) Like atop my world now above other things I have created over the years. Made some 1928 style PC fixtures from scratch. Every day from now on when I sit in the lunch room at work, I will get to see the months of work in creation of them as with other stuff when I walk about the shop that will last longer than I do.
Kind of a kick that when I got out of college, I wanted to set the world on fire with my new set designs, or at least become the "Grumpy old man of the theater" in finding a place I could settle down at. Settle down I did in just getting a very healty and respectable raise thru my wiring/fixture work in something I only minored in college on in study of and only had to do also for design but now is career. Work likes and helps support my work on the museum gear.
Attachments
Last edited:
