question about video lighting

blalew

Active Member
I have appreciated this forum in it's breadth & depth of knowledge but also with regard to how helpful folks here are. My first real post...

I have a very small setup in a classroom for videotaping. There's a 6' x 12' (wide) x 6" stage. I've decided to light it as two 6' areas that should blend, which is the problem I'm having.

Lighting consists of four S4 Jr Zoom fixtures w/ R132, two hitting each area at 45degree angles. I'm also using S4 PARs w/ WFL as toplight. I can't remember the throw distances at the moment but the ceiling is approx 12'. The S4 Jr Zooms are set to about 30 deg.

My problem - I'm basically trying to create a nice, even field, lit from 45s & toplight. I've read some of Shelley's book & he mentions the "slinky method" of getting beam angles to touch, but that only seems possibly with straight front light. Not to mention I have the zoom option, and I'm not clear on how to set it.

Obviously I'm very limited in my options here and I realize video is not very forgiving. I also realize I may be in over my head :) Thanks for any input.
 
Take a look at this article John Jackman is good at an approach that is not big budget

Light Right - A Crash Course In Lighting Video, John Jackman

in GENERAL, and just an opinion, the source4 jr will not be very helpful
Fresnel lens fixtures are much more useful, UNLESS you want a very dramatic type lighting. A lot of tv studios are using more of the advanced Florescent fixtures

http://www.dvinfo.net/forum/photon-management/235735-budget-fluorescent-fixtures.html

here are some ideas on the do it your self method

http://www.bmyers.com/public/857.cfm?sd=30

Basically what you typically want is a more even light than you are going to get with a few Source4 Jr's

Sharyn
 
Last edited:
I just Googled "slinky method" and the second or third item on the results page was this.

There is a diagram at the top of page 225 that shows five overlapping pools of light, but on page 226, figure 9.55 shows the slinky method of lighting using three instruments that are above the stage and off to one side (Stage Right).

If I was lighting your stage with the slinky method and your Source Four Jr.s, I would divide the stage into thirds. Aim two SF Jr.s at 45-degree angles (90 degrees to each other) so their hot spots are 1/3 of the way across the stage from side to side. Aim the other two SF Jr.s the same way with their hot spots 2/3 of the way across the stage. Then use the zoom adjustment so the edge of the beam from the two 1/3 instruments just touches the hot spot of the beam from the 2/3 instruments, and the edge of the beam from the 2/3 instruments just touches the hot spot of the 1/3 instruments.

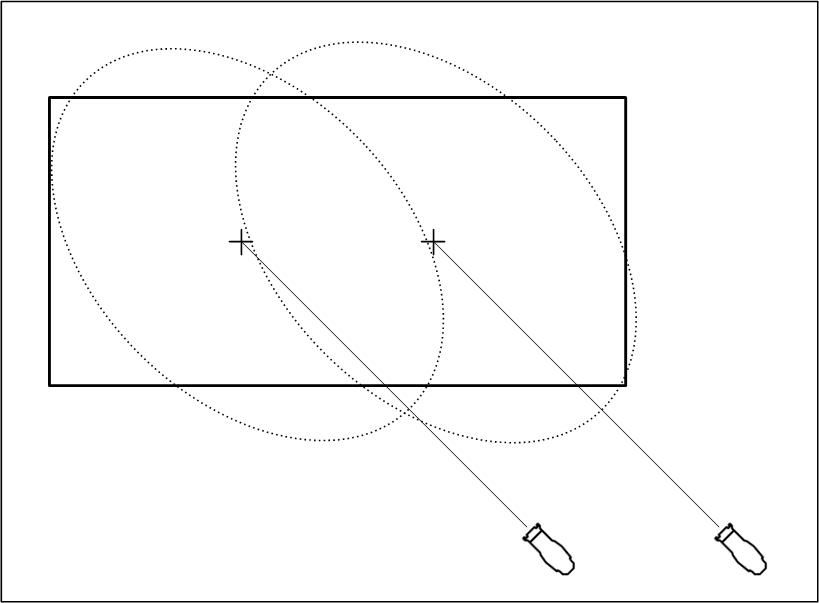
As they say a picture is worth a thousand words, here is a drawing I made in Visio that illustrates my point. I probably used the wrong symbol for a Source Four, and I totally guessed on the ellipses, but you should be able to get the general idea.

proxy.php


This drawing is for two of the Source Four Jr.s. Just put the other two House Left and repeat the procedure.

Hope this helps! ;)
 
You'd still be hot in the center, Phil. In order to make the slinky method work, one must align the edge of one field angle with the edge of another fixture's beam angle.

blalew, I'd opt for only one S4-Jr. fixture per side, zoomed wide enough to cover the entire stage. If the unit wouldn't go wide enough, I'd move the mounting position back farther, and probably use two fixtures per side with their beams exactly overlapping one another for more intensity.

SHARYNF is spot on--the primary facelight fixture in studios is the Fresnel, with a lens and wattage large enough to cover the desired area with one fixture.
 
If I was lighting your stage with the slinky method and your Source Four Jr.s, I would divide the stage into thirds. Aim two SF Jr.s at 45-degree angles (90 degrees to each other) so their hot spots are 1/3 of the way across the stage from side to side. Aim the other two SF Jr.s the same way with their hot spots 2/3 of the way across the stage. Then use the zoom adjustment so the edge of the beam from the two 1/3 instruments just touches the hot spot of the beam from the 2/3 instruments, and the edge of the beam from the 2/3 instruments just touches the hot spot of the 1/3 instruments.

I think I understand what you're trying to say. I was attempting to do something like this but couldn't seem to figure out how big to zoom, so I'll give it a shot to see how it looks. I also have some R100 that I can try to use to soften the light.

I may also try to zoom the fixtures out all the way to see if I can cover the entire area with both lights, but it seems I'd be doing a lot of cutting to keep light off of a video projection screen above :)

For toplight I have S4 PARs w/ WFL lens. Again, I'm having trouble with hotspots & holes, and for the same reason - I realize I'm just trying to put one fixture on one area without thinking about the proper amount of overlap. I'm thinking of trying out the XWFL (60 degree) and focusing both toplights to basically the same spot. Might need some barn doors though to keep it off the video screen?

BTW, thanks to all who responded. I appreciate your expertise & opinions.
 
Last edited:
Blalew and xander, thanks for the props, but scroll up and read Derek's post. He knows a lot more about this than I do and he has a lot more experience (I'm a Flyman).

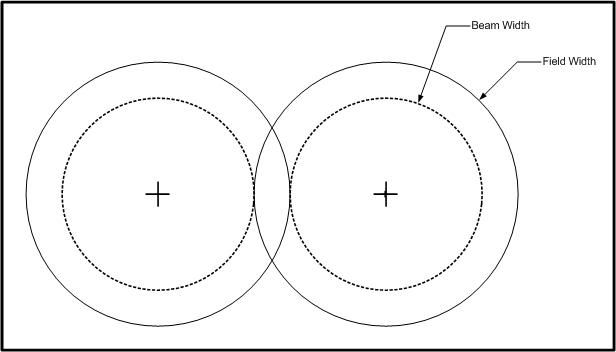
Derek, did you mean something like this?

proxy.php


(It was a lot easier for drafting purposes to use circles than ellipses. Unfortunately, VectorWorks isn't in my budget at the moment, nor is being a student <sigh>)
 
Personally, I'd go the opposite direction altogether.

Use your S4 Pars as your front light as blending will be better and use the zooms for high back left and right lighting.
 
To philhaney, not that I want to speak for darek, but yes, I think that is exactly what he means. That is the correct use of the slinky method.

To billesc, I thought about this as well but it can be a little difficult to blend pars perfectly as well. If you can cover the entire area with one par that might be great. Also, the new info that there is a projection screen to worry about may make the par idea not so great.

But, there is nothing like good old trial and error and everybody's ideas here are good.

my $.02
 
This is just my opinion but having decades of experience with video, using the Source 4 jr for general lighting in a tv studio setup that you need to have even is extremely difficult, and you will go crazy trying to get it to work.
You are right in the area where the Video guys and the Stage Lighting guys usually are about to kill one another

1 a video camera has a totally different level of contrast than the eye
2 basically you need to have a seamless edge blending to get it even wash
3 IF you want to have a theatrical look, then that is one thing, if you want it for a tv filming type set then you need a totally different tool
4 if you try to do it this way and the talent moves and you need to have the camera follow you are either going to run into auto shutter/iris changes that become very visible, or your camera people will need to have some one on the headset constantly giving them manual cues. It will be extremely difficult to correct things unless the person making the correct has a view of the image the camera is capturing and this means an external real monitor, the 2 1/2 LCD on the camera is NOT going to do it.
4 You are going to constantly be fighting under exposed and over exposed areas. Cameras with a zebra pattern will help.


It is joke if you need to screw in a screw get a screw driver sure you can hammer it in if you want to but.... Different instruments are designed for different lighting tasks

You can put together a fluorescent set up that will work and make you life much easier for not a lot of money. \
But that is just my opinion ;-))))

Sharyn
 
SharynF, thanks for all the input. Wow, didn't realize this would be a problem... we do have a Sony 13" PVM that I'm using to check the image, but the camera work will be strictly point/shoot amateur op. This is an improvement from the flourescent light bars that they had hanging overhead. So we'll just do our best at this point... it will be a big improvement but I didn't realize we'd probably need more of a studio setup than a stage setup.

Is this the reason that, when doing IMAG for concerts, people will use followspots? Seems it'd be really difficult to get an even wash in a concert-type environment where IMAG/video is a big part of the show. Although I guess also most of the talent isn't walking from area to area either...
 
There has been a big move to using fluorescent lights in TV these days due to the even light and low heat. Color corrected they work quite well. A few of the multi tube fixtures with some color correcting gel would work well.

At a concert for IMAG typically you are doing a close up shot and you are looking for that "concert Look' so odd colors and shading are acceptable. In addition typically at a concert you have a colored wash in the back and then white/amber in the front light

If you have an intercom system with the camera person then the person mixing or recording can tell the camera operator what to do. As I mentioned the main issue is over/underexposed sections in the image.

Typically in the old days people just used a lot of Fresnels but that made the set very very hot

Playaround with some fluorescent fixtures if you have the time and see what you think, The pro's mount them on stands or yokes that allow for the panel to be tilted

another thing you could try is to use light reflectors, these could be good sized pieces of art board, point the S4 at the board and use the board to give you a difussed light.
Basically what you are trying to achieve is a even "non edged" light


Sharyn
 
Last edited:
I definitely appreciate all the help. And I've certainly learned a lot along the way. Isn't that the way it's supposed to be?

Aside on the slinky method... seems very difficult to do with 45/45 lighting (a la McCandless). Seems to work better with straight front or top. But I digress.

Speaking of having a hammer, I decided to borrow a tactic from audio land (something I'm a lot more comfortable & experienced with). Along with derekleffew's suggestion to cover the entire stage with both fixtures, I think I've got a reasonably good 1st cut. Here's what I did.

In audio, generally speaking :lol: when aiming a loudspeaker at a listening area, you point the loudspeaker at the furthest seats. (Assuming you need just one speaker to cover the listening area... we're not discussing delay rings or fills here).

Why? Because it's "on-axis" (where it's pointed) output magnitude is 6dB higher than at the "edge" of the stated dispersion pattern. Pointing the speaker at the back seats (within reason) results in generally more even coverage in the listening area. The inverse square law is working for you here... the closer folks are off-axis and so they get a lower level, but the further folks are on-axis but further away. Doing it this way you get much more even coverage, and it's much better than pointing the speaker at the front row and having a large difference between the two seating areas.

Interestingly, the cosine distribution of a typical -correctly bench focused- ERS means that it has a hot spot in the center of the beam, and approximately 2/3 of the whole pool of light is the beam angle, at which point it's half of the intensity of the hotspot at the center. Theoretically. Of course, the inverse square law also applies to light.

So armed with the audio analogy hammer, and having hang points at 45/45 and the fixtures I have, I thought, "why not focus the hotspot of the light to the far DS area, head-high, and zoom the fixture out so that the edge of the beam angle hits the near DS area, head-high." The further area gets the hotspot, the closer area gets the edge of the beam angle. So I did that, and did shutter cuts to get light off of the screen & other places, dropped in some R132. It's remarkably even, and the camera seems happy with it (Sony TRV900).

Now I know the QUALITY of light is much different and it would look better with Fresnels, but what I gots is what I gots ...

Too bad you can't do shutter cuts with speakers!
 
Sounds good, I would check to see how it works with a flat surface and also with talent standing in different positions. Make sure you check it with a decent Video monitor.
But as they say what works works

Sharyn
 
If you are going with single camera, the McCandless method seems to work ok. I found that when doing a multiple camera shoot (especially if you are using less than ideal lighting instruments) it is better to adopt a four point lighting design (compass points). This allows the cameras from different angles to have equal lighting (makes it much easier on the video director).

Also, I am not a fan of "running the barrels" as it takes the field that you spent the time bench focussing and making it uneven. It is much better to use diffusion, especially when lighting for video.
 

Users who are viewing this thread

Back