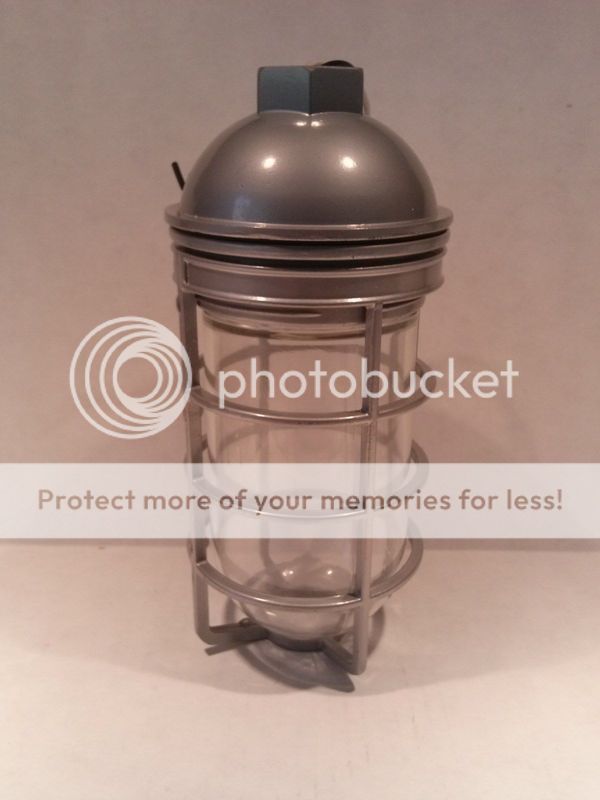
ghost light ????

Uses a 13W LED which puts out the equivalent of a 100W incandescent.

Total cost for supplies was $87 plus $20 for the LED. I already had the casters and wood for the base. Not quite happy with the base yet, but very pleased with the results.

One thing I was worried about was the glass globe getting too hot since it was meant to be mounted facing down. I left the thing running all weekend and the glass globe was warm, but I was able to place my hand on it and leave it there without any discomfort so I'm not worried anymore.

Problem: The fine print on LED lamps usually indicates that they cannot be used in an enclosed fixture. Even though they don't get hot to the touch, the electronics require airflow to cool the heat sink. The exception has been the Cree lamps, but in an interview, even they admitted it is a problem but they would rather replace some lamps in-warranty then discourage the use of LED lamps. You may find that the lamp has a much shorter lifespan when using it enclosed like that. (CFL's are actually the same way.)

Amazing how troublesome a simple stand light can be! ;)
 
I thought I would ask here since it is the most relevant thread.

How does one employ proper strain relief to this fixture:


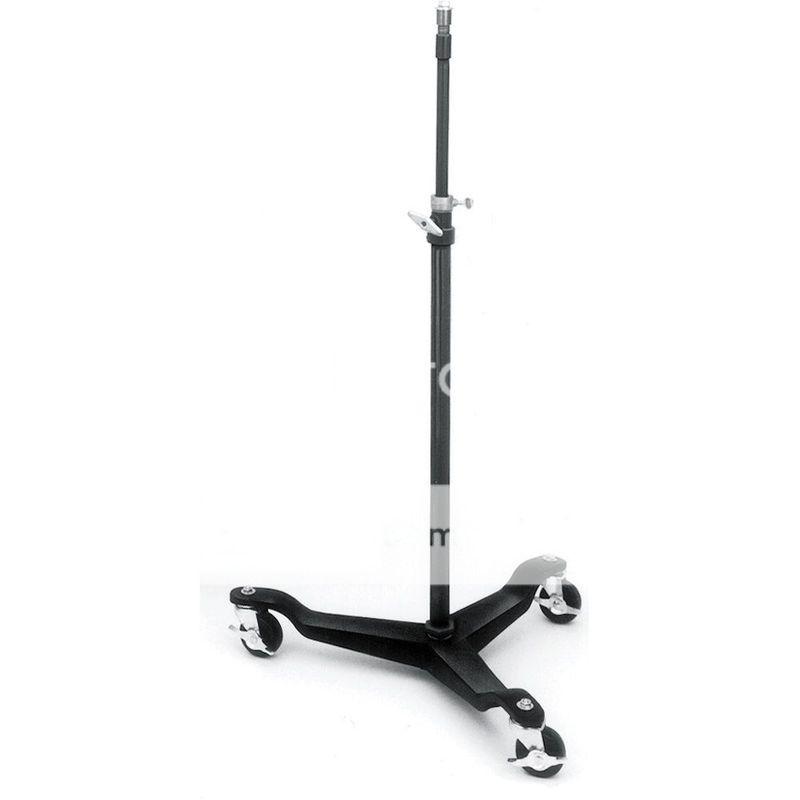
When it is mounted to this stand:


(Upper female-threaded mast section replaced with 1/2 NPT screw pipe)

The only solution I can think of is an Underwriter's Knot situated in the bell-housing of the fixture. The Altman ghost light seems to use a similar head - I'm curious as to how they do it.
 
I remember that there is types of this "explosion proof" caged fixtures or at least fixture head caps that have three NPT outlet fittings on them. One outlet you can cap, another you can cord grip and one you can mount to. I normally, given the cable has to go down to the floor anyway, and the stand is a hollow pipe, send the SOOW cable down thru the pipe. I have a few versions I built for shows in stock I would have to re-view in how I did... (On vacation until the end of the year.) Have done the ghost light cable hook in the past, but think it was more about antique lights on a stand in it's use. Believe I always send the cable down to the base where needed anyway. Otherwise.... anyone asked Altman to join the website?

All this said, LED lamp as a Ghost Light lamp is an excellent idea! Concept of it being on all night is a perfect use. That said, also I wouldn't have a glass globe in use anyway for something that can and does fall over. No ghost lights I have ever built, while caged have ever included a glass globe. Does it need it for some reason? Is something that can fall over on stage a good idea to have a glass globe for? What's the purpose of having a glass globe - just because it's included with the cage that normally screws in indipendant of it?

Fine detail notes above about not inside a hurricane lamp due to ventilation makes me wonder about the dozen or so CFL lamps the architect installed in our work washroom and hallway hurricane lamps - my department often has to change.... Never thought about it other than by design they wanted bad lighting in the washrooms to keep people off their phones while in the stalls. Will look into the heating details of CFL lamps now in thanks given the above note.
 
Last edited:
I remember that there is types of this "explosion proof" caged fixtures or at least fixture head caps that have three NPT outlet fittings on them. One outlet you can cap, another you can cord grip and one you can mount to. I normally, given the cable has to go down to the floor anyway, and the stand is a hollow pipe, send the SOOW cable down thru the pipe. I have a few versions I built for shows in stock I would have to re-view in how I did... (On vacation until the end of the year.) Have done the ghost light cable hook in the past, but think it was more about antique lights on a stand in it's use. Believe I always send the cable down to the base where needed anyway. Otherwise.... anyone asked Altman to join the website?

All this said, LED lamp as a Ghost Light lamp is an excellent idea! Concept of it being on all night is a perfect use. That said, also I wouldn't have a glass globe in use anyway for something that can and does fall over. No ghost lights I have ever built, while caged have ever included a glass globe. Does it need it for some reason? Is something that can fall over on stage a good idea to have a glass globe for? What's the purpose of having a glass globe - just because it's included with the cage that normally screws in indipendant of it?

Thanks, @ship -- I don't believe this fixture has multiple NPT caps, but it hasn't arrived yet. I assume it just has the one on the bottom/top. I may also look in to what @n1ist said about the condulet option.

Good point about the glass globe. I was planning on removing that for the reasons you stated. Sharp glass hazard as well as ventilation. I have had good luck with Cree LED lamps from Home Depot, so that's probably what I will be using (100w equivalent).

Besides that, the stand I'm using wasn't originally a followspot stand. It was ordered from BH several years ago and just has a female insert for a 1/2" bolt. Hopefully I can remove that section of pipe and have it accept 1/2" black pipe. If not, all bets are off but I might have a second stand I could use. This was originally just me getting rid of a stand I had lying around and now it has turned in to me creating a ghost light for the recipient. I'm not concerned with my abilities electrically; I just want to make sure I get it right in terms of strain relief. I'm also considering using crimp-style wire nuts as opposed to twist-on within the fixture. I might even solder the connections first. Multiple layers of safety above all.
 
Yea, the Cree's don't do well in closed fixtures. (most LEDs don't) The 100w Cree still has the rubber (silicon) coated glass globe and the heatsink along the bottom. I was experimenting with one to see if it was suitable for outdoor acorn style lights, but after 4 minutes of low airflow the sink was skin-burning hot. They are fine in open fixtures.
 
Yea, the Cree's don't do well in closed fixtures. (most LEDs don't) The 100w Cree still has the rubber (silicon) coated glass globe and the heatsink along the bottom. I was experimenting with one to see if it was suitable for outdoor acorn style lights, but after 4 minutes of low airflow the sink was skin-burning hot. They are fine in open fixtures.

Funny you mention that - I surprised myself when I touched the sink on a Cree lamp operating in an open fixture. I didn't take the temperature, but it was definitely hot enough to cause burns if I left my hand there (I jerked away fairly quickly).

Also of interest, on the lamp packaging it says:

"Do not use in multi-bulb enclosed fixtures together with other bulb technologies (e.g. incandescent, halogen, CFL, etc.)."

But nothing about enclosed fixtures as a concept. I'm sure it's still a no-no, but I guess they're fairly OK with it enough to not warn against it. Seems like the above warning was out of concern for operating near external heat sources (max. ambient temp listed is 113F).
 
I remember an early interview I saw where the Cree rep was saying that they came to the conclusion that it was best to leave that off the package as it adds to confusion and they thought that it could cost them more sales then they would loose replacing any that might fail. Funny part is the "other bulb technologies" line sounds even more confusing! What that's really aimed at is closed ceiling fixtures that might use 2 lamps. If the second lamp throws a lot of heat (like an incandescent) then the heatsink on the Cree becomes useless as the ambient air in the fixture is even hotter. All LEDs are pretty much in the same boat. I have taken the Cree's apart and the caps are rated for 105C which is good. Don't know if that's the case with some of the other LEDs out there. Still, moving the heat from the LED emitters and dumping it is where the big problem is with all of them.
 
  • Like
Reactions: Les
Attach a lamp socket to the top of a piece of conduit which is attached to a square/rectangular wooden base. Use 16/3 wire to run the power for the socket down through the conduit and out under the base. Put the connector of your choice on the other end. Make sure to use a compact flourescent bulb, because there's no filament to break when the ghost light is moved while it's hot. All of these materials can be found at your local Lowes' Home Improvement. I have no idea if Home Depot carries all of the stuff, but lowes does!


Great advice EXCEPT for the "Make sure to use a compact fluorescent bulb" part. That's a terrible idea. Ghost lights as described above have a VERY big habit of tipping over. The last thing you need is to be cleaning up glass and mercury. Buy an 8W LED bulb instead. It will last forever and use less energy than the Flourescent. And, when it falls over you won't have to clean up mercury and shattered pieces of small glass.
 
Above post was deleted in quote in missing, not sure abut the wooden base attachment of socket concept, but also not sure about Mark's reply to it also. Yea, messy if a CFL breaks, but I also find some LED globes made of glass and not silicone coated. Have a Cree lamp on my work table - cracked, but silicone coated. Osram's might be, but not all are.

Would hope such a coating would be a selling point, but in buying a few hundred recently for an ice rink I foiund out the coated version was discontinued - (Bulbrite). Such a specication as per old incandescent silicone coated lamps, should become a specification standard.
 
My ghost light will be a bit easier and more standard in its construction, being mounted to an Altman castered stand. I did find a silicone-coated Cree lamp. 75w equivalent, I believe.

I hope to get it finished up tomorrow. Wiring will be the next order of business. I am using the light fixture below, and was originally going to just use wire nuts but I am starting to think better of it, and use heat shrunk butt-splices instead. I have decided that I will use a loose knot in the SJOOW cable within the bell-housing of the fixture to provide strain relief. That's about the best and most self-sufficient approach I can think of, but with the 1/2" NPT opening of the fixture, it should be sufficient.

 
The new Cree's are plastic, at least in the 60W size. I expect the 100's to soon be as well.
proxy.php
 
I saw those plastic Crees at Home Depot the other day. I actually went with the "classic" version because those just seemed a little cheap. I might buy a few for home use though. I have a Cree LED in my night stand light and it ever-so-slightly flickers every once in a while. Has anyone else experienced that?

Also, I'm shying away from using butt connections. I don't have a very good crimper and don't feel like buying one at the moment (still recovering from the $80 Heyco tool purchase. Ha.) Any advice on crimps vs wirenuts in an application like this? I assume many people would prefer crimps, and I'm curious to know what everyone's preferred splicing methods are. This won't be a high-temp application, but I do need to join #14 stranded to #16 stranded.
 
I was shying away from them at first as well. Since then, I've picked up about 50 for the church renovation. Although they feel cheap due to the light weight, they actually work very well. Have one in my drop light and have banged it around quite a bit. At 11 watts, they are a bit less efficient as compared to the 9.5 watt version, although they have a slightly higher output.
Now, about the flicker- The glass style has the emitters mounted to the heat sink and the electronics in the base. They snap together and two sets of contacts rest on each other. Out of the 500 I put in at the church, about 4 of them have developed "the flicker." Of course I took one apart. As you might expect, the problem is those contacts. Clean them, snap them together, and no flicker. Problem is, I haven't figured out how to get them apart without breaking the glass to get to the release pins ;)
I suspect as time goes by, more will develop the problem, so I'm still working on an "intact" method. Since they often do the "green energy" thing, the lamps often sell below $4 so there is not much incentive to come up with a fix.
 
interesting about the lamps - thanks. Liking plastic bulbs at times but if glass globe otherwise in my main use for lamp socket stringers - prefer coated lamps.

Insulation displacement tool is always superior to a crushing tool. In other words, a tool that pushes a tooth into the crimp pushes material into the area of the wire and leaves no room to expand/contract or wire to settle after. A crimp tool that just crushes the crimp smaller in compression leaves room for the wire to settle with expansion and contraction and settle in a loose way. Can do that crimp with vise grips in crushing a crimp and little difference. There are a few larger wire gauges I have crimp tools for tha make hex crimps or dimple, but for most cable in standard gauges I displace instead of crush the crimp.

Wire nuts are never good for other than homeowner uses - this especially for fine stranded wire. I like cap splices like the McMaster Carr #7242k64, but my guys have gotten me into the lever lock styles of crimps like the #8904t2 in yet to find a failure with stranded or solid wire. Had bad cap splices in years of use of them, but yet to see a bad lever lock splice - but they are new for me.

I use the Klein #1005, #1006 and especially with 12ga wire + in size, the Ideal #30-426 a huge amount. Wise to wait in doing it properly for the proper insulation or material displacement tool. By the way, should you break your Heyco tool, there is replacement springs available thru Allied Electronics or most suppliers. It happens in adjusting sizes for cord grip.


On cord grip, good question and don't remember how I did that. Will have run a reamer over any fittings the cord was run thru in making sure no edges were sharp. Probably did UL'Knot at least or did a cable tie if not some form of cable strap. Think just a cable tie to ensure outer jacket could not fall thru the hole in exposing inner conductors to a potentially sharp edge.

Not really feasible to thru tap the taper tap of the hole in installing a cord grip inside the lamp cap assembly, and still able to screw into the stand pipe. Grounding is good - ensure your ground has bonded to your instrument before closing it up. At times a powder coat of paint will lighn up just so' with the ground terminal that you will not get a good ground. Something to check before finishing the assembly as a warning in what to check.
 

Users who are viewing this thread

Back