Vintage Lighting old ellipsoidal wiring

I am in the process or rewiring six very old ellipsoidals that take p28 sockets. I got some new sockets from Norcostco, but they had no wire. I'd rather not pay $2.00/ft at the place I was refered to by a friend so I'm looking for other options. The ellipsoidals will be running 750watt lamps. I have several spools of 16 gauge PVC wire rated @ 600v up to 105 degrees celcius (Carol brand) but I'm not sure if it would hold up to several years of use. I'm curious if anyone knows whether this wire is good enough or if anyone has any other options.
 
I am in the process or rewiring six very old ellipsoidals that take p28 sockets. I got some new sockets from Norcostco, but they had no wire. I'd rather not pay $2.00/ft at the place I was refered to by a friend so I'm looking for other options. The ellipsoidals will be running 750watt lamps. I have several spools of 16 gauge PVC wire rated @ 600v up to 105 degrees celcius (Carol brand) but I'm not sure if it would hold up to several years of use. I'm curious if anyone knows whether this wire is good enough or if anyone has any other options.

Ah you got yourself into a world of questions you didn't plan on.

First the asbestos pad below the socket - scrape it clean and hopefully your new sockets came with a replacement insulator. Than if your holes align for the new style socket to the old ones as hole patterns have changed. Could work but could be off as with some wider sockets even fitting inside the plate as at times found to be a problem. What specific fixture are you working on? Photos if not sure? And yes... they can bench focus often very good in accuracy and efficiency dependant on what they are compared with.

There is versions of the P-28s that have wires attached, and versions that have screw terminals. You got them without attached wires. Not a bad thing, just need to invest in the proper crimp tool and high temp. crip, lock washer and high temperatre electical tape your program should already stock.

Getter' done in also testing the ground sufficiency. You a fixing lights now in attempting to do so, now a need to learn thus the best and most important time to learn from others with such info that will stay with you for a career. Cannot express any better time for my own learning than when I was now responsible for what I was doing - this in learning education or technique.

Many articles already posted about wiring lighting fixtures by many people on the forum. You are now the guy on site in doing so and responsible for what's done. Means you have a lot of book or On-line study to do especially to this website so as to master what you are now doing.

I expect that with some research into wiring of fixtures that you can master them.

Do some research, and once initial questions in well covered are answered, ask more. We want you to do safe gear, just that effort now that it's your responibility to now learn your role and responsibity includes more than asking. It involves study I hope you now do.

The answers are on this and other websites. Study, learn, than once you master... improve on. This to the extent to me even saying that your sockets were probably not in need of replacement but more in need of cleaning properly. P-28s is the socket I believe you describe as further research.

Posted on the net is many people by way of hundreds of fixtures serviced and rewired in experience in wiring them already. Good to ask, but often hard to re-create what experience notes in having already done so. Do the search onto wiring them than ask for refinement questions or for stuff in reading you don't understand. Will much better help you than an easy reply or post.
 
Last edited:
Yes, that wire should work. No, don't use the PVC. Search on here also for Heyco connectors and fiberglass sleeving.

See also the thread http://www.controlbooth.com/forums/lighting-electrics/3656-radial-leko-service-call.html also by the inimitable ship.


Thank You!

Yes, I have read that thread. Yes, I have been researching what needs to be done to do it correctly. I just couldn't find anything about a certain spec of wire to use, and available options.

Now I'm on the hunt for the asbestos/fiberglass padding as none of them currently have any.
 
Here is one trusty supplier's offerings re: insulator pads:

Altman Socket Insulator, Medium Prefocus, 1-7/8"O.D.

Have fun with your project! This comes second to safety, which I see that you're taking seriously. Good on your for taking the time to research and acquire the correct parts! You will learn a lot from this project, and with only six instruments, you probably won't feel overwhelmed -- that takes all the fun out of restoration projects like these! Keep us updated!
 
Last edited:
ProAdv_sponsor_left.jpg


Don't forget to tell them ControlBooth sent ya!
 
Last edited:
Some advice about upgrading and keeping your fixtures safe may differ depending on what you have. So what kind of old Ellipsoidals are we dealing with here? If you don't know post a picture and the mighty CB collective brain will identify them for you.
 
Err...I don't like 105 degree C wire for this application. Should be teflon TFE at 200 degrees C.

ST

I believe he was speaking about the link that I provided. Which was the specs that you mentioned. I didn't think that the 105degree C was going to work, I am concidering the wire that I gave a link for. I was just looking for verification, just in case.
 
It may help you to source all your parts from the same supplier. Production Advantage carries the wire you would want to use in black, white and green for around $1.56 per #12 36" lead (XLPE). They have #16 150c SFF2 for $1.40 (40") as well. I am personally not sure which one of these you would want to use. That is more of a Ship, STEVETERRY or derekleffew question, though I was under the impression that 150c was the lowest you would want to go. If the XLPE is 150c, or better yet, 200c; go with that. They also carry the fiberglass sleeves, high-temp ring terminals, and just about anything else you will need (all under the Electrical Parts category).
 
Last edited:
OK, for ship, gafftaper, and others, here's the full story since I have a little more time. These fixtures were hung in a building and not used for many years. After testing the system, 3 of 6 were not working. One more failed the next day. The people taking care of the building for the past many years turn the heat completely off during the winter, allowing moisture inside. We are on the coastline and moisture/corrosion is a constant problem everywhere locally. These facts were not known or realized until latter.

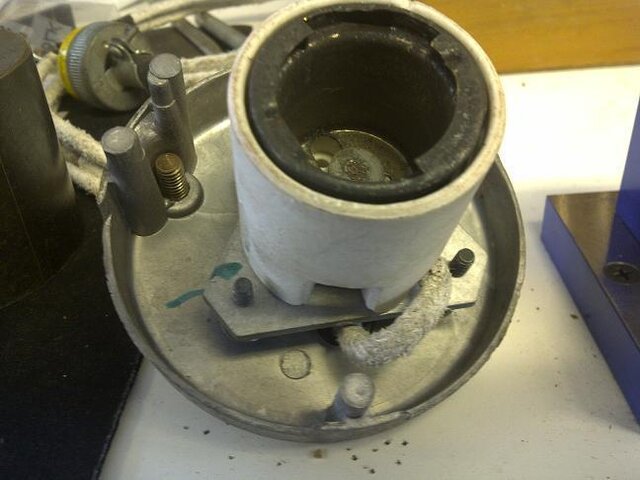
I assumed that the problem was just the lamps, so I took them down and attempted to replace the lamp on the first fixture. The center pin of the socket was so corroded that the spring would not compress to allow me to install a new lamp. I decided to attempt cleaning of the socket, unscrewing it from the base. The screws are so corroded, that one broke during removal. I thought to myself, OK, new sockets then. I continue to remove the socket from the base, and in doing so, I was inspecting the wires . . . well, it's obvious they need replacing too. Oh, and guess what? None of them have insulators. Further inspection shows that the shutters on most of them are frozen from rust and/or warped beyond use. So I'm in for a complete rebuild.

Many thanks to those that have posted in the past concerning rebuilding these fixtures. It has helped me a lot in getting familiar with them and what they require. Unfortunately, I was not able to find actual part numbers or specifications of the necessary parts, only general descriptions. That is why I posted the question about the wire type above. I pretty much knew what was needed, but wanted confirmation, which I now have.

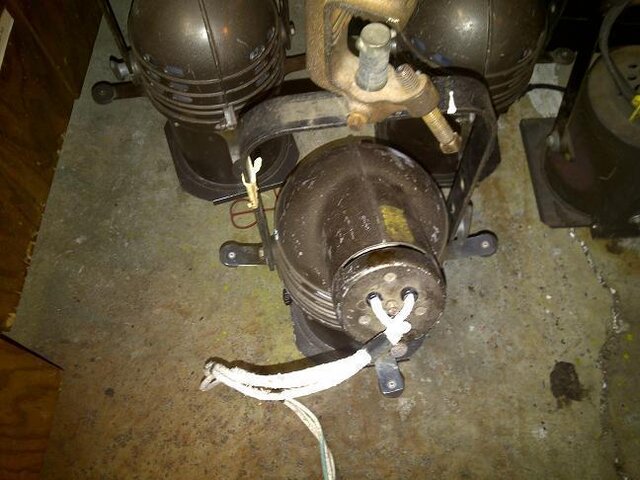
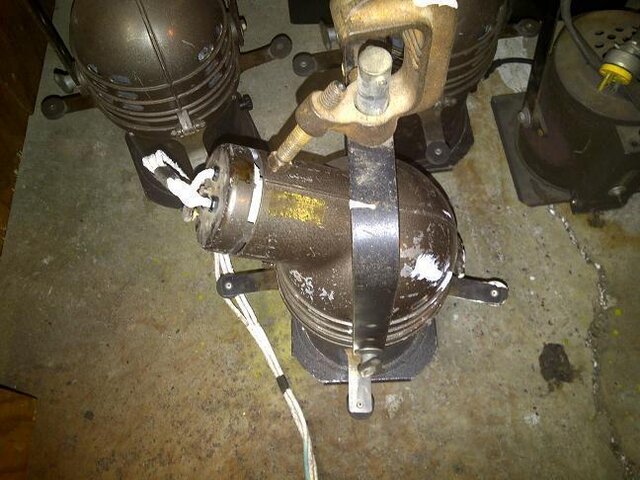
Everything is on order, even safety cables, which shockingly none of these had. The one exception is the shutters. All of the other parts, all the way down to strain reliefs, I have been able to pinpoint part numbers or other necessary information to facilitate ordering. I can not tell which type of fixture I have, so following gafftaper's recommendation, below are a few pictures. Hopefully someone can tell me what type of unit these are so that I can order the proper replacement shutters.

South Shore-20110217-00135.jpg

South Shore-20110217-00136.jpg
South Shore-20110217-00137.jpg
 
Yessir, those are Altman #360 ellipsoidals (precursor to the 360Q). These take the exact same shutters as the 360Q, which are readily available through Production Advantage (and others) for about $2.50 a piece. In fact, the entire shutter gate is the same, so if you need new shutter spacer and/or pressure plates, they are interchangeable. These particular fixtures date back to the '70's - early '80's. They are still highly serviceable, but the greenish lenses will detract a little from your light output. Not a huge deal, but they won't quite match newer 360Q's. Beware of breaking the locking dog discs on the yoke -- I don't believe they are easy to come by these days. Don't force tilt these fixtures or you will snap those tabs right off, which will cause your lights to frequently drop focus.

Just realized that I forgot to add a link to my last post. Here are Production Advantage's electrical supplies:

http://www.productionadvantageonline.com/Electrical-Supplies/

And here are the parts for the shutter assembly:

http://www.productionadvantageonline.com/Altman-Lighting-Instrument-Parts/

Note that they have the lock dog discs listed but "without tabs". The #360 and early 360Q uses discs "with tabs". Not sure if these are interchangeable (or if you even need them) :) . The picture doesn't seem to match the description.

Of course, Production Advantage isn't the only dealer out there, but I have had a lot of success with them. A sales rep named Rocky Harlow was a huge help. If you need an exploded diagram of your fixtures, he'll be happy to email you one. You could probably find one here also with some searching (I'm sure derekleffew has it in his back pocket!)

*Make sure your fixtures still have the light shield between the lamp cap and fixture housing. Also, note that the shutter blades do not come with the insulated grips. You can either carefully drill out your old ones and rerivet them to the new blades (using aluminum rivets) or you can order them from the next page of parts. Since you have so few fixtures, I'd spare the labor and order new grips and rivets. Buy yourself a pop rivet gun from the hardware store for about $14 (the Arrow brand is nice). That will come in handy on future lighting projects also.

Tips on shutter removal/reinstallation:

You will make your life much easier if you remove all the shutter gate components if you're replacing the shutters. This is so you can verify that all the parts are there and in the right place, as well as perform any resurfacing maintenance you see fit. It is also easy just to start fresh, rather than attempt to slide the new shutters between the spacers. Here is the correct order (starting at the lens) for future reference:

1.) Gobo holder (align the tab with the notch in the fixture so that it rests securely and upright)
2.) Shutter Spacer
3.) Upper and Lower shutters
4.) Shutter spacer
5.) Left and Right shutters
6.) Shutter spacer
7.) Pressure Plate

You don't have to, but a little graphite lube (emphasis on little) will go a long way. Apply it between each shutter/spacer set.

*The upper/lower and left/right shutter order really doesn't matter, but top and bottom first is what I have always done.

You will most likely need to remove the grips in order to free the shutters. Either drill out the rivet, or you can remove the entire gate from the fixture (effectively splitting it in half) and use a bench grinder to flatten the rivets. This will not free the grips, but it will make them slim enough to fit through the slot. Don't try cutting the shutters with tin snips -- personal experience says it won't work ;) .

Reinstall the new shutters and hardware in the same orientation and sequence that they came out. Be sure to get all the spacers in -- especially the one against the gobo holder. Without it, the shutters will jam and basically be very frustrating, often without warning and only when you are trying to do a delicate shutter cut (most likely the last shutter you adjust will be the one to jam up) ;) .

Don't rivet the grips on until the shutters are in the fixture, unless you don't mind either grinding the rivet heads down or redrilling/reriveting. I have found that the grips are still very secure even after grinding, so that may not be a bad idea (making future replacement easier).
 
Last edited:
I did not see any mention of this but those wires use an asbestos covering. If you have not already removed them I recommend using a mask and disposable gloves while taking them off the fixture. Place the used wires in a plastic ziplock and dispose of properly. Although I don't believe this product is on the EPA hit list it is best to take precautions.

There is an SMRL wire that can still be used as individual runs of wire through the existing strain reliefs. It is high temp with a fiberglass covering. Otherwise the TFE wire in the sleeve is best but you would need to drill a new hole to pass the wires through and use a new strain relief. A romex connector will work well on these and old Fresnels.


Good catch. Asbestos is relatively harmless unless inhaled, it's the dust-like particles that can damage your lungs when airborne. Like you said wear a mask. My dad also taught me some time ago to use water when cutting or disturbing it. That's what I intend to do, soak these in a bucket/utility sink/etc. and work with them underwater to remove the wire from the fixture, then double bag them up and dispose. I'll thouroughly dry the peices to be reused once all of the wiring and insulation is off of them.
 
...My dad also taught me some time ago to use water when cutting or disturbing it. That's what I intend to do, soak these in a bucket/utility sink/etc. and work with them underwater to remove the wire from the fixture, then double bag them up and dispose. ...
And what do you plan on doing with the (now contaminated) water, as well as every surface it has touched?

See also this thread: Call "911" or not...
 

Users who are viewing this thread

Back