Putting LEDs into costumes

blackisthenewblack

Active Member
So I have a fun little project that I started today at work. It involves putting copious amounts of single LEDs and LED strips onto costumes that will be used for a "mega-spectacle" outdoor post rodeo show. Needless to say, there is little ground work prepared but we will be building a prototype this week along with specing parts and designing some custom PCBs. The current plan is to use Arduino boards coupled with the Jimmy Rodgers LOL (lots of leds) pads that we will wire out of. This will allow us to put up to ~200 LEDs per circuit board. So I figured I may as well attempt to document the process for those who wish to follow the process (seeing as it is a newer emerging technology). If you have tips or tricks feel free to add them, but I shall attempt to keep this updated with the process.


Arduino Tutorial - Learn electronics and microcontrollers using Arduino! (basic tutorial)
LoL Shield
Arduino - ArduinoBoardUno
 
LEDs can and do get hot, be careful to to burn anyone.
 
well, for the most part, it will likely be flash and trash, so they will likely be pulsing or flashing in some way as it saves us battery, stays cooler, and looks more interesting.

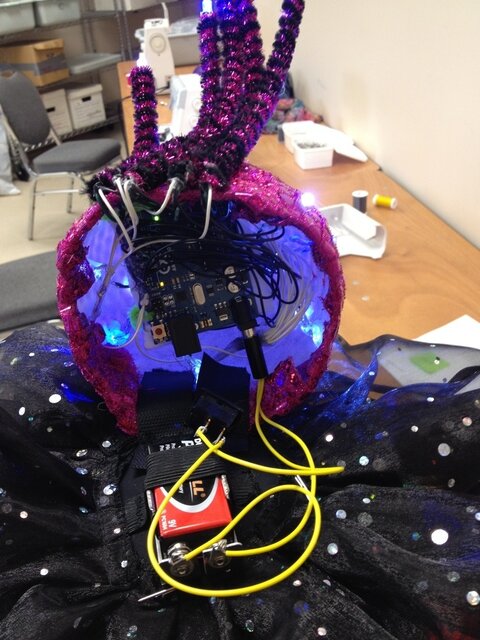
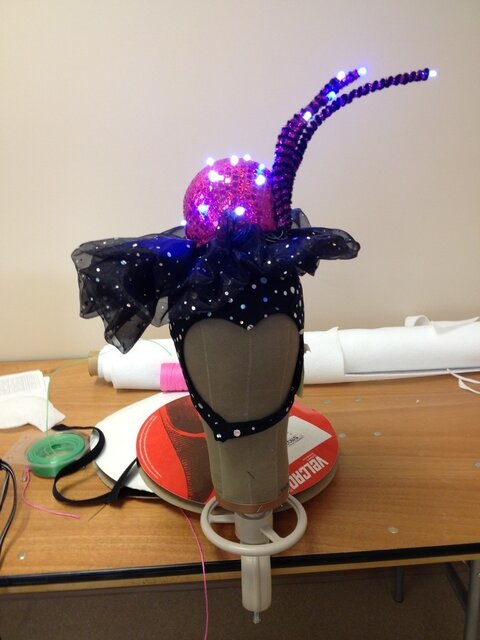
In terms of progress, we now have 20 outputs of single LEDs ready to be installed in a fosshape hat. I have gotten them to flash and cycle through (progress!) so this prototype should be good for the production meeting next week.

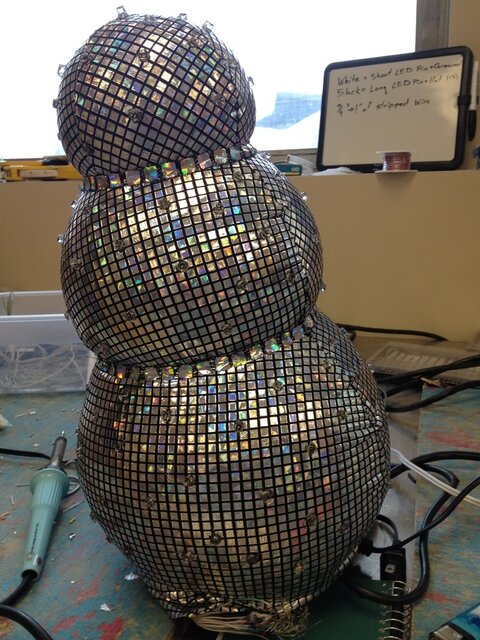
With regards to the choice of LEDs, we are using Super Bright LEDs that have a very wide angle throw that appears to be close to 180 degrees. As a result, they have a hemispherical throw rather than a focused beam. This works for us because the audience is any where from ground level up to 45 degrees from horizontal in terms of sightlines. Also pretty bright with a noticeable presence. This particular costume is for some "human disco balls" so combined with the reflective fabric should be interesting.
 
So we are now into the second week of Lightuming (its a new word - Lighting up Costumes). We now have one prototype complete and are well on our way on prototype of hat number 2. 019.JPG018.JPG017.JPG015.JPG
 
Cool idea. It's great to see you are using Arduinos. The Hats look great. Keep posting updates.
 
Wow those look great!!!!

The one draw back that I have with arduinos is their cost and size. When I need an arduino I get a Teensy, it's also a hobbyist programmer board but it's maybe a tenth the size of the arduino and can be programmed either as a arduino or with C/C++ (i think that's the two). They also cost more like ~20 dollars.
 
Looking good. I'm most interested in how you are going to do the communication component. I've thought about doing something along these lines before but the wireless technology was too expensive for me - at least $20/module. Not to mention the wireless hardware and programming you need on the server side to communicate with each Arduino.

You could try using an RF receiver/transmitter pair (would also be convenient if every costume is going to be doing the same thing), but I wouldn't trust these unless you have some serious programming chops to filter and essentially encode the signal so that the Arduino knows it's getting valid data:
RF Link Receiver - 4800bps (315MHz) - SparkFun Electronics
 
Well, since the project got started so late in the process and with the number of crew members, sheer volume of costumes and time. We have decided to forgo the wireless control and are instead going with push button manual start. The plan is to ramp it up to wireless DMX next year (as this is a yearly - post rodeo extravaganza). according to my knowledge, we are making 4 of those pink hats, 4 of the pink hats in silver, 4 of the snowman hats with LOL shields, 4 mohawks, 4 other hats, 4 tutus with LoL shields, 4 ball gowns with Lol shields, 4 stilt walkers with RGB smart strips, 4 shirts with white LED strips. So four people and 6 weeks to go from protoype to finished piece.

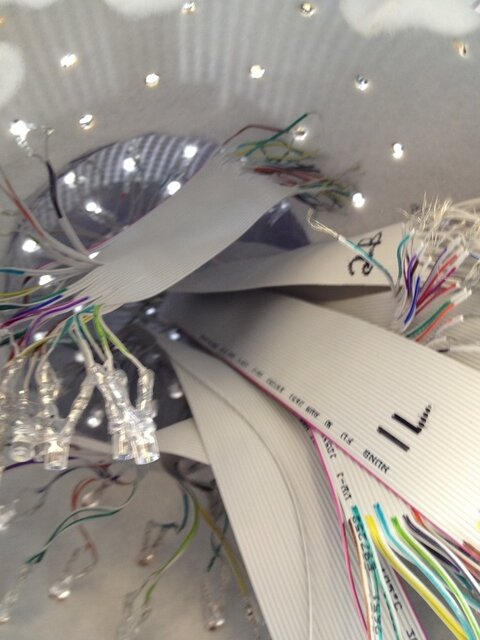
For the Ball gowns and tutus, we are looking at getting some custom LOL shields created to accept wires of computer ribbon cable inserted into wiring harnesses. (here is a tip: if using many LEDs go with rainbow coded ribbon cable. It is easier to track lines.)
 
So week 3

Custom Lol shields came in this week. Reporter as well.
The pink hats are now complete, just programming left. We are "controlling" these units in the show with battery disconnect switches on each costume which will resest the units when turned on. This is an easier solution for us this year as there is no coding required and less wiring within the unit.
We now have a custom lol shield in the silver hats as designed by Solarbotics here in Calgary. (Pictures of the custom bits to follow next week). We are using a 30 pin ribbon cable crimp connection into a lockable header which allows for disassembly and recycling as needed. The ribbon cable allows for easier distribution of the individual LEDs within the costume, as well as easier programming as each segment corresponds to a section of the hat/dresses that this system is used in.

We are also working on the stilt walkers hats which are similar to the pink hats in that they have 18 LEDs; however, they are using an Ardweeny w/ Backpack as opposed to an Arduino Uno. It is a smaller footprint unit (primarily designed for breadboarding as it is cheaper) but the backpack gives the same functionality.

Mohawks will be using a new form of Ardweeny backpack as launched this week. Still using 18 LEDs but using ribbon cable with a new "Backpack" whic

More details to come as things continue to flesh out...

also DMX control for arduinos is possible - just not this year...
 
also DMX control for arduinos is possible - just not this year...

I would love to come back to this thread next year if you do this again. In my honest opinion, I don't even think you would want to use one of those DMX shields (on the costumes, at least). You're going to have to somehow make it wireless anyways, so the DMX shield is just extra hardware and weight that you don't need. Rather, you should just transmit the DMX data (in the DMX protocol format) wirelessly, and have it received wirelessly directly by a wireless radio module on the Arduino (probably something like the XBee). You would then program the Arduinos to directly take and use the DMX data that is being fed to them wirelessly.

As far as the master "sender" unit, it's going to need to interface with some DMX control software on a PC. Unless you want to build your own dongle and program support for it into whatever control software you plan to use, the best approach that I can think of would be to buy something like Entec's DMX USB dongle (that's well supported across a variety of control software). Then take the DMX out from that, and go into the DMX in on a DMX shield for Arduino like the one you linked above. Have the "sender" Arduino (with a wireless sender module, like the XBee but ideally one that's very powerful for range and stability) take the DMX from the shield input and transmit it wirelessly to the other Arduinos. The same data gets sent to all devices, and the individual units are either addressed in software or in hardware (jumper switches?) to only listen to what they need (like how wired DMX functions).

So your final signal flow would be:

PC/software > Entec DMX USB dongle > DMX shield on Arduino > "sender" Arduino code > "sender" Arduino wireless module > . . . . . airwaves . . . . > "reciever" Arduino wireless module > "reciever" Arduino code > LED's

At least that's my two cents.

Don't know if you've seen Blue Man Group's latest show, but they have a "dance party" bit at the end where they have tons of large inflatable fabric balls that have RGB LED's inside that flash in sync to the music and other lights. The crowd throws the balls up in the air and it's pretty trippy - they are all exactly in sync across the entire theater. If you could come up with something that is as flexible, reliable, and fast as that, you would have something that you could probably turn around and make a profit on.
 
Last edited:
So I promised that I would update this thread after the show was complete, so here it is.

Some Pictures Here

So as it turns out, everything worked fairly well and as expected. Everything was durable enough so that no repairs were needed. The big dresses and the lightning bolts (RGB LED tape powered via a custom 12V shield) had the biggest pop, as expected due to sheer light output. Everything was still visible from the long distances required by the show, but those two units definitely stood out more. Luckily we did not have much rain on this outdoor show, so I cannont really say how waterproof that the units were, but I think that we managed a good balance between access and durability. For some of the units, we encased them in an acrylic box as they were in more contact with the dancers as they moved around. In terms of the timings on the lighted choreography, having the actors turn them on worked with mixed results, as some costumes were more programmed or patterned to the music than others; however, as we were dealing with 12-18 year olds operating the devices with all of 2 rehearsals, some were closer than others. In some cases, we were within 0.5 seconds in the pattern which was better than expected.

One timing issue that we did not encounter was the differential in the internal clocks of the arduino. Even though two would be powered on at the same time, from the same switch and battery pack, after a period of 2 minutes, a difference in pattern could be detected. We do not know exactly where this issue comes from, but suspect that it could be helped by an external clock on the device.

Also included in this project which was a late development, we incoporated 12V LED RGB strips into costumes, (which are the lightning bolts in the pictures) via another custom bit, that is capable of driving two in-dependant strips of LEDS. These are considered analogue LED strips as they change the entire strip one color or another, rather than individual RGB control via bit-shifting. They are mounted to a piece of mirrored plexi and then covered with a triagular piece of acrylic, cut to lightning bolt shape. They were also inserted into clear plastic tubing, which was covered in a semi transparent fabric to give a really cool effect as the strip spiralled around a hat.


What we learned from the project:
More time and budget would be nice...
Ribbon Cable is your friend as it makes co-ordinating wires and individual LEDs much easier
There are many different evolving technologies out there. LEDs are being developed on a weekly scale, Micro-controllers are open source
Open source technology can be utilized very easily
Sometimes custom parts are required to save time and money as well as get the required effect - 100 hours soldering or 5 hours of an engineer?
There are people interested in learning about these developments, so share your knowledge to outside groups and other micro-controller groups

Until next time.

Ps. Should I post links to the parts that were developed when they hit the internet?
I was also the rigging intern on the show with HAFE, which was an amazing experience in itself.
 
One of the pieces that we had re-engineered was a LOL Shield. What we had done to it, was a re-spacing of the LEDS to accept 28 pin ribbon strips via lockable header clips. It is about double the size of the regular lolshield but has the same functionality. It also saves about 9 hours of soldiering per costume.

Another piece that we adapted to our purpose was the ardweeny multipack. It is designed to power servos and the like, but again those nice looking pin outs are spaced perfectly to accept a locking crimp connection for ribbon cable. Not exactly custom, just a slight tweak, as well as a minor change in the programming to allow for reversed polarity due to the pin out. So high is low and low is high.

The last piece was again another ardweeny backpack, which was a fully custom PCB that allowed us to power the 12V LEDs as well as the 5V Ardweeny. It accepts a Li-Po battery as well as a 12 V wall wort. It can drive 2 strips of LEDs as previously mentioned so that piece was 3.5 inches in length and 1.25" in width. To the knowledge that we had, there was nothing in the market that we knew of that could do this.
 
One crazy idea for wireless control on the cheap for next year would be IR control. It would require more infrastructure than RF (multiple wired IR transmitter panels aimed towards deck), and would mean you'd need to work out where you could put the IR receiver on each piece that's constantly more-or-less within LoS of said transmitters, and YMMV on how much data you could reliably push (global timecode yes, individual channel control maybe not). On the other hand, the receiver modules are dirt cheap compared to anything RF, use less power, occupy a less regulated band of EMR than unlicensed RF stuff (that is, you can turn the xmit power up to 11), and since you have very low-level control over the "protocol" (i.e. on/off), you can customize it to the data rate and error tolerance required.
 
Last edited:
That's a really impressive show. Thanks for sharing the follow up details. Post all the information you feel like sharing. Often others can learn from your successes and mistakes for future productions. Also it would be interesting to hear about your experiences working with HAFE and making a truck fly. I'm not saying tell us every detail of how to do it, just report on what you did and what you learned from the experience.
 
Gaff - The system is a tension wire grid system with four overhead track wires. From that, there is a trolley that comes down from each line that raises and lowers to pick things up and move them around, resulting in two dimensional movement on its own. When you hook more than one line up via a clew or other such object, you are able to achieve a rudimentary form of 3-D movement within the limitations of the system. So from what I saw at the olympics in London, a fairly similar system with no overhead roof or support. The truck is a custom aluminium frame with a fibreglass shell coated in 400# of glass mirror tiles. From each corner of the frame a cable drift goes up to a central point, which also contains a rider-controlled motor that spins the truck. This motor also acts as a clew for all four overhead lines to connect to. So in total, the truck and human rider weighed in at around 1200#

I was the local backup for the lead operator of the console as well as an extra set of eyes on the system. So I came in after the set-up, as I was building costumes at the time, but was there for all of the programming and rehearsal times. There were a number of acts and devices that flew throughout the show, including girls in summersault harnesses, a cube with performers on it, a safety device for the Chinese girls on bicycles, country singer Paul Brandt flying on a lexan and metal disc, a giant metal eagle with rider, silk act, and flying truck. So quite a few things for an 80 minute show. As a result, it has some very tight transition periods and some with a little more room. Compounding this process is the fact that it occurs after chuckwagon races on an outdoor portable stage (no flappy roof though). The turn around time from racing to show is about 30 minutes, which involves rolling in wagons with the stage, dressing rooms, flying acts and pyro.

video timelapse of show here. You can see the truck flying towards the end.
video excepts here . 3:14 feature truck and costumes.

How the show works is an afternoon pre show check of all of the motors and rigging, to ensure that all systems are go, followed by races, then transition, then top of show. There are two backstage riggers connecting all of the apparati, two designated spotter with over-ride joysticks as a safety system, and the console operator and backup (me). Overall, it was an amazing experience, which I hope to be able to do again. I learned about motor control and programming which is a very interesting art form, as numbers correlate with a position on stage. There is also a very important dynamic that must exist between performer and operator as lives hang in the balance, as well as an impeccable requirement for safety protocol.
 
Quite an impressive show indeed.
One crazy idea for wireless control on the cheap for next year would be IR control. It would require more infrastructure than RF (multiple wired IR transmitter panels aimed towards deck), and would mean you'd need to work out where you could put the IR receiver on each piece that's constantly more-or-less within LoS of said transmitters, and YMMV on how much data you could reliably push (global timecode yes, individual channel control maybe not). On the other hand, the receiver modules are dirt cheap compared to anything RF, use less power, occupy a less regulated band of EMR than unlicensed RF stuff (that is, you can turn the xmit power up to 11), and since you have very low-level control over the "protocol" (i.e. on/off), you can customize it to the data rate and error tolerance required.

This is actually a genius idea. Program the show into the devices beforehand, then send global timecode through the IR transmitters. You wouldn't have to worry about 100% line of sight on the costumes as they wouldn't need to pick up every single "ping". They would just sync the internal clocks to the received timecode whenever successful data was received, and then if the IR receiver goes out of sight for a second or two (performer turns around, whatever), the show continues on the internal clock until another syncing timecode packet is received. As the internal clocks are accurate to two minutes this would be a perfect solution (highly unlikely the IR reciever on any given costume is going to go out of LOS for more than a minute - if so you didn't design the IR transmitter placement properly).

As cpf mentioned you could even design your own "protocol" to fit what you need. I would recommend at least basic packet headers and a packet checksum so the Arduino knows it's getting a valid timecode packet. This would be very similar as to if you are doing raw RF, but like cpf said, probably cheaper. See here for more info: RF Datalink using a PICAXE UART

The one question I would have about this is whether any IR from the stage lights could throw the whole system off. If you design the transmission protocol and packets well I don't think that would be an issue though.

Edit: More info on IR modulation and protocols:
http://tinkerish.com/docs/ir remote control details.pdf

This IR reciever will do the automatic filtering and demodulation for you, but it is expensive:
https://www.sparkfun.com/products/8554
 
Last edited:
What would happen if you wanted to start the program running in a different room, offstage or in a concrete bunker of a basement and have the program running as they come up the onstage elevators? Would you just put another transmitter in that room then to sync the start of the code?

Seeing that the show likes the use of LED video walls, would those screens through IR. My knowledge of the spectrum thrown by those is lacking.
 
The part I linked to is the same one, functionally at least, as is used in the sparkfun board - extra $8 is just the extra stuff you get with it, economics may vary.

All communication would be binary, a series of 38khz pulses of IR light. Unless your stage lights or LED walls run near that frequency (they don't) you shouldn't have problems.

As long as all the transmitters were kept in lock step, or strictly staggered to avoid collisions, you could put a transmitter anywhere, in or out of view of the main stage, and it w/should work perfectly.
 
What would happen if you wanted to start the program running in a different room, offstage or in a concrete bunker of a basement and have the program running as they come up the onstage elevators? Would you just put another transmitter in that room then to sync the start of the code?

Seeing that the show likes the use of LED video walls, would those screens through IR. My knowledge of the spectrum thrown by those is lacking.

Yes. It would depend on your specific implementation but you could just send a start timecode of 00:00:00 (or whatever) and then let the internal clocks carry the timing until they arrive onstage and sync again with the on-stage transmitter.

[-]Unfortunately you couldn't use the video walls to do the driving, they have their own PWM stuff going on (which you can't control), and even if that was at the right frequency, and even if they do bleed a bit into the IR range, you can't control the IR output independently.[/-] Nevermind, thought you were asking if you could use them as IR transmitters. No, as cpf already answered they shouldn't interfere.

Not sure how you programmed the show in to the Arduinos before, but this might also require a bit of refactoring of your show code. You would likely want to build a system of timecode classes so that the timecode can start, stop, and pause anywhere and the timecode events are actual objects (as in OOP) associated to an actual timecode string. Would make programming the show relatively easy and flexible.

Hell, if you really want to go the full nine yards you could add in an SD shield, program each Arduino with the base system code, and then program it to load and run the show off the SD card (pick a data format - XML or JSON, perhaps), so you could easily reprogram all the units for an updated show or a different show completely just by swapping out the SD cards. This would also eliminate any restriction on show size or complexity due to onboard memory limitations of the Arduino.

cpf does bring up a good point about the multiple transmitters though. At 38 kHz the pulse width is only 26 microseconds, or roughly .03 ms. Syncing up multiple transmitters to that degree of accuracy may be difficult, or maybe not...
 
Last edited:

Users who are viewing this thread

Back